


Running an online store in 2026 means competing with thousands of other brands for customer attention.
Your product images need to stand out, but professional photography services can drain your budget quickly. The good news?
Budget e-commerce photography doesn't mean sacrificing quality. With the right approach, smart equipment choices, and proper techniques, you can create compelling product images that drive sales without breaking the bank. Whether you're a startup founder shooting your first products or an established brand looking to reduce photography costs, understanding how to maximize value while maintaining professional standards is essential for e-commerce success.
Understanding Budget E-Commerce Photography Fundamentals
Budget e-commerce photography is about making strategic choices that deliver professional results without premium price tags. It's not about buying the cheapest equipment available or cutting corners that hurt image quality. Instead, it focuses on identifying which investments matter most and where you can save without compromising the final product.
The key is understanding what customers actually need to see. Clear, well-lit images that accurately represent your products matter far more than expensive cameras or elaborate setups. Most smartphones in 2026 have cameras capable of producing 12+ megapixel images, which exceeds the requirements for most e-commerce platforms and product listings.
The ROI of Smart Photography Investments
When budgeting for product photography, think about cost per image over time rather than upfront expenses. A $300 lighting kit might seem expensive initially, but if it helps you shoot 1,000 products over two years, that's just 30 cents per product. Compare that to outsourcing every shoot at $15-50 per product, and the math becomes compelling.
Consider these budget allocation priorities:
- Lighting equipment: 40-50% of your budget
- Camera or smartphone accessories: 20-30%
- Backgrounds and props: 15-20%
- Editing software: 10-15%
- Miscellaneous tools: 5-10%
This breakdown ensures you invest heavily in lighting, which makes the biggest difference in image quality, while being strategic with other expenses.
Essential Equipment for Budget E-Commerce Photography
Building a capable photography setup doesn't require a five-figure investment. Smart equipment choices let you achieve professional results while keeping costs manageable. The best affordable cameras for e-commerce work have come down significantly in price, with quality mirrorless options available under $600.
Camera Options That Won't Break the Bank
You have three viable options for budget e-commerce photography equipment:
Smartphone photography works brilliantly for many products, especially smaller items. Modern phones like the iPhone 15 Pro or Samsung Galaxy S24 Ultra offer computational photography features that rival dedicated cameras. Add a $30 tripod mount, and you're ready to shoot.
Used DSLR cameras from 2020 to 2023 provide excellent value. Models like the Canon Rebel T7i or Nikon D5600 sell for $300-500 used but deliver image quality that exceeds most e-commerce requirements. Check reputable used camera dealers for warranty-backed options.
Entry-level mirrorless cameras offer the best long-term value for growing businesses. The best mirrorless camera deals under $580 include body-and-lens kits that handle everything from jewelry to furniture photography.
Lighting: Where Budget Setups Perform Best
Lighting makes or breaks product photography, and fortunately, it's also where you can achieve professional results affordably. Natural window light costs nothing but requires working around weather and time of day. For consistent, controllable lighting, invest in proper equipment.
Continuous LED lights have revolutionized budget e-commerce photography. Two-light kits with stands and diffusers run $150-250 and provide enough output for most products. They're easier to work with than strobes because you see exactly how the light falls on your subject.
DIY reflectors and diffusers stretch your lighting budget further:
- White foam boards ($5 each) work as reflectors
- Shower curtains or white bed sheets make excellent diffusers
- Black poster board creates a negative fill for reducing unwanted reflections
- Aluminum foil on cardboard creates directional reflectors
The essential photography equipment for product photography includes these simple tools that cost under $50 total, but dramatically improve your lighting control.
Creating Your Budget Photo Studio Space
You don't need a dedicated studio space to produce professional product photos. A spare bedroom corner, garage area, or even a dining room table can become your photography studio with minimal investment and smart organization.
Space Requirements and Setup
Budget e-commerce photography thrives in compact spaces. A 6x6 foot area provides enough room for a small product table, lighting stands, and a camera position. Consistency matters more than square footage. Setting up and breaking down equipment repeatedly wastes time and creates inconsistent results.
Look for spaces with these characteristics:
- Neutral wall colors (white, gray, or beige)
- Electrical outlets for continuous lights
- Minimal ambient window light you can control with blinds
- Enough height for overhead lighting (8-foot ceilings work fine)
- Storage for equipment and products
A folding table ($30-60) at waist height creates an ideal shooting surface. Cover it with a sweep (seamless paper background) secured with clamps, and you have a professional-looking setup. Many small businesses successfully photograph products using these simple arrangements.
Background Solutions on a Budget
White background product photography remains the e-commerce standard because it focuses attention on the product and works across all platforms. Creating perfect white backgrounds costs less than you think.


Seamless paper rolls ($25-40 for 53-inch wide paper) last for hundreds of products if you're careful. Buy white first, then add gray or colored options as needs arise. The white background studio guide explains how to achieve that clean, professional look.
Alternative background options include:
- White poster board ($3 each) for small items
- White vinyl tablecloths ($8-12) that wipe clean
- Fabric backdrops ($20-40) for varied textures
- Acrylic sheets ($15-30) for reflective surfaces
Each option suits different types of e-commerce images your store needs. Start with one or two and expand as your photography skills and product range grow.
Mastering Budget-Friendly Photography Techniques
Technical skills matter more than expensive equipment for budget e-commerce photography success. Learning proper techniques helps you maximize your gear's potential and create images that rival those from high-end studios.
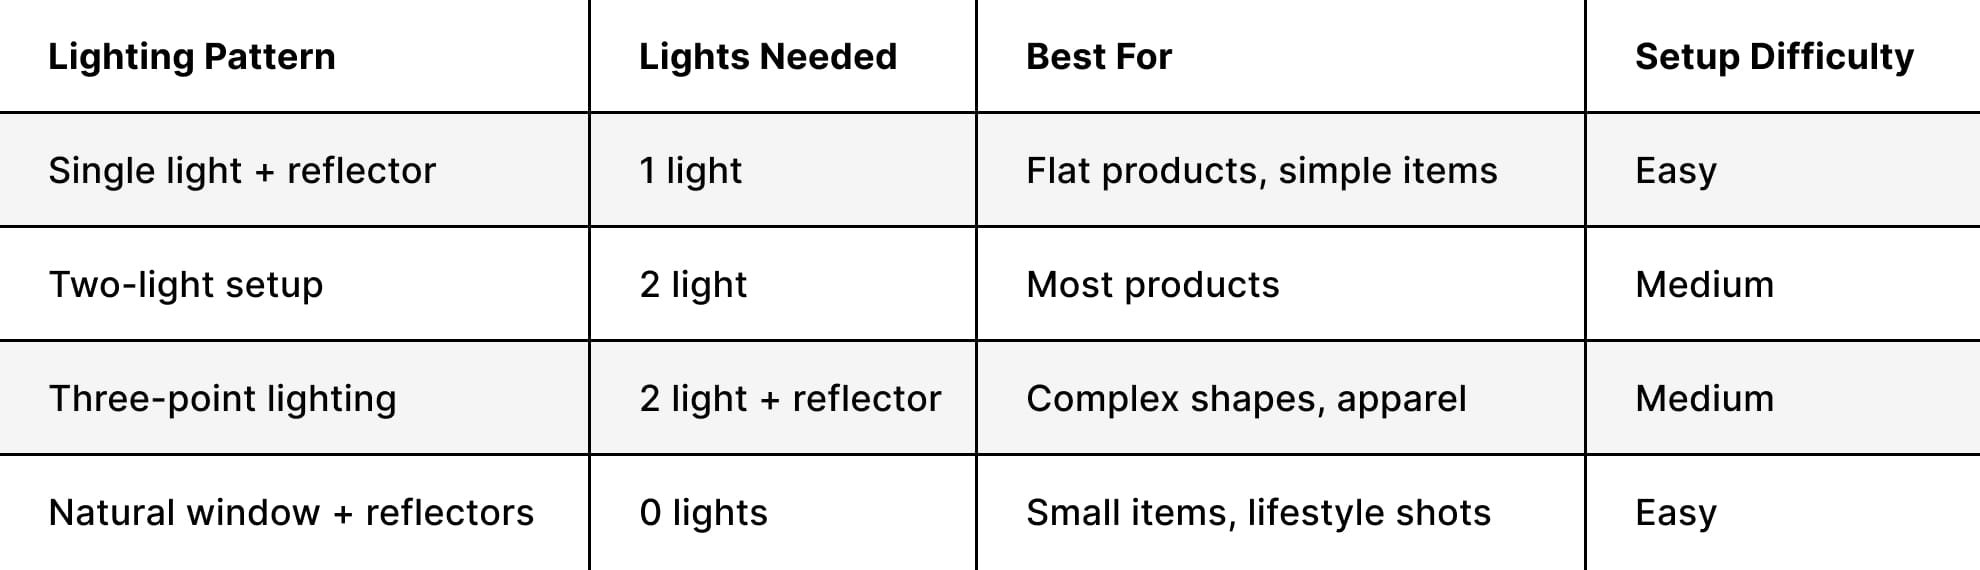
Lighting Patterns That Elevate Budget Shoots
Professional photographers use specific lighting patterns to shape how products appear. These techniques work equally well with budget lights as they do with $3,000 strobes. The secret is understanding light placement and ratios.
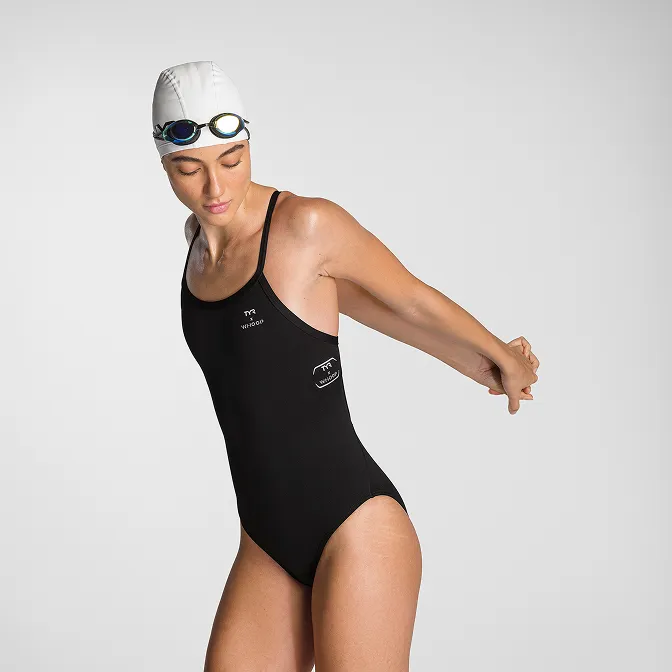
The classic three-point lighting setup uses a key light (main illumination), fill light (reduces shadows), and rim light (separates product from background). You can achieve this with two LED panels by using a reflector as your fill light. Position your key light at a 45-degree angle, place the fill opposite at a lower intensity, and use natural window light or a third small light from behind.
For products like bags or shoes, side lighting reveals texture and dimensionality. Position your main light at 90 degrees to the camera, add a reflector opposite, and shoot. This simple setup costs under $200 but creates compelling images.
Camera Settings for Consistent Results
Consistency is crucial for budget e-commerce photography because it builds customer trust and speeds up your workflow. Use manual camera settings to ensure every image matches.
Set your camera to Manual mode and use these baseline settings:
- ISO 100-200: Keeps noise minimal
- Aperture f/8-f/11: Ensures products stay sharp throughout
- Shutter speed 1/125 or slower: Adequate with a tripod and continuous lights
- White balance: Custom or daylight preset (5500K)
- RAW file format: Maximum editing flexibility
These settings work for 80% of products. Adjust as needed for specific challenges like reflective surfaces or dark materials. The comprehensive guide to photographing products covers troubleshooting common issues.
Efficient Workflows That Reduce Photography Costs
Time is money in budget e-commerce photography. Developing efficient workflows lets you photograph more products per session, reducing your cost per image significantly. Professional studios like those offering e-commerce product photography services use systematic approaches you can adapt.
Batch Processing Your Products
Shooting similar products together maximizes efficiency. If you're photographing multiple shoes, set up once and shoot them all. The same applies to jewelry, electronics, or any product category.
Create a photography production line:
- Stage 1: Prepare all products (clean, steam, and arrange)
- Stage 2: Shoot all front views
- Stage 3: Shoot all alternate angles
- Stage 4: Shoot all detail shots
- Stage 5: Capture lifestyle or styled images
This assembly-line approach can triple your output compared to photographing products individually. Many e-commerce brands find they can shoot 30-50 products in a four-hour session using batch processing methods detailed in essential product photography workflow guides.
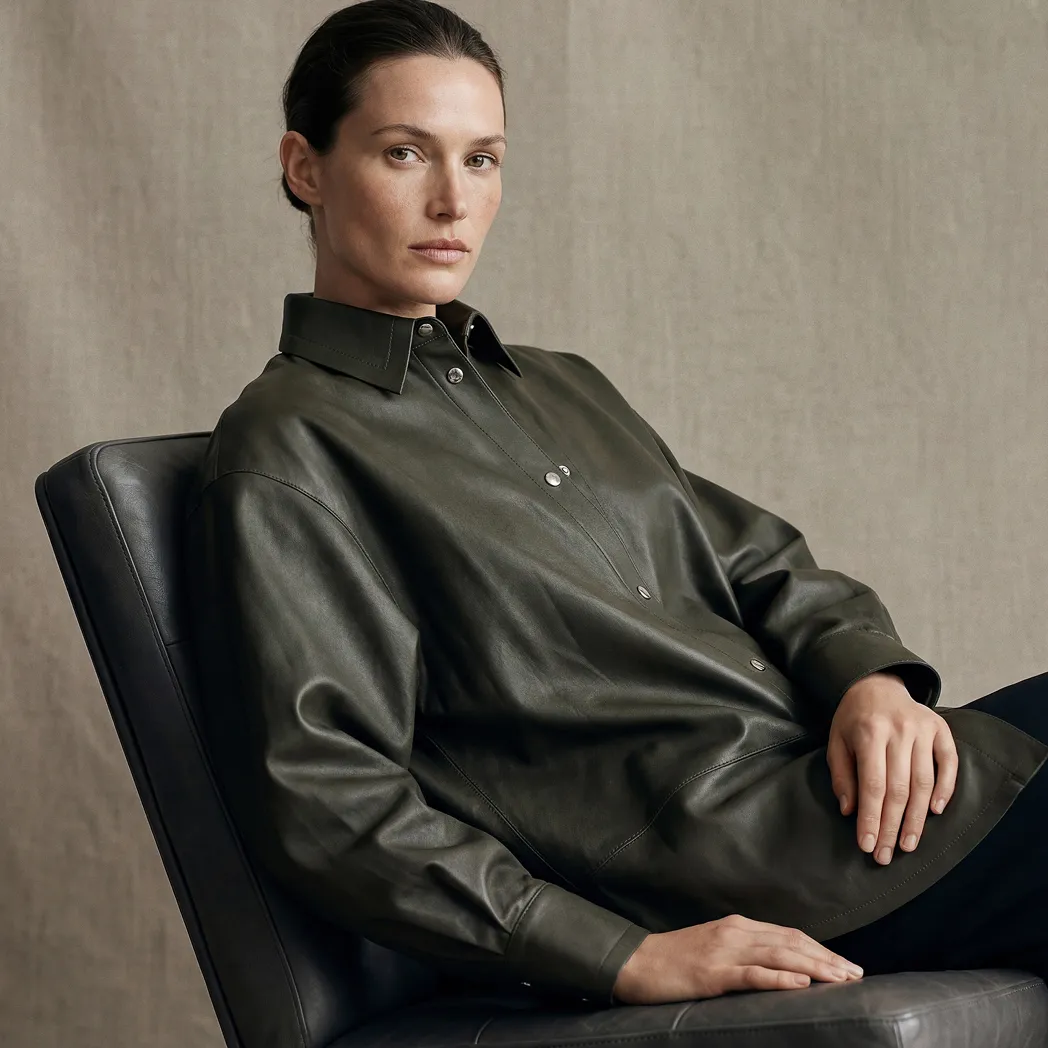
Styling Products for Maximum Impact
Budget e-commerce photography doesn't mean boring images. Smart product styling photography ideas help your images stand out without expensive props or elaborate sets.
Affordable styling approaches include:
- Grouping complementary products together
- Adding affordable props from dollar stores
- Using materials like wood boards, fabric, or stone
- Incorporating seasonal elements
- Creating minimal, clean compositions
The key is consistency across your catalog. Choose a styling approach that reflects your brand and stick with it. This builds brand recognition and keeps production costs predictable.
Post-Processing on a Budget
Great photography doesn't end when you press the shutter button. Post-processing transforms good images into great ones, and you don't need expensive software subscriptions to achieve professional results. Budget e-commerce photography editing focuses on essential adjustments that make products look their best.
Free and Affordable Editing Software Options
Adobe Lightroom and Photoshop remain industry standards, but they're not your only options. Several alternatives deliver excellent results for e-commerce work at a fraction of the cost.
Budget-friendly editing solutions:
- GIMP (Free): Open-source Photoshop alternative with powerful tools
- Darktable (Free): RAW processing comparable to Lightroom
- Affinity Photo ($70 one-time): Professional features without subscriptions
- Canva Pro ($13/month): Simple editing plus template creation
- Pixlr (Free/$5 monthly): Browser-based editing anywhere
Start with free options while learning. As your skills grow, invest in paid software that matches your needs. The benefits of retouching in e-commerce photography justify spending time on this crucial step.
Essential Editing Techniques
Budget e-commerce photography editing follows a consistent process. Develop presets or templates that you apply to all images for consistency. Here's a streamlined approach:
- Crop and straighten: Ensure consistent framing
- Adjust exposure: Brighten or darken as needed
- Color correct: Match product colors accurately
- Remove backgrounds: Create clean, distraction-free images
- Remove imperfections: Dust, scratches, or minor flaws
- Sharpen appropriately: Enhance details without over-processing
These six steps handle most e-commerce image needs. Creating and using product photography templates speeds up this process dramatically. Once you've edited one product, save those settings and apply them to similar items.
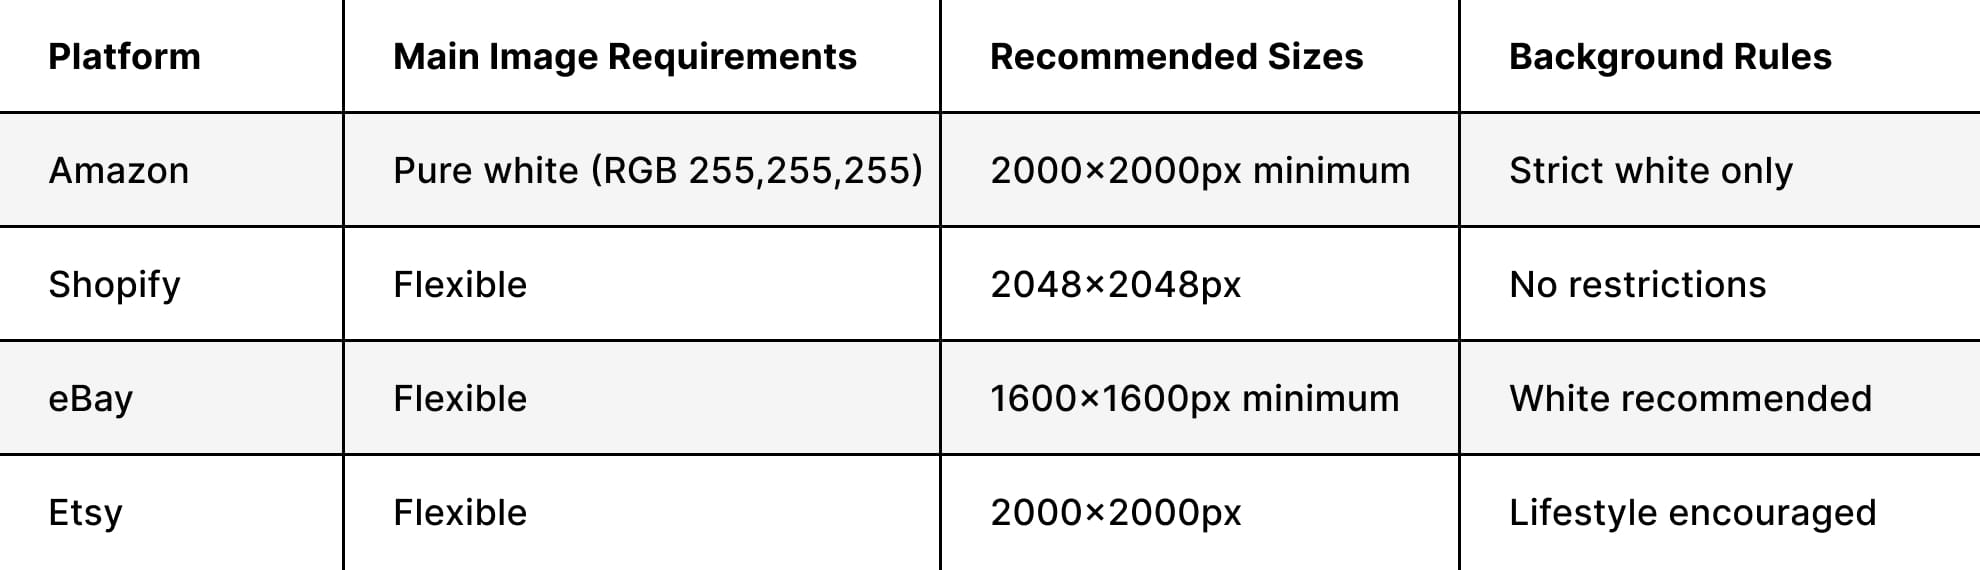
Platform-Specific Requirements and Optimization
Different e-commerce platforms have specific image requirements and standards that affect how you shoot and edit. Understanding these requirements prevents wasted effort and ensures your budget e-commerce photography works effectively wherever you sell.
Amazon Product Photography Guidelines
Amazon has strict product image requirements that directly impact your conversion rates. The main image must show the product on a pure white background (RGB 255, 255, 255) and fill at least 85% of the frame.
Amazon-specific budget photography tips:
- Shoot at a minimum 2000x2000 pixels for zoom functionality
- Use pure white backgrounds (overexpose slightly in post)
- Ensure products are in focus throughout
- Include lifestyle images in secondary slots
- Follow category-specific requirements for your products
The platform's detailed photography guidelines for Amazon sellers help you nail these requirements from the start, avoiding costly reshoots.
Shopify and Other Platform Considerations
Shopify offers more creative flexibility than Amazon but still benefits from consistency. The platform's image requirements recommend square images (1:1 ratio) at 2048x2048 pixels for optimal display across devices.
Understanding where your products will appear helps you plan budget e-commerce photography that works across all channels. Shoot once, optimize for multiple platforms, and maximize your photography ROI.
Learning Resources and Skill Development
Becoming proficient in budget e-commerce photography is a journey, not a destination. The more you learn, the better your images become, and the more value you extract from your equipment investment. Fortunately, 2026 offers abundant free and low-cost learning resources.
Online Tutorials and Courses
YouTube hosts thousands of product photography tutorials, including practical guides on taking e-commerce photos at home on a budget. These visual demonstrations show exactly how professionals set up shots, troubleshoot problems, and achieve specific looks.
Top learning paths for budget photographers:
- Platform-specific channels teaching product photography
- Lighting technique tutorials (free on YouTube)
- Editing workflow demonstrations
- Case studies from successful e-commerce brands
- Community forums for troubleshooting specific challenges
This video on critical considerations for e-commerce photography covers budget-friendly tips and tricks that immediately improve your results. The key is consistent practice and applying what you learn to your own products.
Building Skills Without Breaking the Bank
Professional photographer's advice on working within budget constraints emphasizes resourcefulness over expensive equipment. Start with simple products, master the fundamentals, then gradually tackle more challenging items.
Practice with personal items before shooting inventory. This builds confidence, helps you identify equipment gaps, and develops your eye for composition without risking product damage or deadline pressure. Many successful e-commerce photographers started exactly this way, learning through experimentation and iteration.
Advanced Budget Photography Strategies
Once you've mastered the basics, several advanced strategies help deliver even better results. These techniques separate average product photos from those that truly drive conversions and sales.
Creating Multiple Image Types Cost-Effectively
Modern e-commerce requires various types of product photos, including white background shots, lifestyle images, detail photos, and more. Smart photographers capture all these variations during a single session.
Multi-image shooting strategy:
- Set up a white background configuration
- Shoot all required angles and views
- Add simple props for lifestyle variation
- Capture macro details of key features
- Photograph products in use (if applicable)
This approach means one setup time generates multiple usable images. Whether you're shooting handbags or eyewear, plan your shot list to maximize each session's output.
Leveraging AI Tools Wisely
Artificial intelligence has transformed AI's role in e-commerce photography, offering budget-friendly options for background removal, image enhancement, and even product staging. These AI tools for product photos can save hours of manual editing.
Use AI strategically:
- Background removal (faster than manual masking)
- Batch color correction and exposure adjustment
- Creating product variations or mockups
- Upscaling lower-resolution images when needed
- Generating shadow and reflection effects
At Squareshot, this approach goes a step further with a dedicated AI service: starting from clean, on-white product photography, brands can generate campaign visuals, new backgrounds, and variations without reshooting. This turns a single shoot into a scalable content system.
Used strategically, AI can streamline production and expand output — but it still relies on strong fundamentals. Lighting, focus, and composition remain essential, with AI working best as an enhancement layer, not a replacement for solid photography.
Scaling Your Budget Photography Operation
As your e-commerce business grows, your photography needs evolve. Budget e-commerce photography at scale requires systems, templates, and potentially bringing in help during peak seasons. Planning this growth ensures your per-image costs remain manageable even as volume increases.
When to Outsource vs. DIY
Every growing brand faces this decision. DIY photography makes sense when you're shooting under 50 products monthly, and learning brings value to your skill set. Beyond that volume, or when timelines get tight, outsourcing becomes cost-effective.
Calculate your true DIY costs:
- Equipment depreciation per image
- Time spent shooting and editing (at your hourly rate)
- Learning curve and mistakes
- Opportunity cost of not focusing on core business tasks
Professional product photography services offer economies of scale and expertise that often cost less than your DIY time once you factor in all variables. The break-even point varies by business, but most brands find outsourcing worthwhile around 75-100 products monthly.
Building Reusable Photography Assets
Smart budget e-commerce photography creates assets you can reuse. Shoot products against multiple backgrounds during single sessions. Capture extra detail shots. Take lifestyle images with neutral props that work across seasons.
Reusable asset strategies:
- Shoot at a higher resolution than currently needed
- Capture both portrait and landscape orientations
- Include negative space for text overlay
- Photograph seasonal products with evergreen props
- Create modular lifestyle scenes you can update with new products
These approaches, combined with proper e-commerce image management strategies, mean your photography investment delivers value well beyond the initial product launch. This forward-thinking approach reduces long-term costs significantly.
Maintaining Quality While Controlling Costs
The ultimate goal of budget e-commerce photography isn't just saving money. It's achieving professional quality that drives sales while keeping costs reasonable. This balance requires understanding where quality matters most and where you can economize without customer impact.
Quality Checkpoints That Matter
Not all aspects of product photography affect conversion rates equally. Research shows customers prioritize accurate colors, sharp focus on key features, and sufficient detail to make purchase decisions. They care less about perfect shadows or elaborate styling.
Focus quality efforts on:
- Color accuracy: Products must match what ships
- Sharpness: Key features should be crisp and clear
- Exposure: Proper brightness showing all details
- Backgrounds: Clean, distraction-free presentation
- Consistency: All images match your brand standards
These essential e-commerce photography tips ensure customers get the information they need. Perfect artistic composition matters less than clear, accurate representation for most product categories.
Measuring Photography ROI
Budget e-commerce photography should deliver measurable results. Track metrics that connect your images to business outcomes. Once you're managing your fulfillment efficiently through services like e-commerce fulfillment partners, optimizing product imagery becomes crucial for driving the sales that those operations support.
Building Long-Term Photography Capabilities
The best budget e-commerce photography approach builds your capabilities over time. Start with essential equipment, master it completely, then add specialized gear as specific needs arise. This prevents overspending on equipment you'll rarely use while ensuring you have the tools for actual requirements.
Growth timeline for photography capabilities:
- Months 1-3: Master basic setup, lighting, and editing
- Months 4-6: Expand to lifestyle and detail photography
- Months 7-12: Add specialized capabilities for your product category
- Year 2+: Optimize workflow, consider selective outsourcing
This measured approach develops genuine expertise while controlling costs. You'll make better equipment decisions based on real needs rather than perceived requirements, and your skills will grow with your investment.
Budget e-commerce photography succeeds by making strategic choices that prioritize results over expensive equipment, focusing on techniques and consistency that customers actually notice. Whether you're building in-house capabilities or preparing to scale beyond DIY approaches, understanding cost-effective photography principles ensures your product images drive sales without draining resources.
Squareshot helps e-commerce brands bridge the gap between budget constraints and professional quality, offering flexible photography services with fast turnaround times that scale with your business needs while maintaining the consistency and polish your products deserve.
Product A
SQUARE SHOT
%20(2).jpg)


