Creating a professional product photography setup doesn't require a Hollywood budget or years of technical training. Whether you're launching an e-commerce store, building a business catalog, or simply want to improve your visual branding, understanding the fundamentals of setup design will transform your product images from amateur snapshots into marketing assets. The right configuration balances lighting quality, camera positioning, and background selection to create consistency across your entire product line.
Essential Equipment for Your Product Photography Setup
Building an effective product photography setup starts with selecting the right gear. You don't need to purchase everything at once, but understanding what each component contributes helps you prioritize investments.
Camera Choices and Lens Selection
Your camera choice matters less than you might think. Modern smartphones can capture excellent product images, though a DSLR or mirrorless camera offers more control over settings. A 50mm prime lens or a versatile 24-70mm zoom lens covers most product photography needs.
- DSLR or Mirrorless Camera: Provides manual control over exposure, aperture, and ISO
- Macro Lens: Essential for capturing detailed shots of jewelry, cosmetics, or textured products
- Standard Zoom Lens: Versatile option for products of varying sizes
- Smartphone with Manual Mode: Budget-friendly starting point for basic catalog work
Stabilization Equipment
Camera shake ruins otherwise perfect shots. A sturdy tripod isn't optional for professional work. This ensures consistency across multiple shots and allows for longer exposures without blur.
Lighting Components That Define Quality
Lighting makes or breaks your product photography setup. Natural window light works for some applications, but controlled artificial lighting delivers consistent, repeatable results that streamline your product photography workflow.
The most versatile configuration uses continuous LED lights rather than strobes. Continuous lights let you see exactly how shadows and highlights appear before capturing the image. Plan to invest in at least two light sources for your initial setup.
Light Modifiers and Diffusion
Bare bulbs create harsh shadows that distract from your product. Light modifiers soften and shape illumination. Light tents provide an enclosed environment that diffuses light from multiple angles, particularly useful for reflective products like glassware or polished metal.
Softboxes, umbrellas, and diffusion panels each serve specific purposes in your product photography setup. Softboxes create directional yet soft light, perfect for defining product shape. Umbrellas spread light broadly for even coverage. Reflectors and bounce cards redirect light to fill shadows without additional power sources.
Optimizing Your Background Selection
Background choice dramatically impacts how viewers perceive your products. The white-background studio approach remains the gold standard for e-commerce platforms, creating clean, professional images that meet marketplace requirements while keeping the focus entirely on the product.
White Background Fundamentals
Pure white backgrounds require specific lighting techniques to achieve the RGB 255,255,255 standard that many platforms demand. Position your product several feet in front of a white backdrop, then light the background separately from the product itself. This separation prevents background light from affecting your product lighting.
Sweep options for white backgrounds include:
- Paper rolls: Affordable, replaceable, creates seamless infinity curves
- Vinyl: Durable, washable, ideal for heavy or messy products
- Fabric: Portable, wrinkle-prone, but lightweight for location work
- Acrylic or Plexiglass: Creates beautiful reflections for certain product types
Alternative Background Options
While white dominates e-commerce, creative photography backgrounds enhance brand storytelling. Textured wood, marble, concrete, or colored seamless paper creates mood and context. Lifestyle backgrounds with complementary props tell a richer product story, but they require more complex lighting in your product photography setup.
Camera Settings for Consistent Results
Mastering three fundamental settings transforms your product photography setup from inconsistent to reliably professional. Aperture, shutter speed, and ISO work together to control exposure and image characteristics.
Aperture Controls Depth of Field
Aperture determines how much of your product appears in sharp focus. For most products, you want everything crisp from front to back. This requires smaller apertures (higher f-numbers), such as f/8, f/11, or even f/16.


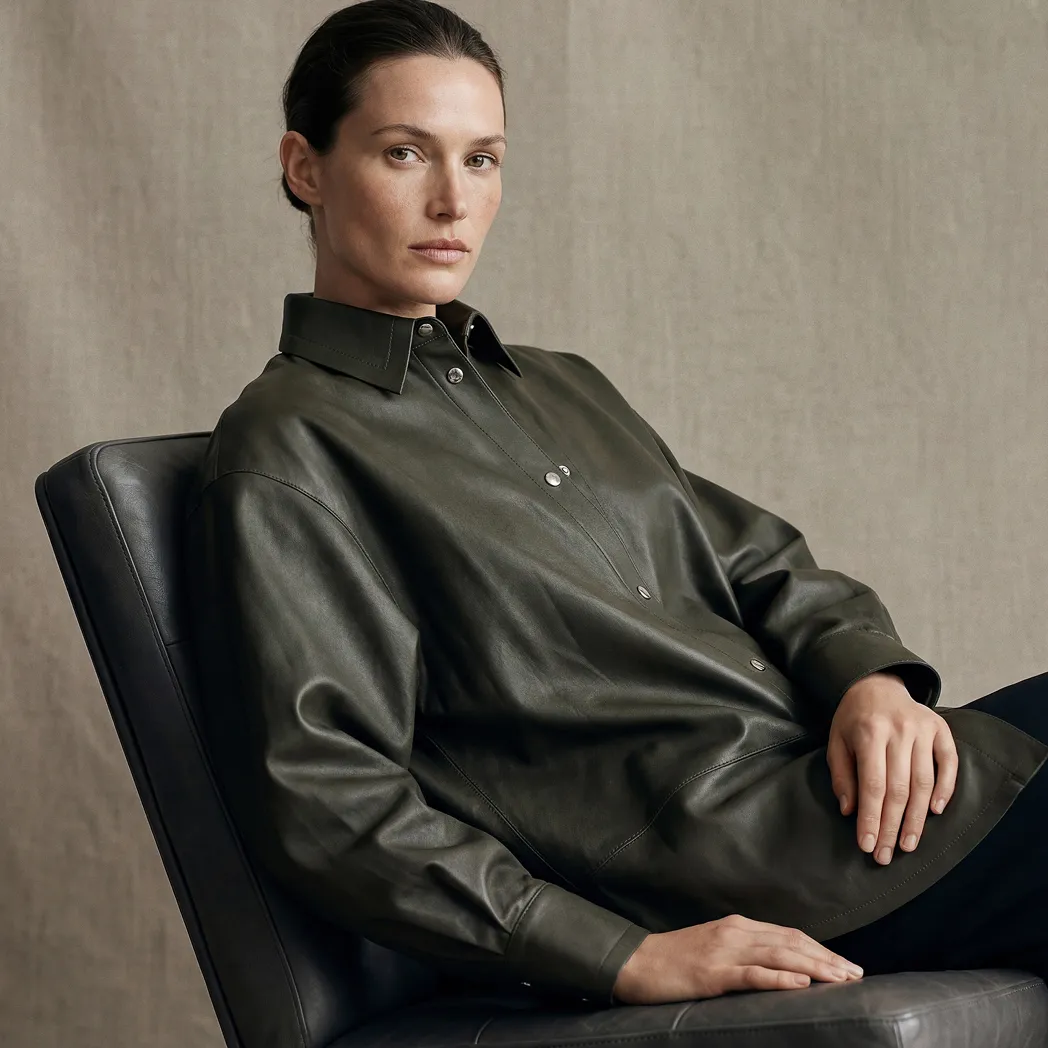
Example: Images like these are typically photographed at around f/11, which keeps the entire product in focus — from fabric texture to stitching details.
Smaller apertures increase depth of field but require more light or longer exposure times. In studio product photography, this is usually solved with strobes and a tripod, allowing photographers to prioritize sharpness without introducing motion blur.
ISO and Shutter Speed Balance
Keep ISO as low as possible (100-400) to minimize digital noise. Since your product photography setup uses a tripod, shutter speed becomes flexible. Slower shutter speeds compensate for smaller apertures and lower ISO settings without introducing blur.
White Balance Accuracy
Color accuracy separates amateur from professional product images. Set white balance manually using a gray card rather than relying on auto white balance. This ensures colors match reality, reducing customer returns and enhancing brand credibility.
Shoot in RAW format whenever possible. RAW files preserve the maximum image data, allowing white balance adjustments during editing without loss of quality. This flexibility is invaluable when processing large batches of products.
Space Planning and Studio Layout
Physical space constraints shape your product photography setup more than any other factor. Even small spaces work effectively with thoughtful organization, while larger studios benefit from dedicated zones for different setup types.
A comprehensive guide to product photography setup emphasizes the importance of workflow efficiency in your physical layout. Position your shooting table where it's easily accessible from storage areas. Keep lighting equipment on rolling stands for quick repositioning.
Minimum Space Requirements
You can create a functional product photography setup in spaces as small as 6' x 8'. This accommodates a shooting table, basic lighting, and camera position. Larger products or full-length apparel photography requires more room, typically 10' x 12' minimum.
Ceiling Height Considerations
Low ceilings limit the angles of overhead lighting but rarely prevent high-quality results. Most product photography uses lighting positioned at or slightly above the product level. Eight-foot ceilings work fine for tabletop and small product work.
Creating a Repeatable Setup
Documentation transforms a product photography setup from a one-time arrangement into a repeatable system. Photograph your lighting positions, measure distances, and record all camera settings. This approach to creating repeatable setups ensures consistency across shooting sessions, which is essential for catalog work requiring a uniform appearance.
Mark floor positions for studio lights with tape. Create templates for common product sizes. Build spreadsheets tracking settings for different product categories. These systems save hours in production while ensuring consistent photography that strengthens your brand identity.
Lighting Patterns and Techniques
Understanding classic lighting patterns gives you a foundation for solving any product challenge. Most product photography setups use variations of three-point lighting: key light, fill light, and backlight or rim light.
Key Light Positioning
Your main light source, the key light, provides primary illumination. Position it at 30-45 degrees to one side of your product, slightly elevated. This angle creates dimension by casting subtle shadows that define shape and texture.
The key light should be your brightest source. In a simple two-light setup, it might be two to three times brighter than your fill light. Adjust intensity by moving lights closer or farther from the product, or by using dimmers if your studio lights support them.
Fill Light Function
Fill light reduces shadows created by the key light without eliminating them entirely. Position the fill light opposite the key light at a similar angle. Lower intensity prevents flat lighting while maintaining visible product detail in shadow areas.
- Position at 30-45 degrees opposite the key light
- Set to 50-75% of key light intensity
- May be replaced by reflector cards for budget setups
- Adjusts shadow depth based on the desired mood
Backlighting for Separation
A third light behind and above the product separates it from the background. This rim light or backlight creates a subtle glow along product edges that adds depth and polish to the final image. Not every product benefits from backlighting, but it elevates transparent items, beverages, and products with interesting edge details.
Advanced Setup Considerations
Once you've mastered basic configurations, advanced techniques expand creative possibilities while solving specific challenges.
Reflective Product Solutions
Shiny products like jewelry, watches, or polished electronics require specialized approaches. Essential gear considerations include polarizing filters to reduce reflections and light tents to create even, reflection-free illumination. Cross-polarization techniques use polarizing filters on both lights and camera lens to eliminate unwanted glare.
Transparent and Translucent Products
Glass, liquids, and transparent plastics need backlighting to reveal their true nature. Position a light source behind the product, often shining through a white acrylic sheet or diffusion panel. Front lighting alone makes transparent products appear muddy and undefined.
Photographing beverages for e-commerce demonstrates these principles. Backlight reveals liquid color and clarity, while carefully positioned accent lights create appealing highlights on glass or bottle surfaces.
Fabric and Apparel Challenges
Textile photography demands attention to texture. Side lighting at shallow angles emphasizes fabric weave and surface characteristics. Photographing clothing often benefits from both flat-lay and mannequin presentations, each requiring different setup adjustments.
Steaming removes wrinkles that lighting emphasizes. Proper styling ensures products appear as customers expect to receive them, reducing returns and building trust.
DIY Setup vs Professional Services
Building your own product photography setup makes sense for some businesses while others benefit from professional partnerships. Consider your volume, budget, timeline, and quality requirements.
A DIY product photography setup can start with minimal investment. Continuous learning improves results over time. However, the real cost includes your time, the learning curve, and the opportunity cost of focusing on photography rather than core business activities.
When DIY Makes Sense
Small product catalogs, continuous new-product launches, and businesses with existing photography capabilities benefit from in-house capabilities. In-house studio costs need evaluation against long-term volume projections.
Professional Service Advantages
High-volume launches, specialized product types, and businesses prioritizing fast market entry often find better ROI through professional photography services. The benefits of professional product photography extend beyond image quality to include faster time-to-market, consistent brand presentation, and advanced retouching capabilities.
Composition Techniques Within Your Setup
Once technical elements align, composition principles transform good product photos into compelling marketing assets. Your product photography setup should accommodate compositional flexibility without requiring major reconfiguration.
Rule of Thirds Application
Imagine your frame divided into nine equal rectangles. Placing products at intersection points creates more dynamic compositions than centering. While catalog work often demands centered products, creative product photography benefits from asymmetrical placement.
Negative Space Strategy
Empty space around products serves important functions. It provides room for text overlays in marketing materials, creates breathing room that reduces visual clutter, and directs viewer attention to the product itself. Your product photography setup should allow easy adjustment of camera distance and framing to control negative space.
Multiple Angle Coverage
E-commerce platforms increasingly require multiple product views. Your setup should facilitate quick angle changes without relighting. A lazy Susan or rotating platform speeds this process while maintaining consistent lighting across all angles.
Standard angles include:
- Straight-on front view (primary listing image)
- 45-degree angle showing depth
- Close-up detail shots of key features
- Overhead flat-lay when applicable
- Back view for apparel and products with rear details
Workflow Optimization and Batch Processing
Efficiency separates profitable product photography from time-consuming struggles. Organize your product photography setup to support batch processing when shooting multiple similar items.
Pre-Shoot Preparation
Clean and prepare all products before the shooting session begins. Group similar items that share lighting requirements. Create a shot list that specifies the required angles and close-ups for each product. This preparation prevents mid-session disruptions that break concentration and waste time.
Tethering for Real-Time Review
Connect your camera to a computer for immediate, large-screen image review. Tethering catches focus issues, lighting problems, and composition errors while products remain in position. This approach, detailed in practical studio setup guides, helps prevent costly reshoots.
Post-Production Integration
Your product photography setup should support streamlined post-production. Consistent lighting and camera settings produce similar baseline images, enabling efficient batch processing. Retouching in e-commerce photography enhances consistency and professionalism, but proper setup minimizes the time spent on corrections.
Maintaining and Evolving Your Setup
A product photography setup isn't static. Regular maintenance and periodic upgrades keep pace with changing business needs and evolving platform requirements.
Equipment Maintenance Schedule
Clean lenses and sensors monthly. Inspect light modifiers for tears or discoloration. Test backup equipment before you need it urgently. Replace seamless paper when it shows wear, scuffs, or discoloration.
Setup Documentation
Create visual guides showing lighting positions, camera settings, and product placement for each product category. Update documentation when you discover improvements. This knowledge preservation proves invaluable when training new team members or resuming production after breaks.
Tracking Results and Improvements
Monitor which product images perform best in terms of conversion rates and customer engagement. A/B test different setup variations when possible. Minimalist product photography approaches might outperform complex setups for certain product categories, while others benefit from creative styling.
Platform requirements change regularly. Amazon, Shopify, and other marketplaces periodically update image specifications. Build flexibility into your product photography setup to adapt without complete reconfiguration.
Budget Allocation Strategies
Smart spending accelerates setup development while avoiding unnecessary expenses. Prioritize investments that directly impact image quality and workflow efficiency.
Essential First Purchases
Start with quality lighting before upgrading camera bodies. A modest camera with excellent lighting outperforms expensive cameras with poor lighting. Invest in a solid tripod early; cheap tripods cost more to replace and can damage equipment.
Beginning recommendations for different budgets:
- Under $500: Two LED continuous lights, light stands, white foam boards as reflectors, paper backdrop, smartphone or entry DSLR
- $500-$2,000: Three-light kit with softboxes, sturdy tripod, mid-range mirrorless camera, white and black seamless paper, basic editing software
- $2,000-$5,000: Professional lighting system, full-frame camera with quality lenses, multiple backdrop options, computer for tethering, professional editing suite
Strategic Upgrade Path
Expand capabilities systematically as volume justifies investment. Comprehensive setup checklists help prioritize purchases based on specific product categories and business goals.
Mastering your product photography setup requires balancing technical knowledge with practical experience, but the fundamentals outlined here provide a solid foundation for consistent, professional results.
Whether you choose to build in-house capabilities or partner with experienced professionals, understanding these principles helps you make informed decisions that elevate your visual branding.
Ready to transform your product imagery without the learning curve and equipment investment?
Product A
SQUARE SHOT