E-commerce fashion brands face a common challenge: how do you showcase clothing in a way that highlights fit, shape, and construction without distracting from the garment itself?
Ghost mannequin photography solves this problem by creating the illusion that garments are being worn by an invisible model. This technique has become the industry standard for online apparel retailers who want to present their products professionally while maintaining focus on the clothing's design and details.
Whether you're shooting for a startup clothing line or managing photography for an established brand, understanding this approach can dramatically improve your product presentation.
What Makes Ghost Mannequin Photography Essential for Fashion Brands
Ghost mannequin clothing photography creates a three-dimensional presentation that helps customers visualize how garments fit and drape on the human form. Unlike flat lay photography, this method reveals the garment's shape, structure, and how it would look when worn.


The technique involves photographing clothing on a specialized mannequin, then digitally removing the mannequin in post-production. This creates a hollow effect that shows both the exterior and interior of the garment, giving shoppers a comprehensive view of the product.
Key advantages of this approach include:
- Enhanced product visualization showing natural garment drape and fit
- Professional, consistent appearance across your entire catalog
- Reduced production costs compared to hiring models for every product
- Faster shooting workflows once the setup is standardized
- Better conversion rates as customers understand product construction
Ghost mannequin photography has become particularly valuable for brands selling structured garments like jackets, button-up shirts, dresses, and hoodies. The method allows customers to see details they couldn't observe in flat photography, reducing return rates and increasing buyer confidence.
Setting Up Your Ghost Mannequin Photography Studio
Creating professional ghost mannequin images starts with the right equipment and studio configuration. You don't need an enormous budget, but you do need specific tools to achieve consistent, high-quality results.
Essential Equipment and Tools
Your basic setup requires a ghost mannequin (also called an invisible mannequin), professional lighting, a quality camera, and a clean backdrop. Setting up a white background studio provides the foundation for this type of product photography.
The mannequin itself is your most critical investment. Quality ghost mannequins feature removable parts that allow you to photograph the garment's interior, which is essential for creating the hollow effect. Choose mannequins that match your target demographic's size and proportions.
Lighting Configuration for Optimal Results
Proper lighting eliminates shadows and creates the even illumination necessary for clean post-production work. Position your main lights at 45-degree angles from the mannequin, with equal distance and power settings to maintain balance.
Standard three-point lighting setup:
- Key light positioned at 45 degrees camera left, slightly elevated
- Fill light at 45 degrees camera right, matching the key light's intensity
- Background light aimed at the backdrop to ensure pure white
Add a fourth light above the mannequin for garments with complex textures or deep folds. This overhead light fills in shadows that the side lights might miss, particularly important when photographing intricate clothing items.
Shooting Techniques for Professional Results
The actual photography process for ghost mannequin clothing photography requires precision and consistency. Each garment typically needs multiple shots to create the final composite image.
The Multi-Shot Approach
You'll need at least two main shots for every garment: one with the mannequin fully dressed, showing the exterior, and one showing the interior (collar, tags, inner construction). For more complex items like jackets or button-up shirts, you might need three or four angles.
Start by dressing the mannequin carefully, ensuring the garment sits naturally without excessive pulling or bunching. Use pins strategically on the back or sides to achieve the perfect fit, placing them where they'll be easy to remove in post-production.
Step-by-step shooting process:
- Style the garment on the mannequin with proper fit and drape
- Shoot the front exterior view with all mannequin parts in place
- Remove the mannequin's neck/shoulder components for the interior shot
- Capture the hollow interior showing collar, labels, and construction
- Photograph any additional angles needed (side views, back details)
- Shoot the sleeves separately if creating 3D arm positioning
Camera settings should remain consistent throughout the clothing shoot. Use manual mode to lock in your exposure, typically shooting at f/8 to f/11 for adequate depth of field. This aperture range keeps both the front and back of the garment in sharp focus.
Maintaining Consistency Across Products
Standardizing your product photography workflow becomes crucial when shooting multiple garments. Keep detailed notes about your camera position, lighting power settings, and mannequin placement.
Mark the studio floor with tape to indicate exact mannequin and tripod positions. This ensures every garment appears at the same size and angle in your final images, creating visual cohesion across your e-commerce catalog. As explained in this detailed ghost mannequin photography guide, consistency directly affects how professional your online store appears to potential customers.
Post-Production and Editing Workflow
The magic of ghost mannequin clothing photography happens in post-production. This stage transforms your multiple shots into a single, seamless image that appears to show clothing floating in three-dimensional space.
Basic Editing Steps and Techniques
Professional editing software like Adobe Photoshop is essential for creating the ghost mannequin effect. The process involves layering your multiple shots and carefully masking out the mannequin to reveal the garment's interior.
Core editing workflow:
- Import all shots from a single garment into Photoshop as layers
- Align the layers precisely using the auto-align function
- Create layer masks to hide the mannequin parts
- Blend the interior shot to show the hollow effect
- Clean up any visible pins, tags, or imperfections
- Adjust colors and exposure for brand consistency
- Crop and resize according to your e-commerce platform requirements
The importance of post-production in achieving the desired effect cannot be overstated. This stage separates amateur ghost mannequin photography from professional results that drive conversions.
Advanced Retouching for Premium Results
Beyond the basic ghost effect, professional retouching elevates your images to match luxury brand standards. This includes removing wrinkles, smoothing fabric texture, and enhancing color accuracy.
Benefits of retouching in e-commerce photography extend to increased perceived value and reduced product returns. When customers see garments presented in their best possible light, they form more accurate expectations about what they're purchasing.
Pay special attention to maintaining natural fabric texture while removing distractions. Over-smoothing can make clothing look artificial or plastic, which undermines trust. The goal is enhancement, not transformation.
Best Practices for Different Garment Types
Different clothing items present unique challenges in ghost mannequin clothing photography. Understanding these nuances helps you adapt your technique for optimal results across your entire product range.
Structured vs. Flowing Garments
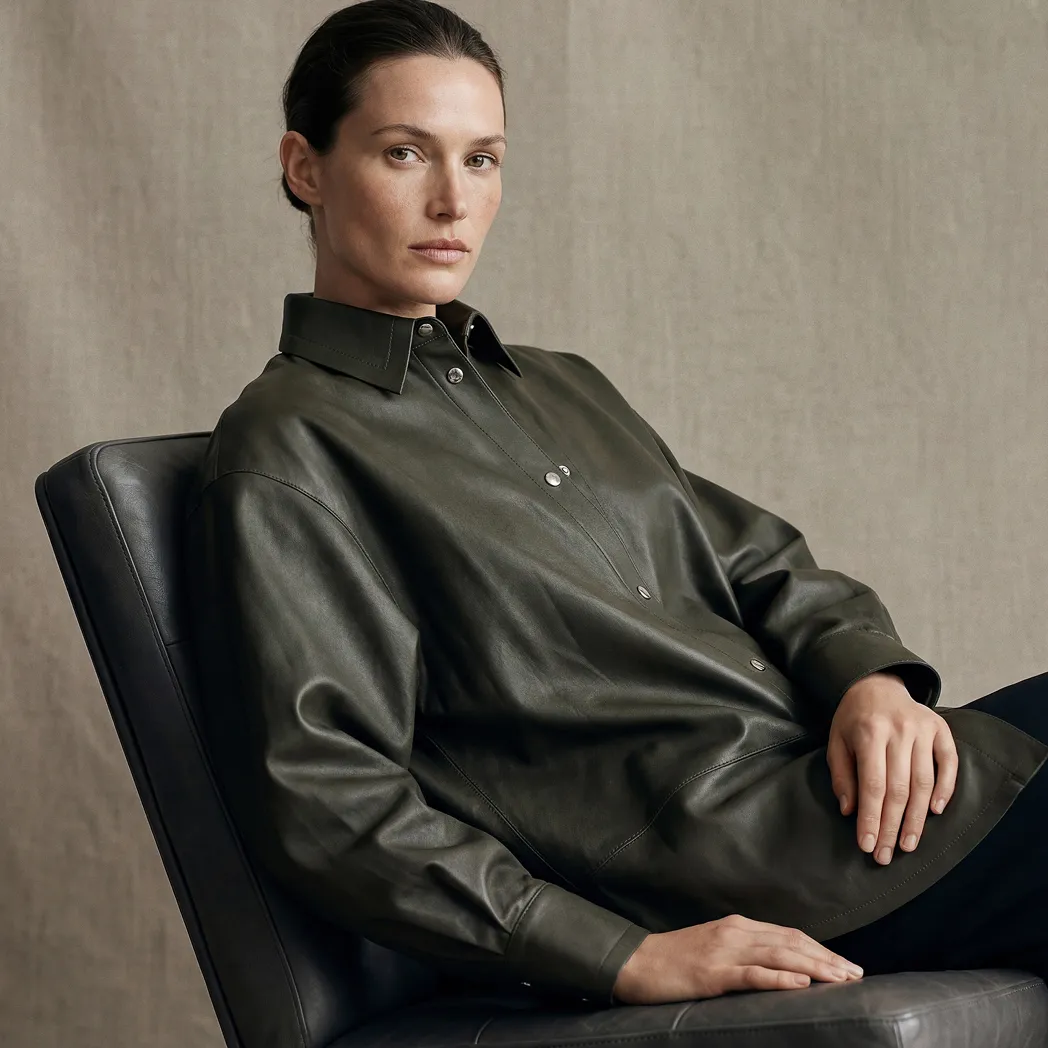
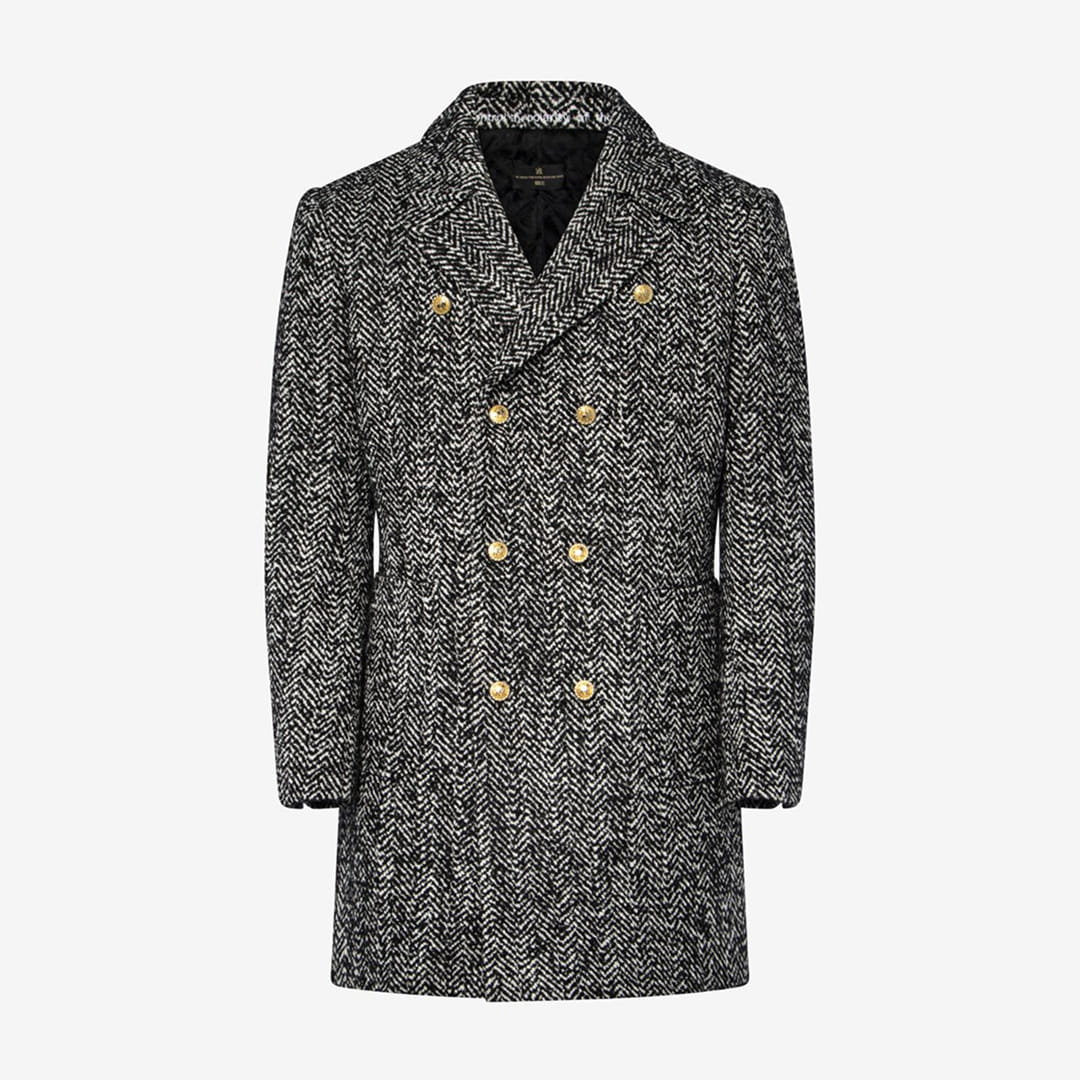
Structured items like blazers, button-up shirts, and jackets are ideal candidates for ghost mannequin photography. Their inherent shape maintains form on the mannequin, making them easier to shoot and edit. Photographing a blazer demonstrates how structured garments naturally showcase their construction.
Flowing garments, such as loose dresses, flowing tops, or oversized pieces, require extra attention to create shape and dimension. These pieces may need more strategic pinning and styling to achieve an appealing silhouette.
Tight-Fitting vs. Loose-Fitting Items
Tight-fitting dresses require mannequins that closely match your target customer's measurements. Any gap between the garment and the mannequin becomes obvious in the final image, requiring extensive editing.
Loose-fitting items present the opposite challenge. Without enough contact with the mannequin, these garments can appear shapeless or poorly constructed. Use strategic pinning on the interior to create pleasing lines while maintaining the garment's intended relaxed fit.
Integration with Your E-Commerce Strategy
Ghost mannequin clothing photography doesn't exist in isolation. It's one component of your broader e-commerce visual strategy that should work seamlessly with other image types.
Combining with Other Product Photography Styles
Most successful online fashion retailers use a mix of photography styles to tell a complete product story. Ghost mannequin images serve as your primary product shots, while lifestyle photography shows garments in context, and detail shots highlight fabric quality and construction.
Recommended image mix for clothing products:
- Primary ghost mannequin shot (front view)
- Back view ghost mannequin shot
- Side view showing garment profile
- Close-up detail shot of fabric/texture
- Lifestyle image showing a garment being worn
- Interior detail highlighting quality features
This variety addresses different customer needs throughout the buying journey. Some shoppers want clinical product information, while others need an emotional connection through lifestyle imagery. Understanding what product images you need for your online store helps you allocate photography resources effectively.
Platform-Specific Requirements
Different e-commerce platforms have varying image requirements that affect how you shoot and edit ghost mannequin photography. Amazon product image requirements for product pages differ from those of Shopify or your own website.
Pay attention to aspect ratios, file sizes, and resolution requirements. Most platforms prefer square images (1:1 ratio) or slightly vertical formats (4:5 ratio). Shooting with these dimensions in mind saves editing time and ensures your images display optimally across all devices.
Cost Considerations and ROI
Investing in ghost mannequin clothing photography requires upfront costs, but the return on investment often justifies the expense for growing fashion brands.
Initial Setup vs. Ongoing Costs
Your initial investment includes equipment purchase, studio setup, and potentially training or hiring specialized staff. Quality ghost mannequins range from $200 to $800, depending on features and build quality. Lighting equipment adds another $500 to $2,000 for a professional setup.
Ongoing costs include studio space, electricity, equipment maintenance, and either staff time or outsourcing to professional services. Product photography pricing varies widely based on location, volume, and complexity.
Cost breakdown for 100 garment shoot:
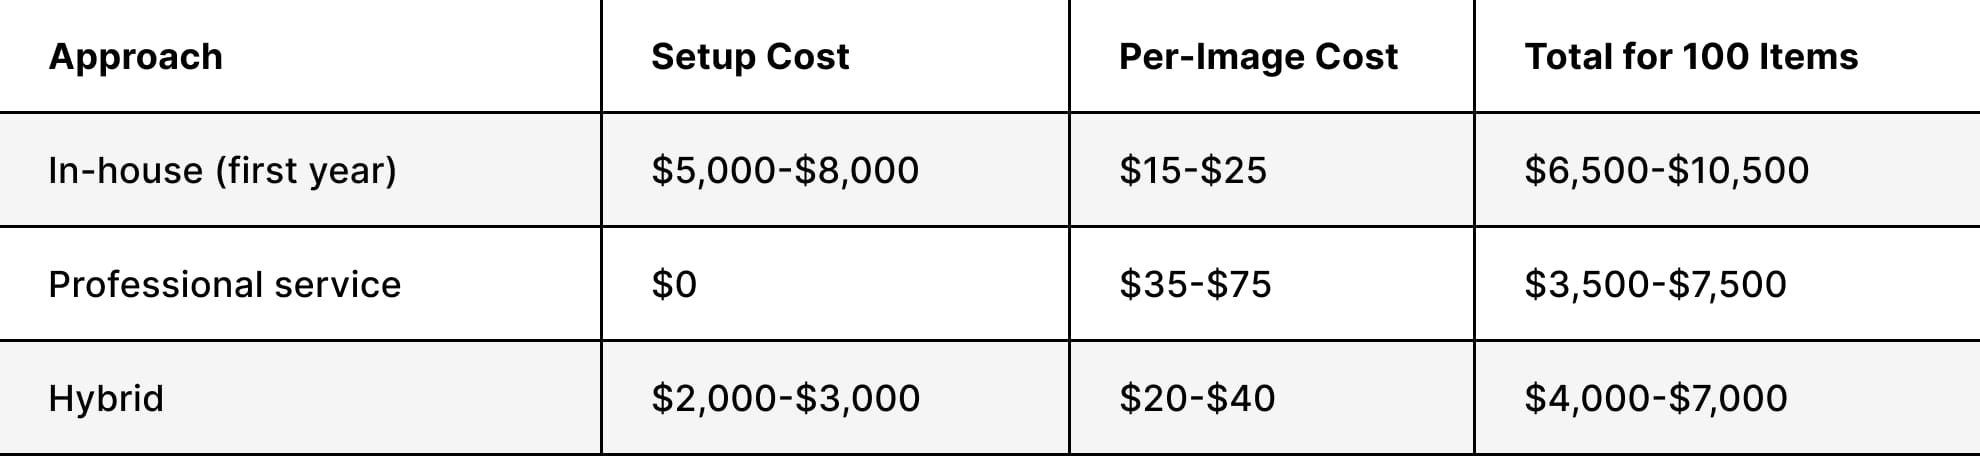
These numbers demonstrate why many brands choose to outsource initially, then bring photography in-house as volume increases. Understanding e-commerce photography budgeting helps you make informed decisions about which approach fits your business stage.
Measuring Impact on Conversion Rates
The true value of professional ghost mannequin clothing photography appears in your conversion metrics. Brands typically see 20-30% increases in conversion rates when upgrading from amateur flat lay images to professional ghost mannequin photography.
Track metrics such as time on page, add-to-cart rates, and return rates to measure impact. Customers who can clearly visualize fit and construction are more confident in their purchases, leading to fewer returns and higher satisfaction scores.
Scaling Your Ghost Mannequin Photography Production
As your clothing line grows, efficient production becomes critical. What works for 50 products annually becomes unsustainable at 500 products.
Streamlining Your Workflow
Automation and systematization transform ghost mannequin photography from a creative process into a repeatable production line. Create detailed checklists for styling, shooting, and editing each garment type.
Production efficiency strategies:
- Batch similar items (all shirts, then all pants, then all jackets)
- Pre-set camera and lighting configurations for each category
- Use consistent file naming conventions for easy tracking
- Develop editing presets for common adjustments
- Create templates for different garment types
- Schedule regular production days rather than ad-hoc shooting
Consider whether specialized product photography services make sense for your peak seasons or new product launches. Outsourcing allows you to scale quickly without capital investment in additional equipment or staff.
Quality Control and Consistency Checks
Maintaining consistency across hundreds or thousands of product images requires systematic quality control. Establish clear standards for image quality, editing style, and technical specifications.
Review batches of images before publishing to catch inconsistencies in color correction, exposure, or editing approach. E-commerce image standards should be documented and shared with everyone involved in the photography process.
Common Challenges and Solutions
Even experienced photographers encounter obstacles when shooting ghost mannequin clothing photography. Understanding common issues and their solutions saves time and frustration.
Technical Difficulties and Fixes
Challenge: Visible mannequin edges bleeding through thin or light-colored fabrics
Solution: Use a mannequin color that contrasts minimally with the garment, or photograph an intermediate layer first to block the mannequin color.
Challenge: Inconsistent lighting creates hard-to-blend seams
Solution: Invest in quality diffusers and ensure equal power output from all lights. Use a light meter to verify consistency.
Challenge: Wrinkles and fabric imperfections
Solution: Steam every garment thoroughly before shooting. Keep a steamer in the studio for quick touch-ups between shots.
Challenge: Sleeves falling flat or looking unnatural
Solution: Stuff sleeves with tissue paper or use wire armatures inside to create natural bends. Shoot sleeves separately if needed for optimal positioning.
Time Management and Efficiency
Many brands underestimate the time required for professional ghost mannequin clothing photography. Each garment can take 15-30 minutes to shoot and 20-45 minutes to edit, depending on complexity.
Creating an efficient photography workflow requires planning. Schedule dedicated shooting days, prepare all garments in advance, and batch your editing work. This focused approach is more efficient than switching between shooting and editing.
If you're looking to elevate your apparel photography without the time investment required to build an in-house operation, Squareshot delivers professional ghost mannequin photography with quick turnaround times and advanced retouching, bringing your clothing line to life across all your sales channels.
Product A
SQUARE SHOT