


When shopping for hats online, visuals often do the heavy lifting. In 2026, brands increasingly succeed or fall behind based on how clearly and consistently their hat photography communicates quality and fit.
Stunning visuals are what make your hats stand out and tell your brand’s story. This guide delivers the most comprehensive, up-to-date strategies for hat product photography that actually convert browsers into buyers.
You’ll learn how to select the best equipment, set up your studio, master lighting, style creatively, choose between models and mannequins, edit like a pro, and stay ahead of future trends. Ready to create scroll-stopping photography?
Dive in and master every stage of hat product photography to supercharge your e-commerce success.
Understanding Hat Product Photography in 2026
Hat product photography is evolving rapidly, driven by rising e-commerce demands and shifting consumer expectations. As we move into 2026, mastering this niche means understanding its unique challenges, diverse photo styles, and the cutting-edge trends shaping brand success.
The Unique Challenges and Opportunities of Hat Photography
Hat product photography stands apart from other product categories because hats must showcase structure, texture, and fit in a single image. Capturing the perfect curve of a brim or the softness of felt is no easy feat. Every detail matters, from intricate stitching to interior linings.
As hats continue to be a popular accessory online, high-quality visuals play an increasingly important role in how they’re presented and perceived. Consumers expect to see 360-degree spins and lifestyle images that bring hats to life. Compare a flat, poorly lit photo with a dynamic, professional shot: the difference in click-throughs and conversions is dramatic.
%201-min.jpg)
Types of Hat Product Photography: Catalog, Creative, and Lifestyle
Hat product photography generally falls into three main styles: catalog, creative, and lifestyle.
Catalog photography focuses on clarity and consistency, using clean, neutral backgrounds that keep all attention on the hat itself.


Creative photography is more stylized and thematic, often incorporating props or environments to create a visual concept.
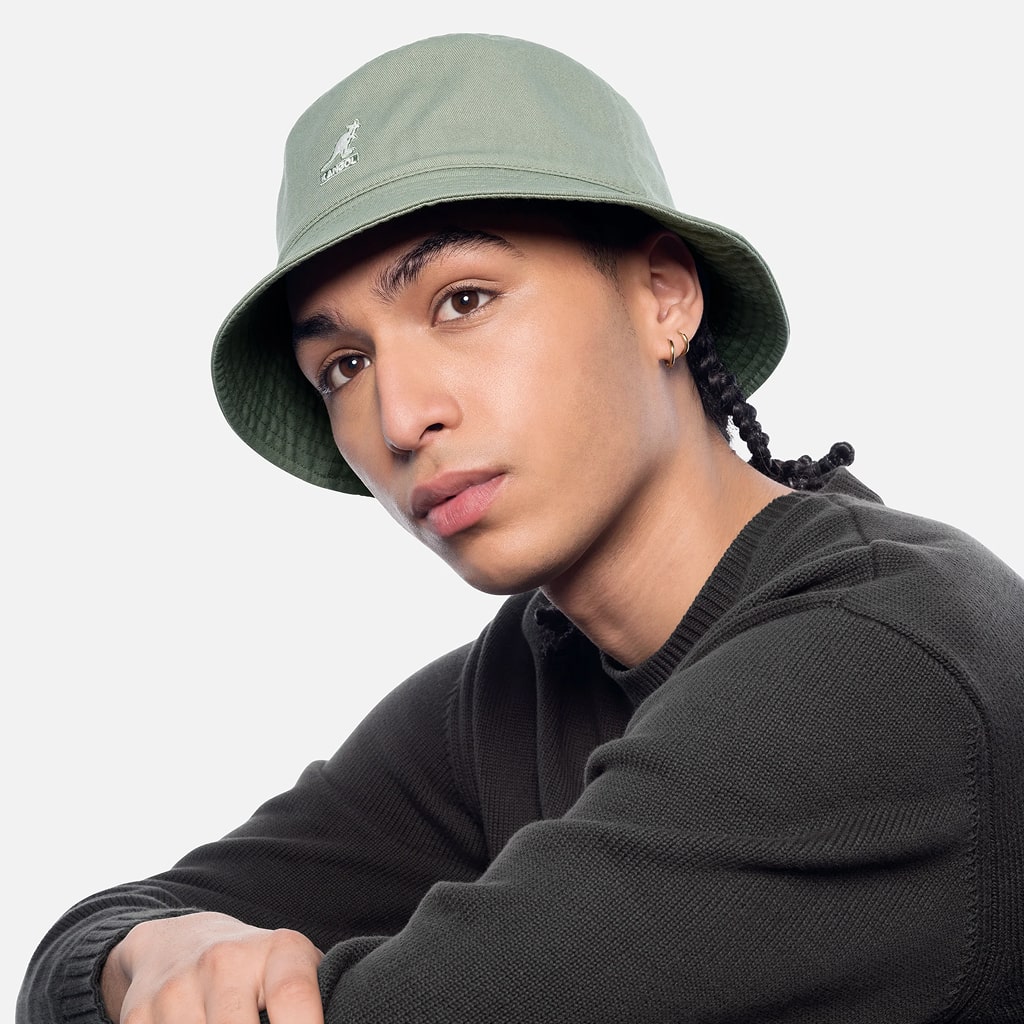
Lifestyle photography places hats in real-world contexts, featuring models and everyday settings to show how the product is worn, for example, a snapback styled on a model in an urban scene. Together, these approaches help brands balance clarity, storytelling, and emotional connection.
Choosing the right style is key to brand identity. Catalog shots are best for clarity and consistency. Creative images tell a story and catch the eye. Lifestyle photos help customers imagine wearing the hat. For instance, a fedora looks elegant in a studio shot, while a lifestyle image of the same fedora in the city creates aspiration and context.
The Role of Product Photography in Hat Brand Success
High-quality hat product photography directly impacts sales and customer satisfaction. Clear, detailed images increase click-through rates and reduce returns, as shoppers know exactly what they are getting. Visual consistency also builds brand trust and recognition.
Looking at competitor content, brands that prioritize professional images often create a more compelling experience on both e-commerce and social platforms. One brand, after upgrading its entire photo catalog, reported a significant sales boost and a decrease in return rates — proof of the power of strong visuals.
2026 Trends: Technology and Consumer Demands
In 2026, product photography will embrace interactive 3D and AR experiences. Shoppers want to view hats from every angle and even try them on virtually. Brands are responding with inclusive model representation and authentic, sustainable storytelling.
AI-driven editing and background removal make post-production faster and more precise. To see how these innovations drive sales and reduce returns, explore the benefits of 360-degree product photography. Brands using AR let customers “wear” hats online, building trust and excitement before purchase.
Essential Equipment and Studio Setup for Hat Photography
Getting the right setup is the foundation of successful hat photography. The right tools and environment help you capture every curve, texture, and unique feature, making your hats irresistible to online shoppers. Let’s break down the essentials you’ll need to create high-quality images that stand out in a crowded market.
Cameras, Lenses, and Accessories
Your camera and lens choices set the tone for hat product photography. DSLRs and mirrorless models like the Canon EOS 5D Mark III or Sony a6400 deliver sharp, detailed images. For lenses, a 50mm is versatile, while an 85mm is perfect for portrait-style shots of hats on models. Macro lenses highlight fine details like stitching or embellishments.
Tripods are a must for stability and repeatable framing. Keep cleaning tools handy to remove dust, lint, or fingerprints before every shot. This attention to detail ensures flawless hat product photography.
Lighting: Natural vs. Artificial and Key Setups
Lighting is everything in hat product photography. Natural light is soft and flattering, but can be inconsistent. Studio lighting, like strobes and softboxes, gives you full control over shadows, highlights, and mood. Use reflectors to fill in shadows and bring out textures, especially on woven or textured hats.
Lighting placement matters. Side lighting can make a straw hat’s weave pop, while a softbox above the hat highlights its shape. For expert advice on setups and light modifiers, check out this Guide to lighting for product photography.
Backgrounds and Surfaces
Backgrounds should complement your hats without distracting from them. White or neutral seamless paper is ideal for catalog images, ensuring your hats are the star of the show. Colored backgrounds work for creative shots, but always consider contrast. For example, a black hat stands out beautifully against a red backdrop.
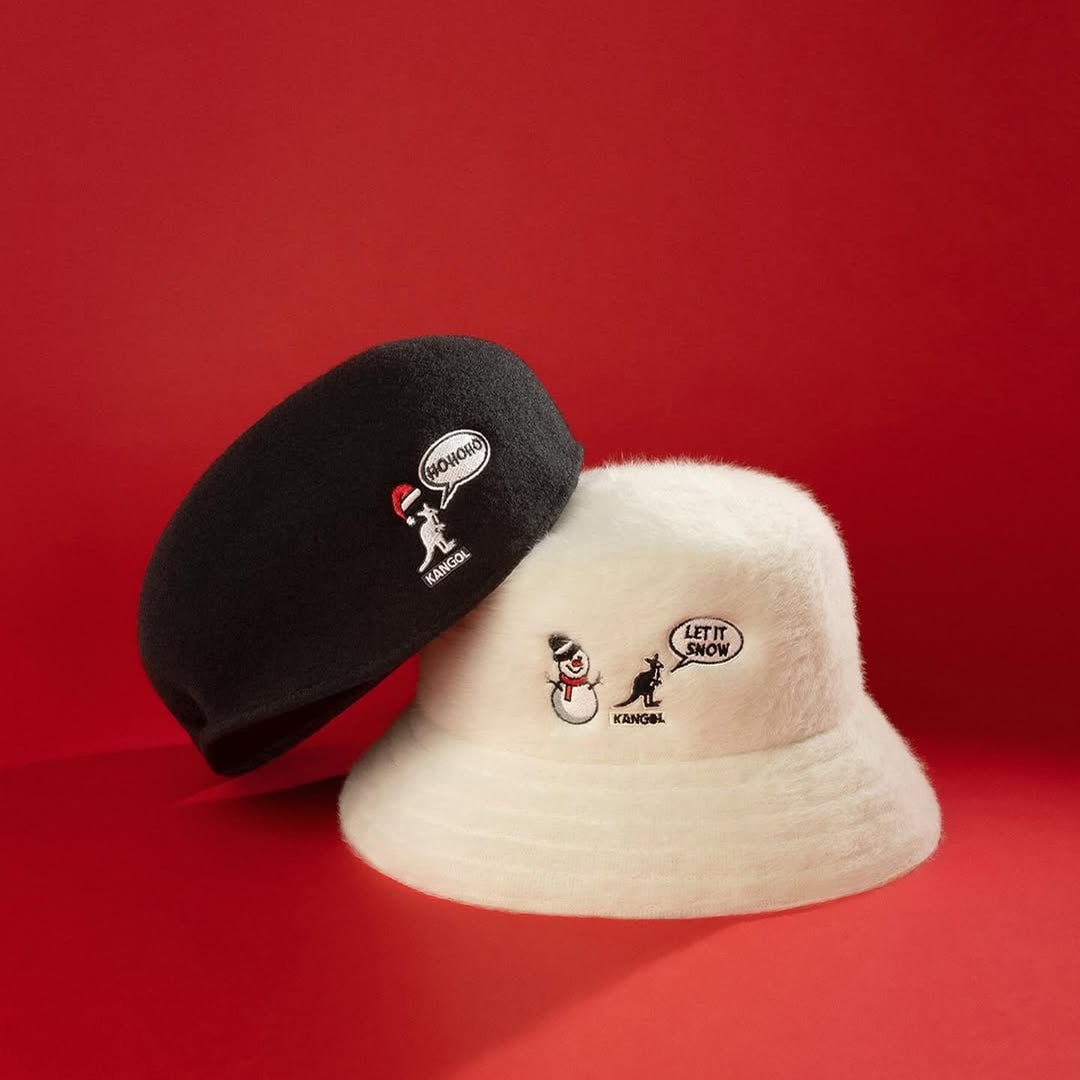
Experiment with textured surfaces, like wood or linen, for lifestyle or creative hat product photography. This adds depth and a sense of context, helping your images connect with shoppers.
Props, Stands, and Mannequins
How you display hats affects their appeal and clarity. Use hat stands or helmet forms to show structure. Ghost mannequins and flat lays are perfect for beanies or fitted caps, revealing shape without distraction.
Models bring hats to life for lifestyle shots.
Other tools include hangers, pins, and creative displays like floating or hanging hats for a dynamic look. Switching between these options lets you highlight the versatility of your hat product photography.
Studio Layout and Space Optimization
A well-organized studio speeds up workflow and prevents mistakes. Position your shooting table near your main light source for easy access. Keep backdrops, props, and hats within reach to minimize disruptions.
Allow enough space for multiple angles and setups — this is crucial for batch shooting or 360-degree spins. Tidy cables and keep walkways clear to avoid accidents. Even a small space can be optimized for hat product photography with thoughtful arrangement and planning.
Step-by-Step Hat Product Photography Workflow
Mastering hat product photography means following a clear, repeatable workflow. Each step, from prepping the hats to batch shooting, ensures you capture every detail and style that sets your hats apart. Let’s break down the process so you can build a studio routine that’s both efficient and creative.
Step 1: Hat Preparation and Styling
Preparation is the foundation of great hat product photography. Start by inspecting each hat for dust, lint, or fingerprints. Use a lint roller or soft brush to clean the surface. Shape the hat using hat helmets or inserts to maintain its form.
Remove all tags, stickers, and packaging. Pay attention to embellishments, linings, and stitching, as these small details matter in close-up shots. For soft hats, fluff or reshape them so they look their best. Taking time to prepare each hat ensures your hat product photography starts strong.
Step 2: Setting Up the Studio and Lighting
A well-organized studio setup is essential for consistent hat product photography. Arrange your background and table so you have enough space for different angles. Choose a background that contrasts with the hat color for maximum impact. Place your key and fill lights to avoid harsh shadows and highlight the hat’s shape and texture.
Softboxes or diffused LED panels are great for even lighting. Reflectors or foam boards help soften shadows, especially with textured materials like straw or velvet. Adjust lighting positions if you notice hot spots or deep shadows. Each hat material may require a slight tweak to the lighting. For example, straw hats look best with side lighting that brings out their weave, while velvet hats need soft, even light to show their richness.
Step 3: Camera Settings and Composition Techniques
Getting camera settings right is crucial for sharp, true-to-life hat product photography. Use a tripod for stability and shoot in RAW for the best editing flexibility. Recommended settings include ISO between 200 and 800, aperture at f/8 to f/11, and shutter speed from 1/125 to 1/250.
Turn on grid mode to help with balanced composition and negative space. Capture a variety of angles: front, side, back, and close-ups of unique details. Multiple angles give shoppers a complete view, increasing their confidence in your hat product photography.
Step 4: Shooting with Models, Mannequins, or Flat Lay
Choosing the right presentation style elevates your hat product photography. Use models for lifestyle or contextual shots that show fit and personality. Ghost mannequins are perfect for structured hats, making them look worn without visible support. Flat lay is ideal for soft hats or when you want a minimal, top-down look.

Consider reading this Flat lay product photography guide for advanced flat lay tips. For a sun hat, a model in natural light creates a summery vibe. A beanie looks great on a ghost mannequin, highlighting its shape and fit. Mix and match styles to find what best showcases your hats.
Step 5: Creative Styling and Advanced Techniques
Creativity is what makes hat product photography stand out. Try floating or hanging hats for dynamic, eye-catching visuals. Use fishing line or clear stands to create the illusion of movement. Props and environmental elements can tell a story — think beach props for sun hats or urban textures for snapbacks.
Apply color theory by pairing hats with backgrounds and props that enhance their tones. A pastel hat pops against a soft blue background, while a bold red cap looks sharp with neutral tones. Experiment with angles and depth to add interest. Creative styling helps your hat product photography capture attention in a crowded marketplace.
Step 6: Batch Shooting and Workflow Efficiency
Efficiency is key when shooting multiple hats for e-commerce. Start by planning a detailed shot list, including all required angles and styles for each hat. Organize hats and accessories so you can switch quickly between them. Tethered shooting lets you review images instantly and make adjustments on the fly.
A simple workflow checklist:
*- Prepare all hats and props in advance
- Set up the camera and lighting once for similar hat types
- Shoot all angles for one hat before moving to the next
- Review images in real time via tethered shooting
- Note any reshoots needed before breaking down the setup*
Batch shooting helps you maintain consistency and quality throughout your hat product photography process. By following these steps, you’ll capture images that convert browsers into buyers.
Advanced Editing and Post-Production for Hat Photography
Professional editing is the secret ingredient that transforms ordinary hat product photography into high-converting, scroll-stopping visuals. With the right post-production steps, you can showcase every detail, texture, and color with clarity and style.
Essential Editing Steps for Flawless Hat Images
Editing begins with the basics: making sure your hat product photography is clean, accurate, and visually appealing. Start by removing dust, lint, and blemishes using cloning or healing tools in your preferred editing software. Next, correct the color balance to ensure the hat’s true tones shine through.
Straightening and cropping are critical for consistency across your product catalog. Always check that each hat sits perfectly centered in the frame. For example, when editing a wool beret, zoom in to remove stray lint and ensure the color pops. Consistent editing builds trust and helps your hat product photography stand out.
Retouching Techniques for Hats
Hat product photography often requires specialized retouching to highlight materials and structure. Smoothing fabric, fixing wrinkles, and enhancing textures will make details like felt, straw, or embroidery more prominent. Adjust highlights and shadows to bring out depth, making hats appear three-dimensional.
If you use ghost mannequins, you’ll want to remove visible supports and mannequin necks for a floating effect. For step-by-step guidance on this technique, check out Ghost mannequin product photography. Thoughtful retouching ensures every hat looks its best and keeps customers engaged.
Background Removal and Compositing
Clean backgrounds are a hallmark of professional hat product photography. Use manual selection tools, AI-powered apps, or automated background removers to isolate your hat from distractions. After removal, add a new background that fits your brand’s style, whether it’s a classic white, a creative scene, or a lifestyle image.
Maintain natural-looking edges and realistic shadows, especially when compositing hats onto new scenes. For instance, switching a white background to an outdoor lifestyle setting can give your campaign a fresh feel. Well-executed background edits elevate your hat product photography to the next level.
Preparing Images for E-commerce and Social Media
Optimizing hat product photography for digital platforms is crucial. Resize and compress images for fast loading on Shopify, Amazon, or Instagram. Use the sRGB color profile to make sure your hats look consistent across all devices.
Batch processing tools save time when handling large collections. For example, export your hat images in multiple sizes and formats to fit different marketplaces. Consistent, high-quality images will help your brand’s hat product photography stand out and drive more sales.
Leveraging AI and Automation in 2026
AI is revolutionizing hat product photography editing. Automated retouching tools can remove blemishes, smooth textures, and adjust colors at lightning speed. AI-powered background removers streamline the process for large catalogs, letting you focus on creativity.
Modern editing software now offers 360-degree hat spins and AR previews, making your product images more interactive. Staying updated with the latest plugins ensures your hat product photography remains competitive and future-proof. Embrace automation to save time and scale your brand’s visual output.
Creative Strategies: Styling, Angles, and Storytelling
Creating impactful hat product photography means going beyond basic images to craft a visual story that resonates with shoppers. Let’s break down how to highlight details, choose the right angles, present hats effectively, and use creative styling to build a brand narrative that wins hearts and conversions.
Showcasing Details: Brims, Textures, and Embellishments
Every hat has a story, and it often starts with the small details. In hat product photography, capturing the unique brims, intricate stitching, or bold embellishments is key to helping shoppers imagine the product in their hands.
Use macro lenses and side lighting to highlight textures like woven straw, soft felt, or smooth leather. Try close-up shots to showcase embroidery, logos, or special linings. For example, a crisp shot of a snapback’s embroidered logo instantly communicates quality and style.
- Focus on the main feature: brim shape, band, or embellishment
- Use soft light to avoid harsh shadows on delicate materials
- Clean the hat before shooting to keep details sharp
These techniques ensure your hat product photography draws attention to what makes each piece special.
Capturing Multiple Angles and Dynamic Shots
Today’s shoppers expect to see hats from every perspective. Modern hat product photography must include front, side, back, and interior shots to answer all customer questions at a glance.
Dynamic angles make your products pop. Interactive 360-degree spins and Augmented Reality in product photography experiences allow customers to “try on” hats virtually or view every detail before purchasing.
By offering multiple angles, hat product photography can reduce uncertainty and drive higher conversions.
Model vs. Mannequin vs. Flat Lay: Choosing the Best Presentation
How you present hats can make a major difference in engagement. Hat product photography with a live model brings personality and context, helping shoppers visualize fit and style.
Mannequins, especially ghost mannequins, create a polished look that keeps the focus on the hat’s structure. Flat lay images work well for casual hats or when space is limited. Each method has its place:
- Models: Best for lifestyle, fashion-forward brands
- Mannequins: Ideal for e-commerce consistency
- Flat lay: Great for social media, quick catalogs
Mixing these approaches within your hat product photography strategy ensures you reach a wide audience while maintaining brand consistency.
Using Props and Backgrounds for Brand Storytelling
Props and backgrounds bring hats to life, telling a story beyond the product itself. Select props that match your brand’s identity and speak to your audience’s lifestyle.
Experiment with textured or colored backgrounds to make hats stand out. Using a monochromatic color scheme in product photography can create a sophisticated, modern feel that draws focus to the product.
- Match the background color to the hat for contrast
- Add props that enhance, not distract
- Use environmental elements for seasonal campaigns
Thoughtful styling elevates your hat product photography, making each image memorable.
Trends in Diversity, Inclusion, and Sustainability
In 2026, hat product photography is about more than just aesthetics. Brands are embracing diversity by featuring models of different ages, backgrounds, and styles. This inclusive approach resonates with a broader customer base and builds trust.
Sustainability is also in the spotlight. Showcasing eco-friendly hats in natural settings or highlighting recycled materials visually communicates your brand values. Authentic, unfiltered images are trending, as shoppers crave transparency.
By focusing on these trends, your hat product photography not only looks current but also creates meaningful connections with your audience.
Future-Proofing Your Hat Photography: Trends and Innovations for 2026
As we approach 2026, hat product photography is undergoing rapid transformation. Brands must embrace new technologies and visual trends to stay ahead in a competitive market. Let’s explore the innovations shaping the future of hat product photography, from cutting-edge tech to sustainable aesthetics and data-driven strategies.
Emerging Tech: 3D, AR, and Virtual Try-On
The future of hat product photography is interactive. E-commerce stores are integrating 3D models and augmented reality to let shoppers “try on” hats virtually from home. This technology boosts confidence and reduces returns by showing fit and scale in real time. Tools like AR overlays and 360-degree spins are now accessible for brands of all sizes.
AI is also streamlining workflows, from automated background removal to smart lighting adjustments. For a deeper dive into how AI is transforming the industry, check out AI advancements in product photography. These innovations make hat product photography more engaging and efficient than ever.
Sustainable and Minimalist Visual Aesthetics
Eco-conscious consumers are influencing hat product photography styles. Clean, minimalist visuals with natural backgrounds highlight sustainable materials and ethical production. Brands are using real plants, recycled props, and even outdoor environments to reflect their values.
Minimalist photography not only appeals to modern tastes but also keeps the focus on the hat’s craftsmanship. For example, a straw hat photographed on a simple wooden surface outdoors tells a story of sustainability. This approach helps brands build trust and authenticity through hat product photography.
Data-Driven Photography: Analytics and Optimization
Data is now essential for hat product photography success. Brands leverage analytics to test which styles, angles, and backgrounds convert best. A/B testing catalog shots versus lifestyle images can reveal what resonates with shoppers.
Tracking image performance across platforms helps refine visual strategy. By analyzing metrics like click-through and conversion rates, brands continuously improve their hat product photography. This data-driven approach ensures every image is optimized for results, not just aesthetics.
Building Brand Loyalty Through Visual Consistency
Consistency in hat product photography builds recognition and loyalty. Establishing a signature style — through lighting, backgrounds, or composition — sets your brand apart in a crowded market. Shoppers remember brands that deliver a cohesive visual experience.
Make sure every product photo aligns with your brand’s identity, whether on your website, social media, or ads. Over time, this visual language makes your hats instantly recognizable. Strong consistency in hat product photography transforms casual browsers into loyal fans.
Now that you know what goes into capturing hats that truly stand out online, the next step is to put that knowledge into action. If you’re ready to elevate your brand’s hat imagery and want a team that gets the details right every time, why not get started today?
Product A
SQUARE SHOT
-min.jpg)


