Stunning product photos start with perfect lighting — one of the most powerful tools to make your products stand out. The right light for product photography can instantly elevate your images, capturing attention, building trust, and boosting sales.
This guide will demystify both the science and art behind lighting, offering you actionable, expert-backed strategies whether you're a beginner or a seasoned pro. You'll discover the latest techniques, must-have gear, and step-by-step tips to master any lighting scenario.
Ready to transform your product shots and set your brand apart? Dive in and follow our expert guide for scroll-stopping results.
The Fundamentals of Light in Product Photography
Lighting is the silent storyteller behind every standout product photo. Understanding the science and art of light for product photography is essential, whether you’re just starting out or refining your studio skills. Let’s break down the basics that set the stage for every successful shoot.
Understanding the Three Pillars: Direction, Intensity, and Quality
Mastering light for product photography begins with three core elements: direction, intensity, and quality.
Direction shapes your product’s story. Side lighting, for instance, brings out texture and depth — perfect for fabrics or intricate designs. Front lighting, on the other hand, minimizes shadows and highlights every detail, making it ideal for clean, catalog-ready images.
Intensity refers to the strength of your lighting. Too bright, and your image risks overexposure and flattened features. Too dim, and you lose vibrancy and clarity. Adjusting the intensity allows you to control the mood and ensure accurate color reproduction.
Quality distinguishes hard from soft light. Hard light, with its crisp shadows, works wonders for jewelry, emphasizing brilliance and edges. Soft light, created with diffusers or softboxes, is gentle and flattering for cosmetics and beauty products.
Did you know that 74% of online shoppers rely on product images when making purchase decisions? High-quality light for product photography directly boosts both perceived value and trust. In fact, studies show that investing in proper studio lighting can increase conversion rates by up to 67%.
Before you rush out to buy new gear, revisit these fundamentals. Even experienced pros return to these basics to ensure consistency and professionalism. For a deeper dive into foundational setups and the latest gear, check out the Essential Guide for Product Photography Lighting Setup in 2025.
Natural vs. Artificial Light: Pros, Cons, and Use Cases
Choosing between natural and artificial light for product photography depends on your specific goals, available resources, and the environment in which you work.
Natural light is abundant and free. It delivers a soft, flattering glow, making it perfect for lifestyle shots and brands seeking an organic feel. The catch? It’s unpredictable. Weather changes, time of day, and window placement can all impact your results, requiring adaptability and careful planning.
Artificial light offers total control. With consistent output, adjustable color temperature, and the ability to shape light precisely, artificial setups are ideal for e-commerce, catalogs, and brands needing uniform images. The downside? There’s a learning curve, and the initial setup can be more complex.
Artificial light for product photography is especially valuable for brand consistency. It allows for precise adjustments, ensuring every product looks its best — no matter the weather outside. In fact, product pages with high-quality photos see as much as a 94% higher conversion rate than those with lower-quality images. Increased buyer confidence generally translates into fewer returns
Ultimately, mastering both natural and artificial light for product photography enables you to adapt to any situation and deliver scroll-stopping images every time.
Simple Lighting Setups at a Glance
Not sure where to start? Here are three ready-to-use setups based on your budget and goals:
Setup 1 — One Light (Beginner / Budget)
Best for: Flat-lays, small products, social media content
What you need: 1× LED panel or softbox + 1× white foam board reflector
How: Place light at 45° to the left of your product. Put the foam board on the right side to bounce light back and fill shadows. Shoot from above or straight on.
Result: Clean, soft shadows. Works great for cosmetics, food, and packaged goods.
Setup 2 — Two Lights (Intermediate)
Best for: Amazon/Shopify listings, e-commerce catalogs
What you need: 1× key light (softbox) + 1× fill light or second reflector
How: Key light at 45° to one side, fill light or reflector at 45° on the opposite side at lower intensity (50–70% of key). Both aimed at the product.
Result: Balanced, shadow-free images. Ideal for white-background platform requirements.
Setup 3 — Three-Point (Professional)
Best for: Hero shots, brand campaigns, fashion & jewelry
What you need: 1× key light + 1× fill light + 1× backlight/rim light
How: Key light at 45° front-left, fill at 45° front-right (lower power), backlight aimed at product from behind to separate it from the background.
Result: Dimensional, professional images with depth and product separation. The studio standard.
Essential Studio Lighting Equipment for Product Photography in 2025
A great photo starts with the right light for product photography. In 2025, the landscape of studio lighting equipment is more exciting—and accessible — than ever. Whether you’re shooting at home, in a studio, or on the go, having the right gear will elevate your images and help your products stand out.


Must-Have Light Sources: What’s New and Proven
Choosing the right light for product photography is your first big decision. The main options — continuous lights, strobe lights, speedlights, and ring lights — each bring unique strengths to your workflow.
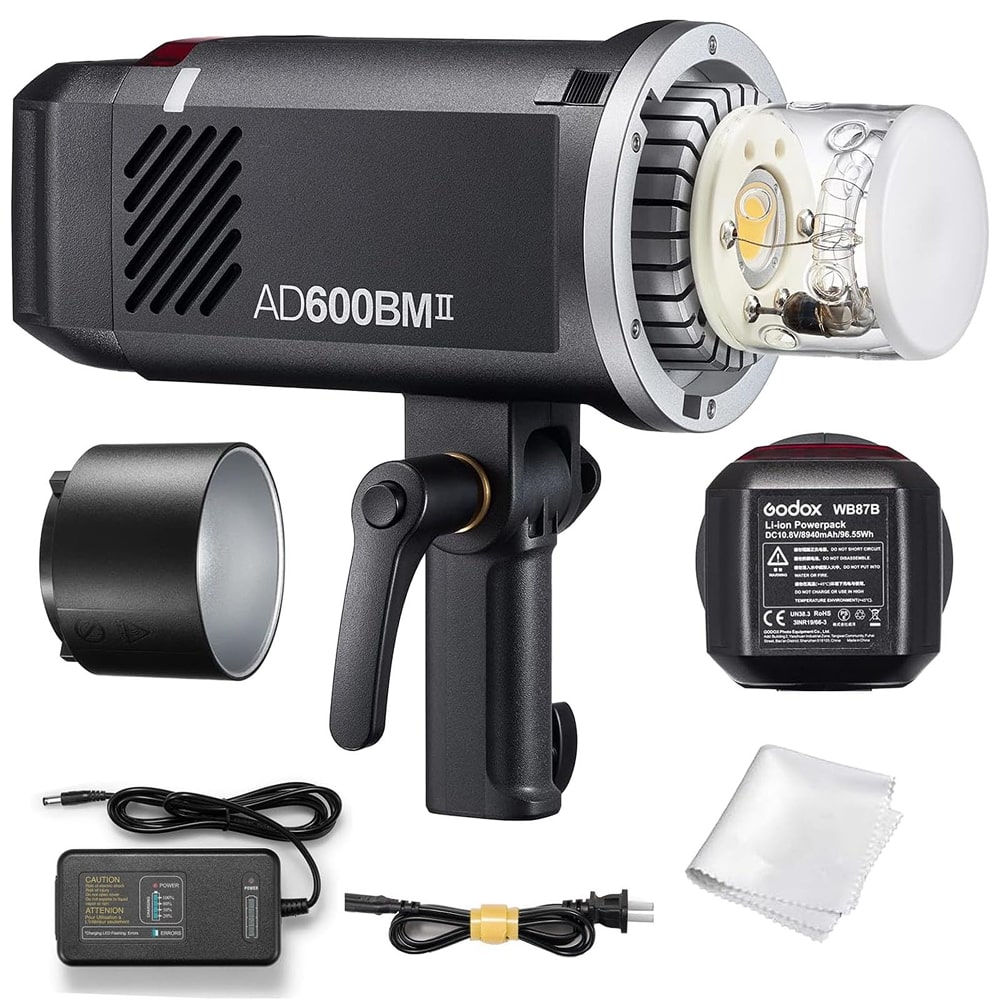
In 2025, LED panels like the Godox SL60W or FV150 are popular for their adjustability and cool operation. Strobe lights such as the Godox AD600BM deliver pro-level power for crisp, detailed shots. Ring lights remain a favorite for jewelry and cosmetics.
Curious about building a starter kit or upgrading your gear? This product photography equipment guide details everything you need to create the perfect light for product photography, from basics to advanced setups.
If you’re just starting out, a single continuous LED and a white foam board reflector can work wonders. As your skills grow, explore multiple lights and experiment with color temperature controls for creative effects.
Light Modifiers and Accessories: Control and Creativity
Modifiers are game-changers for shaping light for product photography. They let you soften, direct, or bounce light exactly where you want it, making your images look polished and consistent.
Popular modifiers and accessories include:
- Softboxes. They deliver soft, even light — essential for reflective surfaces and detail shots.
- Umbrellas. Spread light broadly; great for larger products, but less precise.
- Diffusers. From scrims to sheer curtains, they tame harsh light and minimize shadows.
- Reflectors/Bounce Cards. Silver for contrast, white for subtle fill; perfect for balancing shadows.
- Light tents/lightboxes. They create a shadowless environment for small products, such as watches or gadgets.
For example, using a softbox with a continuous light creates a flattering, natural look for beauty products. A light tent is invaluable for shooting consistent e-commerce images.
Investing in modifiers isn’t just about aesthetics — reflectors and diffusers can dramatically reduce editing time, saving you hours in post-production. The right accessories make mastering light for product photography efficient and fun.
Squareshot: Professional Product Photography Services
If you want flawless light for product photography without the learning curve, Squareshot makes it easy. Our studios in Brooklyn and Los Angeles use advanced studio lighting setups and expert teams to deliver results.
Squareshot offers:
- Catalog, creative, and model shoots tailored for e-commerce, fashion, beauty, and home goods.
- Flexible pricing: per-image, per-day, or membership for ongoing needs.
- Fast turnaround, advanced styling, and professional retouching for every photo.
Our tech-powered workflow ensures consistent, brand-ready images — no matter your business size. With Squareshot, you get the benefits of top-tier light for product photography and a hassle-free experience from start to finish.
Mastering Natural Light for Product Photography
Achieving stunning results with light for product photography doesn’t have to mean investing in expensive studio gear. Natural light is a powerful ally — when you know how to use it right, you can capture professional-quality images that showcase your products at their very best.
Let’s break down exactly how to harness natural light for product photography, from setup to troubleshooting, so you get consistent, eye-catching results every time.
%201-min.jpg)
Step-by-Step Guide to Using Natural Light Effectively
Mastering light for product photography starts with understanding how to use what you already have—sunlight. Here’s a practical, step-by-step approach to get the best from natural light:
1.Find the Ideal Time of Day
Test your shooting space throughout the day to discover when the light is brightest and most neutral. Mid-morning or late afternoon often delivers soft, balanced light for product photography.
2.Set Up Near Large Windows
Place your setup close to big windows or glass doors. More window space means more even, flattering light for product photography.
3. Diffuse Direct Sunlight
Direct sun creates harsh shadows and blown highlights. Use sheer curtains, white sheets, or professional scrims to soften the light for product photography and achieve gentle transitions.
4. Use Reflectors to Fill Shadows
Use a white foam board, poster board, or a white tabletop to bounce light back onto your subject for product photography. This helps eliminate unwanted shadows, giving your images a clean and polished look.
5. Angle Reflectors for Creative Control
Adjust the position and angle of your reflector to sculpt shadows and highlight the best features of your product. Experimentation is key here.
6.Plan Around Weather Conditions
Overcast days can be a blessing, naturally diffusing the light for product images. On sunny days, extra diffusion may be needed.
7.Stay Flexible with Backdrops
Use portable backdrops or a mobile studio setup so you can easily reposition your scene as the light changes.
Natural light is cost-effective, but consistency takes practice. If you want to dive deeper into optimizing your light for product photography, check out these Lighting Techniques for Product Photography.
Overcoming Common Challenges with Natural Light
Even though light for product photography from natural sources is beautiful, it isn’t always predictable. Here’s how to tackle the most common obstacles:
- Inconsistent Lighting. Weather and time of day can shift your results. Schedule shoots during peak daylight and use diffusers to maintain steady light for product photography.
- Harsh Shadows. Sunbeams can produce deep, unattractive shadows. Soften them by moving your subject further from the window or layering more diffusion material.
- Limited Window Space. Not enough sunlight? Use mirrors or multiple reflectors to amplify the available light for product photography, keeping your images bright.
- Changing Light Throughout the Day. Light for product photography can shift in color and intensity. Take test shots regularly, and be ready to adjust your setup as needed.
- Small Spaces. If you don’t have much room, angle your product and reflectors strategically to maximize every bit of light for product photography.
Insight: For beginners and small business owners, natural light for product photography is the most accessible way to start. With a bit of planning and some DIY reflectors, you can achieve professional-looking photos right at home.
Artificial Lighting Setups: From Simple to Advanced
Artificial lighting is the backbone of consistent, professional product photography. Unlike natural light, artificial setups give you complete control — day or night, rain or shine. Mastering light for product photography means understanding setups, from basic to advanced, unlocking creative possibilities, and setting your products apart.
%201-min.jpg)
One-Light, Two-Light, and Three-Point Lighting Setup Explained
Every great artificial setup starts with the basics. The one-light setup is the entry point — simple, budget-friendly, and surprisingly versatile. Place a single light for product photography at a 45-degree angle to your subject. This approach creates dramatic shadows and highlights, perfect for minimalist or moody looks.
Add a second light, and you unlock the two-light setup. Here, the main (key) light illuminates the product, while the fill light softens shadows on the opposite side. This setup strikes a balance between detail and depth, giving your images a polished, professional look.
The gold standard? Three-point lighting setup. This classic setup utilizes a key light, a fill light, and a backlight (sometimes referred to as a hair or rim light). The backlight, positioned behind the product, separates it from the background and adds dimensionality. This method is the go-to lighting for product photography in studios — think fashion, electronics, or anything that needs that extra visual pop.
A well-executed setup ensures your light for product photography consistently flatters every product—no matter the style or complexity.
Choosing and Positioning Artificial Lights for Best Results
Deciding between strobes and continuous lights can make or break your workflow. Strobes (flash units) deliver intense bursts of light, freezing motion, and provide crisp, clean results. They're ideal when you need maximum power or want to capture moving objects. Continuous lights, like LED lights, offer a "what you see is what you get" experience — perfect for beginners and video work.
When setting up your light for product photography, always consider color temperature. Most products look best under 5600K (daylight-balanced) lighting. Matching all your studio lights to the same color temperature avoids odd color casts and ensures your images are true to life.
Modifiers are your secret weapon. Softboxes diffuse harsh beams, creating gentle transitions between light and shadow. Gels can tint your light for product photography to match your brand's mood. Dimmers allow fine-tuning of intensity, letting you sculpt the scene until it's just right.
Practical Tips:
- Test different placements — move your lights closer or farther for softer or harder effects.
- Use a light meter or your camera's histogram for precise exposure.
- For reflective products, angle your light for product photography to minimize unwanted glare.
If you're hungry for more in-depth strategies, check out this Product Photography Lighting: Techniques, Tips & Best Practices guide to level up your technical know-how.
Troubleshooting Common Artificial Lighting Issues
Even with the best setup, challenges happen. Harsh shadows? Try moving your light for product photography farther from the product or add a diffuser. If you notice strange color casts, double-check your white balance and use corrective gels.
Reflections are a common headache, especially with glossy or metallic products. The fix? Use larger softboxes, adjust your angles, or try a polarizing filter to cut glare. It's all about experimenting until your light for product photography flatters, not distracts.
Here's a quick troubleshooting list:
- Harsh Shadows — Soften with diffusers or reposition the light.
- Color Casts — Set custom white balance, match all lights, or use gels.
- Reflections — Use bigger modifiers or move lights off-axis.
- Inconsistent Results — Mark positions, document setups, and shoot tethered when possible.
Remember, mastering light for product photography is a journey. The more you experiment and adjust, the more control you gain, ensuring every product looks its absolute best.
Advanced Light Modifiers and Creative Techniques
Unlocking the full potential of light for product photography means moving beyond basic setups. Advanced light modifiers and creative techniques empower you to shape, control, and stylize your light for product photography in ways that make your products truly stand out. Whether you're after flawless skin tones, sparkling jewelry, or atmospheric lifestyle shots, the right tools and tricks can elevate your images from ordinary to extraordinary.
Harnessing Softboxes, Umbrellas, and Diffusers for Unique Effects
Softboxes are a staple for light in product photography, delivering soft, even illumination that’s ideal for reflective or textured products. Their design spreads light evenly, minimizing harsh shadows and unwanted highlights — perfect for beauty products or glassware. Umbrellas, on the other hand, provide broad, diffused light. They’re quick to set up and work wonders for large items like furniture or when you need to cover a wide shooting area.
Diffusers, such as scrims and translucent panels, give you precise control over the hardness or softness of the light for product photography. By placing a diffuser between your light source and subject, you can soften direct beams, creating gentle transitions and reducing glare.
For more on how professionals achieve these results, check out the Mastering Product Photography: Essential Lighting Techniques for Stunning Images guide, which dives deep into advanced setups and creative applications.
Experimenting with these modifiers is key to mastering light for product photography. Start with a softbox for controlled, studio-quality light, or grab an umbrella for quick, natural-looking shots.
Reflectors, Bounce Cards, and Light Tents: Maximizing Detail and Depth
Reflectors are indispensable for shaping light for product photography, filling in shadows, and adding sparkle. Silver reflectors boost contrast and create crisp highlights, while white reflectors deliver a softer, more natural fill. Bounce cards — small, portable reflectors — let you direct light exactly where it’s needed, like under a product to lift shadows or beside it to enhance texture.
Light tents (or light boxes) are a game-changer for small products, such as jewelry or electronics. They envelop your subject in soft, even light for product photography, eliminating harsh shadows and providing a clean, distraction-free background. This is especially useful for e-commerce catalog images, where consistency is king.
Try combining reflectors and bounce cards for multi-directional fill, reducing the need for extra lights. This not only saves time but also streamlines your workflow and post-processing. Light tents simplify setup and ensure professional results even in tight spaces.
Mastering these tools ensures your light for product photography brings out every detail, making your products irresistible.
Creative Lighting Styles for Brand Differentiation
Once you have control over modifiers, it’s time to explore creative lighting styles that set your brand apart. Backlighting is a dramatic way to create silhouettes or highlight transparency in products like glass bottles with beverages or other liquids. Side lighting is perfect for fabrics or foods, emphasizing texture and depth and making the subject pop.
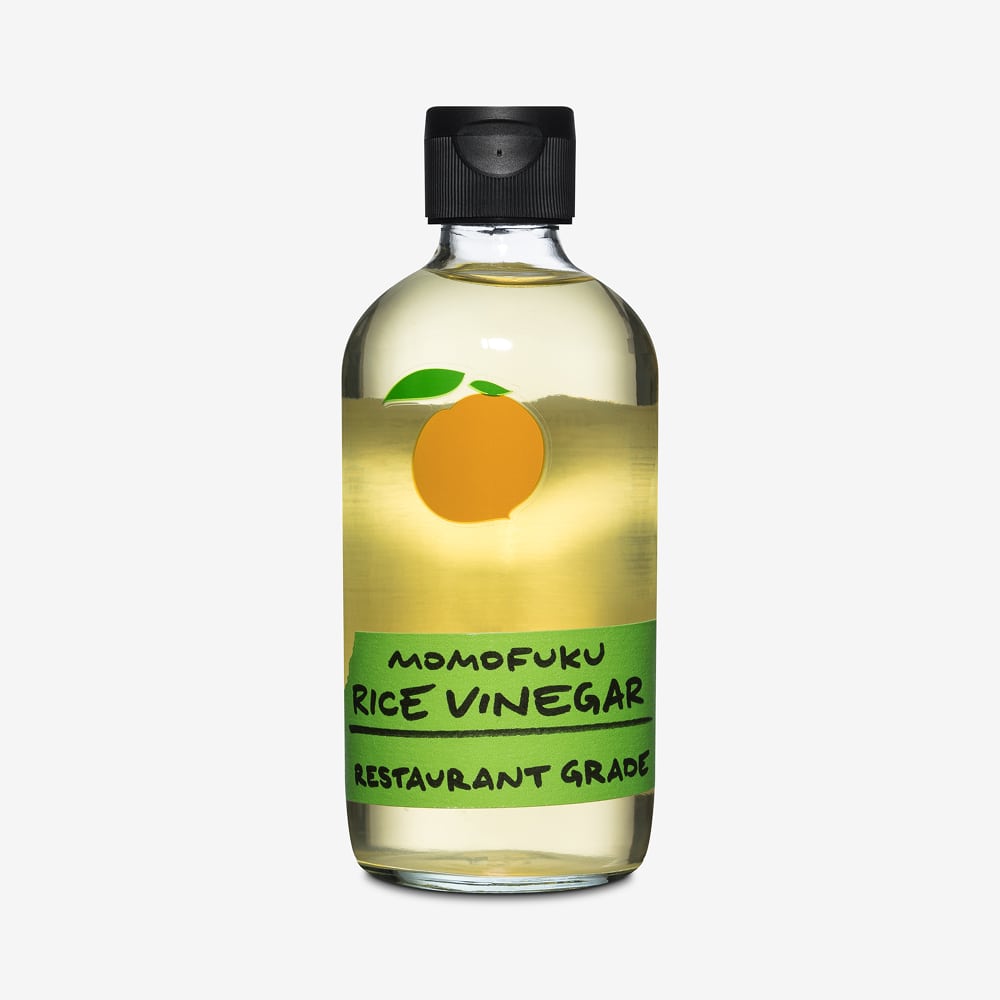
For instance, this product photo uses a strong diffused backlight to illuminate the liquid and create a glowing effect, highlighting the clarity and color of the vinegar. A soft front light evenly lights the label without harsh shadows, likely from a large softbox. Subtle top lighting adds definition to the black cap, while careful use of reflectors or a light tent controls reflections and keeps the background clean and seamless.
Experimentation is encouraged. Experiment with different angles, modifiers, and gels to determine what resonates with your audience. Remember, the right light for product photography isn’t just about clarity; it’s about making your products unforgettable.
AI-Powered Lighting Tools in 2026
Artificial intelligence is changing how photographers plan, execute, and retouch product lighting — reducing setup time and making pro-quality results accessible even without a full studio.
AI in Pre-Production: Planning Your Setup
Tools like Adobe Firefly and Lensa AI now let you preview lighting scenarios before you touch a single light. You can input your product type, background color, and desired mood, and the AI will suggest a lighting angle, modifier type, and color temperature. This is especially useful for brands shooting large catalogs where trial-and-error is expensive.
AI-Assisted Retouching for Lighting Corrections
Tools like Luminar Neo's Relight AI and Adobe Lightroom's AI Masking can fix uneven lighting in post-production without reshooting. They intelligently separate the product from the background and allow independent lighting adjustments — brightening the front face of a product while keeping the background clean.
Common AI lighting corrections in post:
- Removing unwanted reflections on glossy surfaces
- Evening out inconsistent shadows across a catalog batch
- Simulating a different light direction after the fact (useful for A/B testing)
- Auto-white-balance correction matched to studio reference images
AI for Background & Lighting Replacement
Tools like Remove.bg, Photoroom, and Canva's AI background tools now go beyond background removal — they can re-light a product to match a new background's implied light source. For example, if you shoot a product on white but want it on a dark lifestyle background, AI can re-apply matching shadows and highlights automatically.
When AI Helps vs. When to Shoot It Right
AI tools are powerful but work best as a finishing layer, not a substitute for correct lighting on set. A well-lit original photo retouched with AI = professional result. A poorly lit photo corrected with AI = still a poorly lit photo with artifacts.
Rule of thumb: Get the lighting right in-camera first. Use AI to refine, not rescue.
Optimizing Lighting for Different Product Types
Getting the right light for product photography can completely transform how your products are perceived. Not all items respond to the same studio lighting setup, so tailoring your approach is key. Whether you’re shooting a silky dress, a sparkling ring, or a cozy throw pillow, understanding how to adjust your studio lighting will help you capture every detail and boost your product’s appeal.
Tailoring Your Approach: Fashion, Jewelry, Beauty, Home Goods, and More
Different products demand unique lighting strategies to highlight their best features. Here’s how to optimize light for product photography across the most common categories:
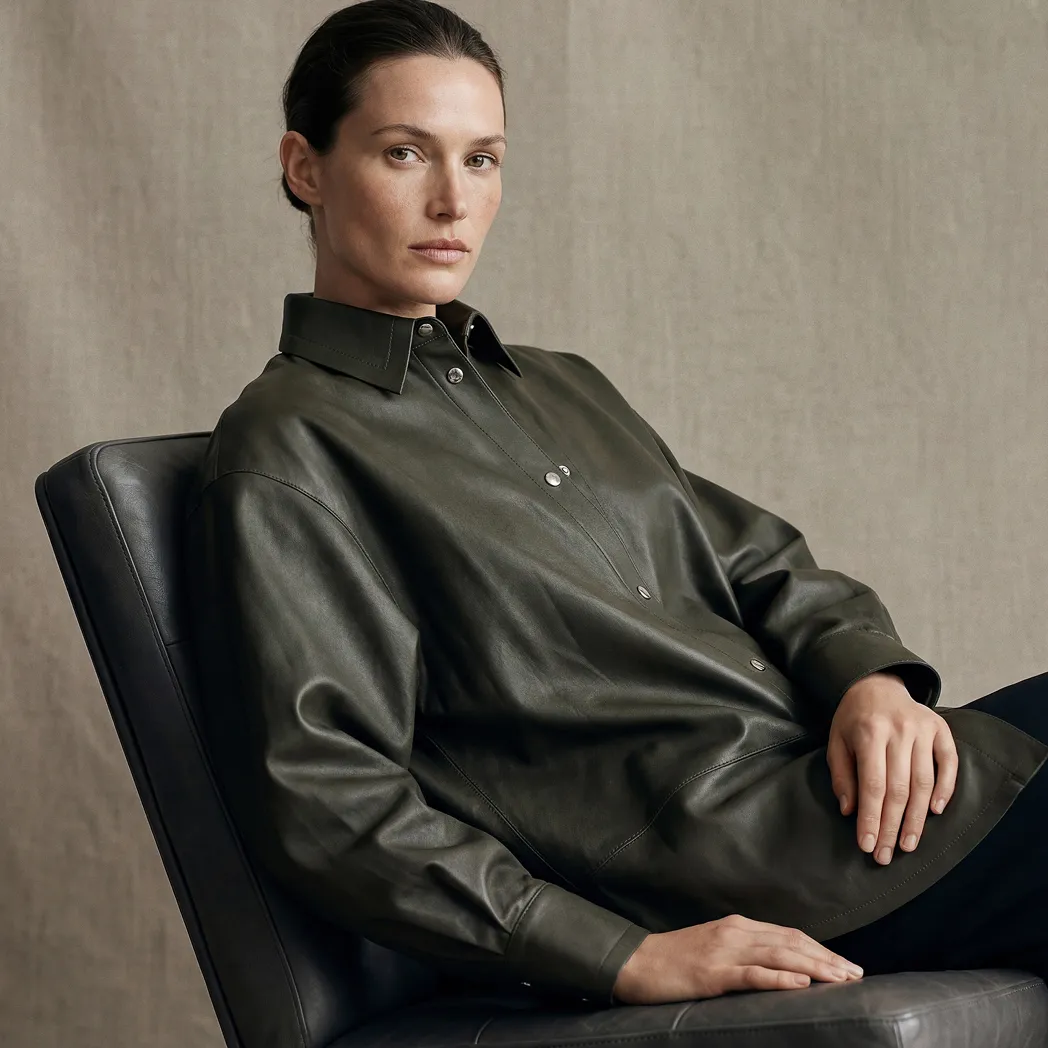
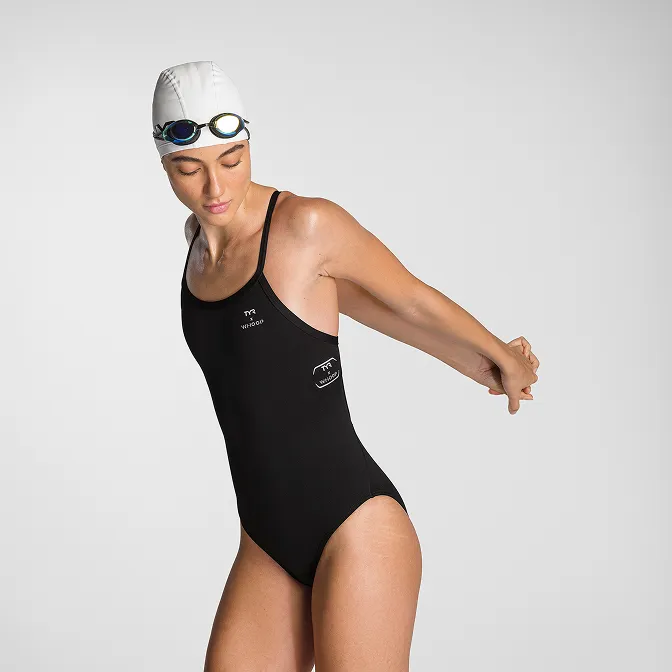
- Fashion. Use soft, even lighting, such as a large softbox, to minimize harsh shadows and accentuate fabric textures. Adding a gentle backlight can give depth to apparel, especially in model shots.
- Jewelry. Hard, focused light for product photography makes gemstones sparkle and metals shine. But, be careful with reflections—diffusers and precise angles are essential to avoid distracting glares.
- Beauty Products. Softboxes and diffusers are your best friends here. They deliver flawless, even skin tones and minimize glare on packaging. For a deeper dive into specialized lighting for beauty, check out these beauty product photography lighting tips.
- Home Goods. Combining natural and artificial light for product photography brings out true-to-life colors and textures in home decor. For more on this, see home goods product photography lighting.
- Electronics. Use light tents or controlled highlights to reduce reflections and showcase screens or features without distractions.
- Food & Beverage. Side or backlighting enhances appetizing textures and freshness, making dishes look irresistible.
Optimizing light for product photography by product type can increase perceived value and significantly reduce returns. When you match your lighting to your product, you help shoppers see every detail, building trust and driving sales.
Adapting to Shooting Environments: Studio vs. On-Location
Your environment plays a huge role in how you use light for product photography. In a studio, you have total control. Multiple lights, modifiers, and backdrops let you create consistent, high-quality images. Documenting your lighting setups and using light meters ensures repeatable results across shoots.
On-location shoots are a different beast. You might have to rely on available light or bring portable LED lights and collapsible reflectors. The challenge? Achieving consistency across locations. Packing a portable lighting kit and calibrating the color temperature are essential steps to maintain your brand’s look, regardless of where you’re shooting.
Here are a few strategies to keep your light for product photography on point, even outside the studio:
- Bring battery-powered lights for flexibility.
- Use color cards to match white balance across different locations.
- Leverage natural light but supplement with portable modifiers when needed.
- Keep a simple lighting diagram or notes for each shoot to reference later.
Flexibility is your superpower. By understanding how to adjust light for product photography to fit both your product and your environment, you’ll deliver professional results every time—whether you’re in a fully equipped studio or working with sunlight by a window.
Troubleshooting and Pro Tips for Flawless Product Lighting
Perfecting light for product photography isn’t just about fancy gear—it’s about understanding common pitfalls and knowing how to fix them. Even seasoned photographers encounter exposure mishaps, color issues, or stubborn shadows. Mastering troubleshooting ensures your product photos always look polished, professional, and ready to impress.
Common Lighting Mistakes and How to Fix Them
Mistakes in lighting for product photography can lead to disappointing results. Overexposure or underexposure is a frequent issue—fix this by adjusting your light intensity, tweaking camera settings, or using modifiers like diffusers and reflectors. Unwanted color casts often sneak in when light sources clash; always set a custom white balance and, if needed, use color-correcting gels to neutralize tints.
Distracting shadows or overly bright highlights? Reposition your lights, add a diffuser, or bring in a reflector to soften the effect. Inconsistent lighting from shoot to shoot is another challenge. The solution? Document your setup, mark light positions, and use a light meter for repeatability.
For accurate color, introduce a gray card at the start of each session. This ensures your product’s hues stay true, especially when you complete a guide to photo retouching in post-production software. Combining these fixes with solid technique transforms frustration into flawless images.
Expert Tips for Efficiency and Consistency
Efficiency is just as vital as creativity when mastering light for product photography. Start by batch shooting similar products — this not only saves time but keeps your lighting consistent across an entire collection. Recording lighting diagrams and camera settings for each setup makes it easy to replicate winning results in future shoots.
Wireless triggers and remote controls streamline your workflow, allowing you to adjust lights without leaving your camera. Investing in high-quality modifiers (like robust softboxes or durable reflectors) pays off in the long run, delivering reliable, repeatable light for product photography.
Remember, consistency isn’t just about aesthetics; it cuts down editing time and builds trust with your audience. According to industry data, brands that maintain consistent lighting and imagery tend to experience higher customer satisfaction and fewer product returns.
Staying Ahead: Lighting Trends and Innovations for 2025
To stay ahead of the curve in product photography, embrace the latest trends. Smart lighting systems now offer app-based controls and customizable presets, making it easier to adapt your setup on the fly. Eco-friendly, energy-efficient LEDs are not only better for the planet but also reduce studio heat and power costs.
Modular and portable lighting kits empower you to shoot anywhere, maintaining quality even on location. The biggest game-changer? Integration with AI-powered editing tools—these automatically apply optimal exposure and color adjustments, elevating your workflow.
Staying up to date with these innovations ensures your light for product photography remains both competitive and future-proof. Don’t be afraid to experiment, adopt new tech, and refine your process; your images (and your business) will thank you.
Now that you’ve got a solid grip on how lighting can completely transform your product shots, why not put your new knowledge to work? Whether you want to test out creative setups at home or need help nailing that perfect, brand-defining look, you don’t have to do it alone. If you’re ready to elevate your visuals and stand out in 2025, let’s make it happen together — start your project and see how professional lighting and expert guidance can bring your ideas to life.
Product A
SQUARE SHOT