


Close-up product photography is rapidly becoming a game-changer for brands, e-commerce, and creative professionals as we head into 2026. With online shopping booming and visual content driving sales, the demand for stunning, detail-rich images has never been higher.
Mastering close-up product photography brings its own challenges, from tricky lighting to capturing fine textures. Yet, those who excel see their product images stand out and convert more shoppers.
This guide will walk you through every step, from essential gear to expert post-production tips. Ready to elevate your product images to a professional level?
Understanding Close-Up Product Photography
In 2026, close-up product photography is redefining how brands connect with shoppers. These images are not just about looking sharp — they let customers experience products almost as if they're holding them in real life. With 75% of online shoppers relying on product images to make buying decisions, mastering this style has never been more important.
Defining Close-Up Product Photography
Close-up product photography captures items at a much closer range than standard product shots, filling the frame with fine details. Unlike macro photography, which often magnifies subjects to life-size or larger, close-up product photography focuses on revealing textures, branding, and features while keeping the product easily recognizable.
This approach is essential for e-commerce, branding, and marketing in 2026. When you want to showcase the shimmer of jewelry, the smoothness of electronics, or the intricacy of cosmetics packaging, close-up product photography does the job.
For a deeper dive into how this style fits into the broader world of product imagery, you can check out this product photography definition and basics resource.
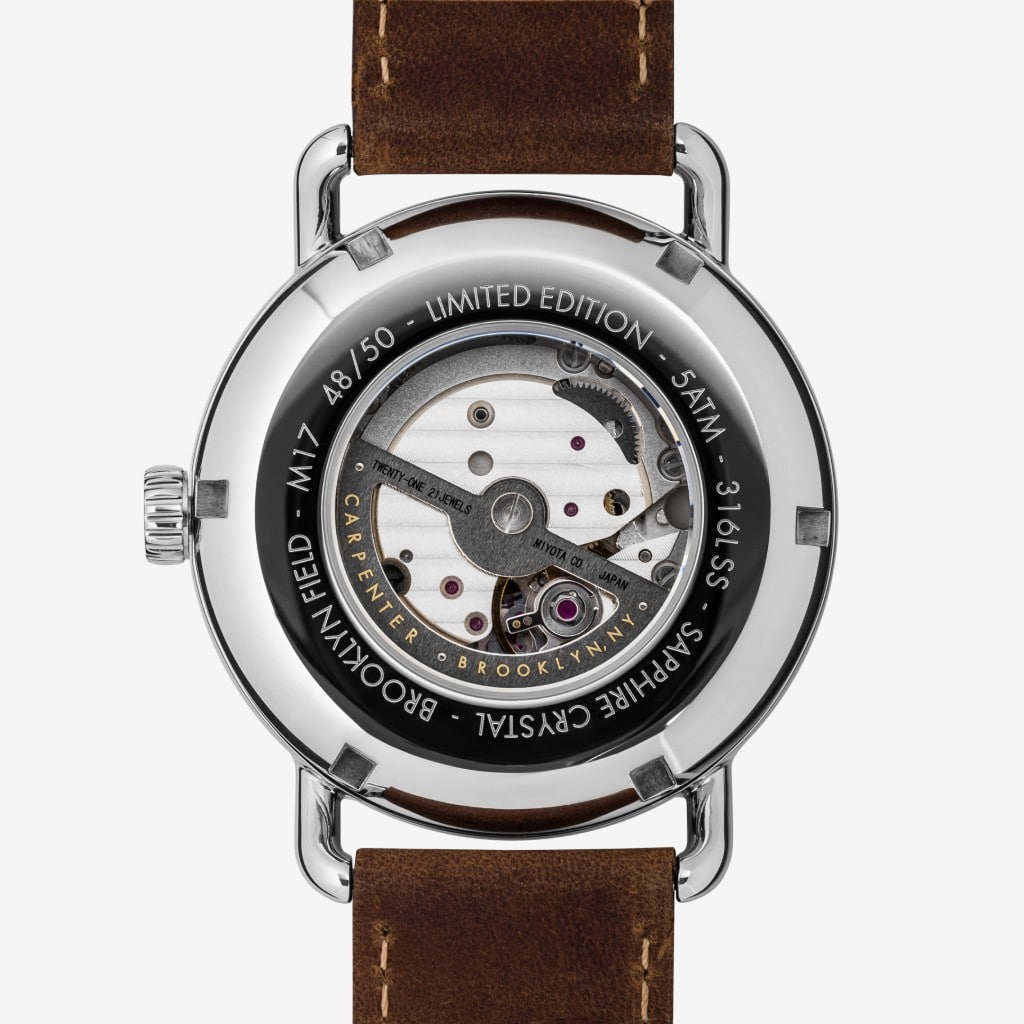
Whether it is the subtle weave of a luxury fabric or the precision of a watch dial, close-up product photography brings these details to the forefront, enticing shoppers to engage and buy.
Benefits and Applications
The benefits of close-up product photography reach far beyond aesthetics. Detailed imagery reveals a product's true craftsmanship and quality, giving customers confidence in their purchase.
Here are some ways brands use close-up product photography:
- Online catalogs to showcase unique features
- Social media campaigns that highlight texture and color
- Advertising materials for high-impact visuals
- Print brochures for luxury or detail-focused products
Detailed shots have been shown to improve conversion rates, as shoppers trust what they can clearly see. Trends in 2026 include immersive shopping experiences and visuals optimized for augmented reality, where close-up product photography is key.
Common Challenges and Solutions
Despite its advantages, close-up product photography comes with unique challenges. Focus can be tricky, especially with a shallow depths of field. Lighting must be controlled to avoid harsh reflections or unwanted shadows. Lens distortion can make products look unnatural.
Poor imagery can quickly harm brand perception, making products seem less desirable or even misleading. The solution lies in using the right gear, setting up controlled lighting, and applying careful post-processing.
Investing in quality equipment, such as macro lenses and stable tripods, helps capture sharp images. Soft, diffused lighting minimizes glare and brings out true color. Post-processing ensures every image is flawless, maintaining your brand’s reputation in a competitive market.
Essential Equipment for Close-Up Product Photography
Choosing the right equipment is the foundation of successful close-up product photography. With the right tools, you can capture every tiny detail, boost image quality, and create shots that genuinely stand out. Let’s break down exactly what you need to master this craft in 2026.
Cameras and Lenses
The camera and lens you choose play a huge role in the results you get from close-up product photography. In 2026, both DSLRs and mirrorless cameras offer excellent image quality, fast autofocus, and high resolution. Mirrorless models are increasingly popular thanks to their compact size and advanced focus features.
Smartphones have also come a long way. Many flagship phones now feature dedicated macro modes and high-resolution sensors, making them a solid choice for beginners or quick social media content.
When it comes to lenses, a dedicated macro lens is your best friend for close-up product photography. Macro lenses allow you to focus much closer than standard lenses, capturing intricate details with superb sharpness. For those on a budget, extension tubes or close-up filters can help you get closer to your subject without buying a new lens, though image quality may not match that of a true macro lens.
For more gear recommendations and comparisons, check out this Best equipment for product photography guide.
Tripods, Mounts, and Stabilization
Stability is everything in close-up product photography. Even the slightest movement can blur your images, especially when shooting at high magnifications. A sturdy tripod with an adjustable head gives you the control needed for precise framing.
Look for tripods with macro rails, which let you move your camera in tiny increments for perfect focus. Vibration reduction features are a bonus, especially when stacking multiple shots.
- Adjustable tripod heads for flexible angles
- Macro rails for fine-tuned focus
- Vibration reduction to minimize shake
Using a macro rail is especially helpful if you want to try focus stacking, a technique that combines several images at different focus points for maximum sharpness.
Lighting Equipment and Modifiers
Lighting can make or break your close-up product photography. Continuous LED panels are popular for their even, adjustable light output and cool temperatures. Strobes deliver powerful bursts of light, ideal for freezing motion or getting crisp shots.
Ring flashes are a staple for close-up work, wrapping light evenly around your subject and minimizing shadows. Light tents and softboxes diffuse light, reducing harsh reflections and revealing product details.
Softboxes and light tents are the go-to tools for achieving soft, natural-looking product shots. The goal is to avoid hard shadows and bring out the best in your products.
- Continuous LED lights for consistent artificial lighting
- Strobes for power and control
- Ring flashes for even, shadowless light
- Light tents and softboxes for diffusion
Backgrounds and Props
The background you choose can dramatically influence the mood and color of your close-up product photography. Seamless paper, acrylic sheets, and fabric backdrops are all popular choices. Custom backgrounds let you create branded or seasonal looks with ease.
A black background, for example, is perfect for dramatic shots, making jewelry pop in the frame. Acrylic and glass surfaces can add reflections, adding depth to your images.
- Seamless paper for clean, classic looks
- Acrylic for reflections and shine
- Fabric for texture and warmth
- Custom backgrounds for branding
Switching backgrounds is a simple way to adapt your photos for different campaigns or product lines.
Accessories and Tools
Small accessories can make a big difference in close-up product photography. Reflectors and diffusers help control light and fill in shadows. Clamps and stands keep products steady, especially if they’re lightweight or oddly shaped.
Remote triggers let you fire your camera without touching it, reducing the risk of blur. Cleaning tools like air blowers and microfiber cloths are essential for dust-free, flawless products.
For maximum sharpness across your images, focus stacking rails let you move your camera in tiny increments to capture every detail. These tools are especially valuable when shooting products with lots of depth or texture.
- Reflectors and diffusers for perfect lighting
- Clamps and stands for stability
- Remote triggers for shake-free shots
- Cleaning kits for spotless products
- Focus stacking rails for extended depth of field
With the right equipment, your close-up product photography will look truly professional and ready for any platform.
Setting Up Your Close-Up Product Photography Studio
Creating the perfect studio for close-up product photography is all about attention to detail, consistency, and control. With the right studio equipment, you’ll be ready to capture stunning, professional images that highlight every feature of your products.
Preparing Your Shooting Space
Start by designating a dedicated space for close-up product photography. A clutter-free area helps maintain consistency and keeps distractions at bay. Control ambient light with blackout curtains or foam boards, which allow you to shape the light exactly how you want it.
Arrange your table and gear so everything is within easy reach. A comfortable, organized environment not only speeds up your workflow but also helps you focus on capturing the best possible shots.
Lighting Setup Techniques
Artificial lighting is the backbone of close-up product photography. Begin by arranging your key, fill, and background lights for even illumination. Soft light, created with diffusion panels or a light tent, reveals product details and minimizes harsh shadows.
Experiment with both hard and soft light to see what flatters your product best. For step-by-step guidance, check out this Guide to lighting for product photography and give your setup a professional edge.
Positioning Products for Maximum Impact
How you position your product can make or break your shot. Angle products to showcase their most important features. Use props and stands to add stability and creativity to your presentation.
For a unique touch, try elevating smaller items on a piece of clear plexiglass. This technique allows light to pass underneath, creating eye-catching reflections and a floating effect that draws attention to product details.
Managing Reflections and Glare
Glossy or metallic products often reflect unwanted environmental elements. To tackle this, position your lights at angles that reduce glare, and use diffusers to soften reflections. Polarizing filters can also help minimize hotspots on shiny surfaces.
Competitors often use strategic light placement to avoid distracting glare, especially on glass bottles or electronics. Experiment with these techniques until you achieve a clean, professional look in every shot.
Background and Surface Selection
Your background should complement your product, not compete with it. Popular choices for close-up product photography include seamless paper, acrylic, or textured fabric. For dramatic shots, try a black backdrop to make colors and details pop.
Rotate backgrounds to match branding or seasonal campaigns. For example, switching from a white to a black surface can instantly change the mood and highlight different aspects of your product.
Workflow Optimization
Keep your studio efficient by organizing gear and prepping products ahead of time. Create a detailed shot list and checklist to ensure you capture all required angles and variations.
Tethered shooting lets you review images in real time, making it easy to spot issues and adjust your setup on the fly. This streamlined workflow ensures your close-up product photography sessions are productive and stress-free.
Mastering Lighting for Close-Up Product Photography
Lighting is the heartbeat of close-up product photography. If you want your product images to stand out in 2026, mastering lighting is non-negotiable. The right lighting setup can turn an ordinary product into a showstopper, revealing textures and details that catch every shopper’s eye.
Types of Lighting and Their Effects
Choosing the right lighting is one of the most important steps in close-up product photography. Light affects how texture, color, and fine details appear, which directly influences how a product is perceived online.
Natural light creates a soft, realistic look and can work well for simple setups. However, it is often unpredictable and difficult to control indoors, making consistency a challenge.
Continuous LED lights are a popular option for product photography. They provide steady, adjustable illumination, allowing product photographers to fine-tune highlights and shadows in real time. Diffusers or softboxes are often needed to keep the light from feeling too harsh.
Strobes and flashes offer powerful output and can freeze motion, but they require syncing and a steeper learning curve. Ring flashes, while compact and even, tend to flatten texture if overused.
For most close-up product photography, continuous LEDs paired with softboxes strike the best balance between control, consistency, and professional-looking results.
Creating Soft, Even Lighting
Soft, even lighting is essential for close-up product photography because it reduces harsh shadows and highlights product features. To achieve this, use diffusion materials like softboxes, light tents, or translucent panels.
Place your lights at a 45-degree angle to the product and add a diffuser between the light source and your subject. This technique wraps light around the product and reveals every detail. For very reflective items, a light tent creates even softness and minimizes glare. Experimenting with different diffusion methods lets you control the mood and clarity of your photos.
Creative Lighting Techniques
Beyond basic setups, creative lighting can set your close-up product photography apart. Try backlighting translucent products to make them glow. Use accent lights to highlight textures or colored gels to add mood and reinforce your brand identity.
Some creative techniques to try:
- Backlighting for glass or liquid products
- Accent side lights for texture
- Colored gels for mood and branding
- Rim lighting to separate the product from the background
Experimenting with these approaches can create dynamic, eye-catching results that help your products pop.
Managing Shadows and Highlights
Shadows and highlights can make or break close-up product photography. Too much contrast hides details, while flat lighting looks dull. Use a combination of fill lights and reflectors to manage shadows, especially in tight macro setups.
If highlights are blowing out, move your lights further away or add another layer of diffusion. Reflectors are perfect for softening shadows on one side of the product and balancing exposure. Small adjustments in light position and power can have a big impact on your final shot.
Advanced Lighting Tools and Accessories
To push your close-up product photography further, consider advanced tools like macro ring flashes, flexible LED arms, and lighting flags. Macro flashes are ideal for evenly lighting small subjects, while flexible arms let you position the light exactly where you need it.
Flags and gobos help shape light and prevent unwanted spill on your background. For more advanced setups and inspiration, check out guides like Macro Photography Techniques 2025, which offer expert insights on gear and technique.
Lighting for Different Product Types
Different products require different lighting approaches in close-up product photography. Jewelry and cosmetics need high diffusion to capture sparkle without glare. Electronics benefit from side lighting to show texture and shape.
For glass or bottles, try illuminating from below or behind to create an internal glow. Soft goods, like fabric, look best with broad, even light that reveals weave and color. Always test your setup and adjust for the unique needs of each product, ensuring every detail shines.
Shooting Techniques: Step-by-Step Guide
Mastering close-up product photography means nailing every detail, from prep to final review. This step-by-step guide will walk you through the process to ensure your product images are crisp, engaging, and ready to convert shoppers.
Step 1: Preparing the Product
Before you even touch the camera, ensure your product is spotless. Any dust, fingerprints, or smudges will be glaringly apparent in close-up product photography.
Wear lint-free gloves to avoid leaving marks. Use a soft brush or air blower to remove loose dust, especially on delicate items like jewelry or tech gadgets. For glass or metal surfaces, a microfiber cloth and a gentle cleaner work wonders.
Pay special attention to small crevices. Even a stray fiber can ruin an otherwise perfect shot. For intricate pieces like watches, take extra time to inspect every angle.
Want to make your prep even more effective? Check out these photoshoot accessories for better results to streamline your workflow and keep your products pristine.
Step 2: Composing the Shot
Strong composition makes your product stand out from the crowd. In close-up product photography, framing is everything.
Use the rule of thirds to position key features. Leading lines guide a viewer’s eye to the most important details, while negative space helps the product breathe. Play with different angles to highlight unique selling points.
For example, when shooting a luxury watch, zoom in on the face or logo to emphasize branding and craftsmanship. Don’t be afraid to experiment with off-center compositions for a modern look.
Take time to try both landscape and portrait orientations, depending on where your images will be used. Compose each shot with the intention to maximize impact.
Step 3: Camera Settings and Focus
Sharp focus and accurate exposure are critical in close-up product photography. Start by setting your aperture between f 8 and f 16 for optimal depth of field and sharpness.
Keep ISO as low as possible to avoid noise. Use a tripod to stabilize your camera and select a shutter speed that eliminates blur. Manual focus gives you more control at close distances, but autofocus with focus peaking or live view can help with precision.
Review each shot at 100% zoom to ensure details are crisp. Adjust white balance to match your lighting setup for true-to-life colors.
Experiment with different focus points to see what draws the most attention to your product’s features.
Step 4: Managing Depth of Field
Close-up product photography often means working with a very shallow depth of field. This can make it tricky to keep the whole product sharp.
Stop down your aperture (higher f-number) to increase the area in focus. For products with lots of depth, try focus stacking: take multiple shots with different focus points and blend them in post-production.
An example is photographing a row of colored pencils. By focus stacking, every pencil tip stays sharp and vibrant. This technique is especially valuable for products with texture or intricate details.
Remember, a blurred background can help isolate the product, but too much blur may hide important features. Balance creativity with clarity.
Step 5: Shooting Multiple Angles and Variations
Variety is key when capturing products. In close-up product photography, aim to cover every angle and detail.
Start with a hero shot that showcases the product’s main feature. Then, shoot side, back, and close-up detail shots to give customers a 360-degree view. Include scale shots if size might be unclear.


Consistency is crucial, especially for e-commerce catalogs. Use the same lighting and background for each shot in a series. This makes your brand look polished and professional.
Don’t forget to create supporting images that highlight unique textures, finishes, or functions.
Step 6: Reviewing and Refining Shots
After each round of shooting, review your images on a large screen. Tethered shooting lets you see results instantly and make real-time adjustments.
Check for dust, reflections, or focus issues before moving on. Adjust lighting or composition as needed to fix any flaws. Build a checklist for each product to ensure all required shots are captured.
Get a second opinion from a colleague or client to catch anything you might have missed. This review step helps maintain quality and consistency across your portfolio.
Step 7: Troubleshooting Common Issues
Even with careful planning, challenges pop up in close-up product photos. Common problems include blurry images from camera shake, exposure imbalances, and color inaccuracies.
Use a sturdy tripod and remote trigger to minimize vibration. Watch for overexposed highlights or deep shadows and adjust your lighting accordingly. Set a custom white balance for accurate colors.
If you spot recurring issues, review your workflow and gear. Accessories like reflectors, diffusers, and macro rails can solve many technical challenges. Stay patient, refine your process, and you’ll see steady improvement.
Post-Processing and Retouching Close-Up Product Photos
Bringing your close-up product photography to life starts with careful post-processing. Editing is where images transform from good to great, revealing every detail and ensuring your products stand out in a crowded market.
Essential Editing Steps
For close-up product photography, the editing process begins with the basics. Start by cropping and straightening your images for a clean composition. Adjust exposure, contrast, and white balance to match the product’s true appearance.
Use retouching tools to remove dust, scratches, or tiny imperfections that the camera may have picked up. This attention to detail matters, since studies show that over 75% of online shoppers rely on product images when making a purchase, according to Product Photography Statistics 2025.
Advanced Photo Editing Techniques
Taking close-up product photos to the next level means mastering advanced retouching. Focus stacking is a powerful method for increasing depth of field, especially when shooting tiny items like jewelry or electronics.
Use cloning and healing tools to ensure seamless backgrounds and remove any distracting marks or blemishes. Enhance textures and details, but avoid over-processing, which can make your product look unrealistic. AI-powered editing tools are emerging in the field, and as discussed in AI in E-commerce Photography, they offer automated solutions for retouching and consistency.
Ensuring Consistency Across Images
Consistency is key in close-up product photography, especially for catalogs or e-commerce platforms. Create editing presets to apply the same look and feel across your entire batch of images. Batch editing saves time and keeps your brand visuals unified.
Use color calibration cards and reference images to maintain color accuracy, which is vital for customer trust. Consistent editing helps your products look professional and reliable, contributing to a cohesive brand experience.
Output Formats and Optimization
Choosing the right output formats is crucial for close-up product photography. Export images in high resolution for print and optimized sizes for web to keep loading times fast. Balance file size and image quality to keep your product photos sharp and detailed without slowing your site.
Follow platform-specific guidelines for Amazon, Shopify, or social media to ensure your images display correctly everywhere they appear. Proper optimization helps your products stand out and keeps your online shop running smoothly.
Quality Control and Final Checks
Before delivering your close-up product photography, always perform a detailed quality check. Review each image at 100% zoom to spot any missed flaws or artifacts. Use a checklist to confirm that all edits are consistent, colors are accurate, and images meet your client’s requirements.
Gather feedback from team members or clients for a final review. This last step ensures your work meets professional standards and your product images are ready to impress.
Expert Tips, Trends, and Future-Proofing Your Workflow
Staying relevant in close-up product photography means more than just mastering your camera. The landscape is evolving rapidly, with new tools and trends shaping every shoot. If you want your images to stand out in 2026, you need to embrace innovation, efficiency, and ethical practices. Let’s dive into what it takes to future-proof your workflow and stay ahead of the curve.
Staying Ahead with 2026 Trends
The world of close-up product photography is transforming with the rise of AI-powered editing, automated batch processing, and smart camera features. Studios are integrating 3D modeling and AR-ready imagery to deliver immersive shopping experiences for customers.
E-commerce platforms now demand higher resolution, transparent backgrounds, and interactive visuals. According to E-commerce Product Photography Market Growth, the market is expanding as brands invest in richer, more detailed product shots. Adapting to these trends ensures your close-up product photography remains competitive in 2026.
Creative Inspiration from Industry Leaders
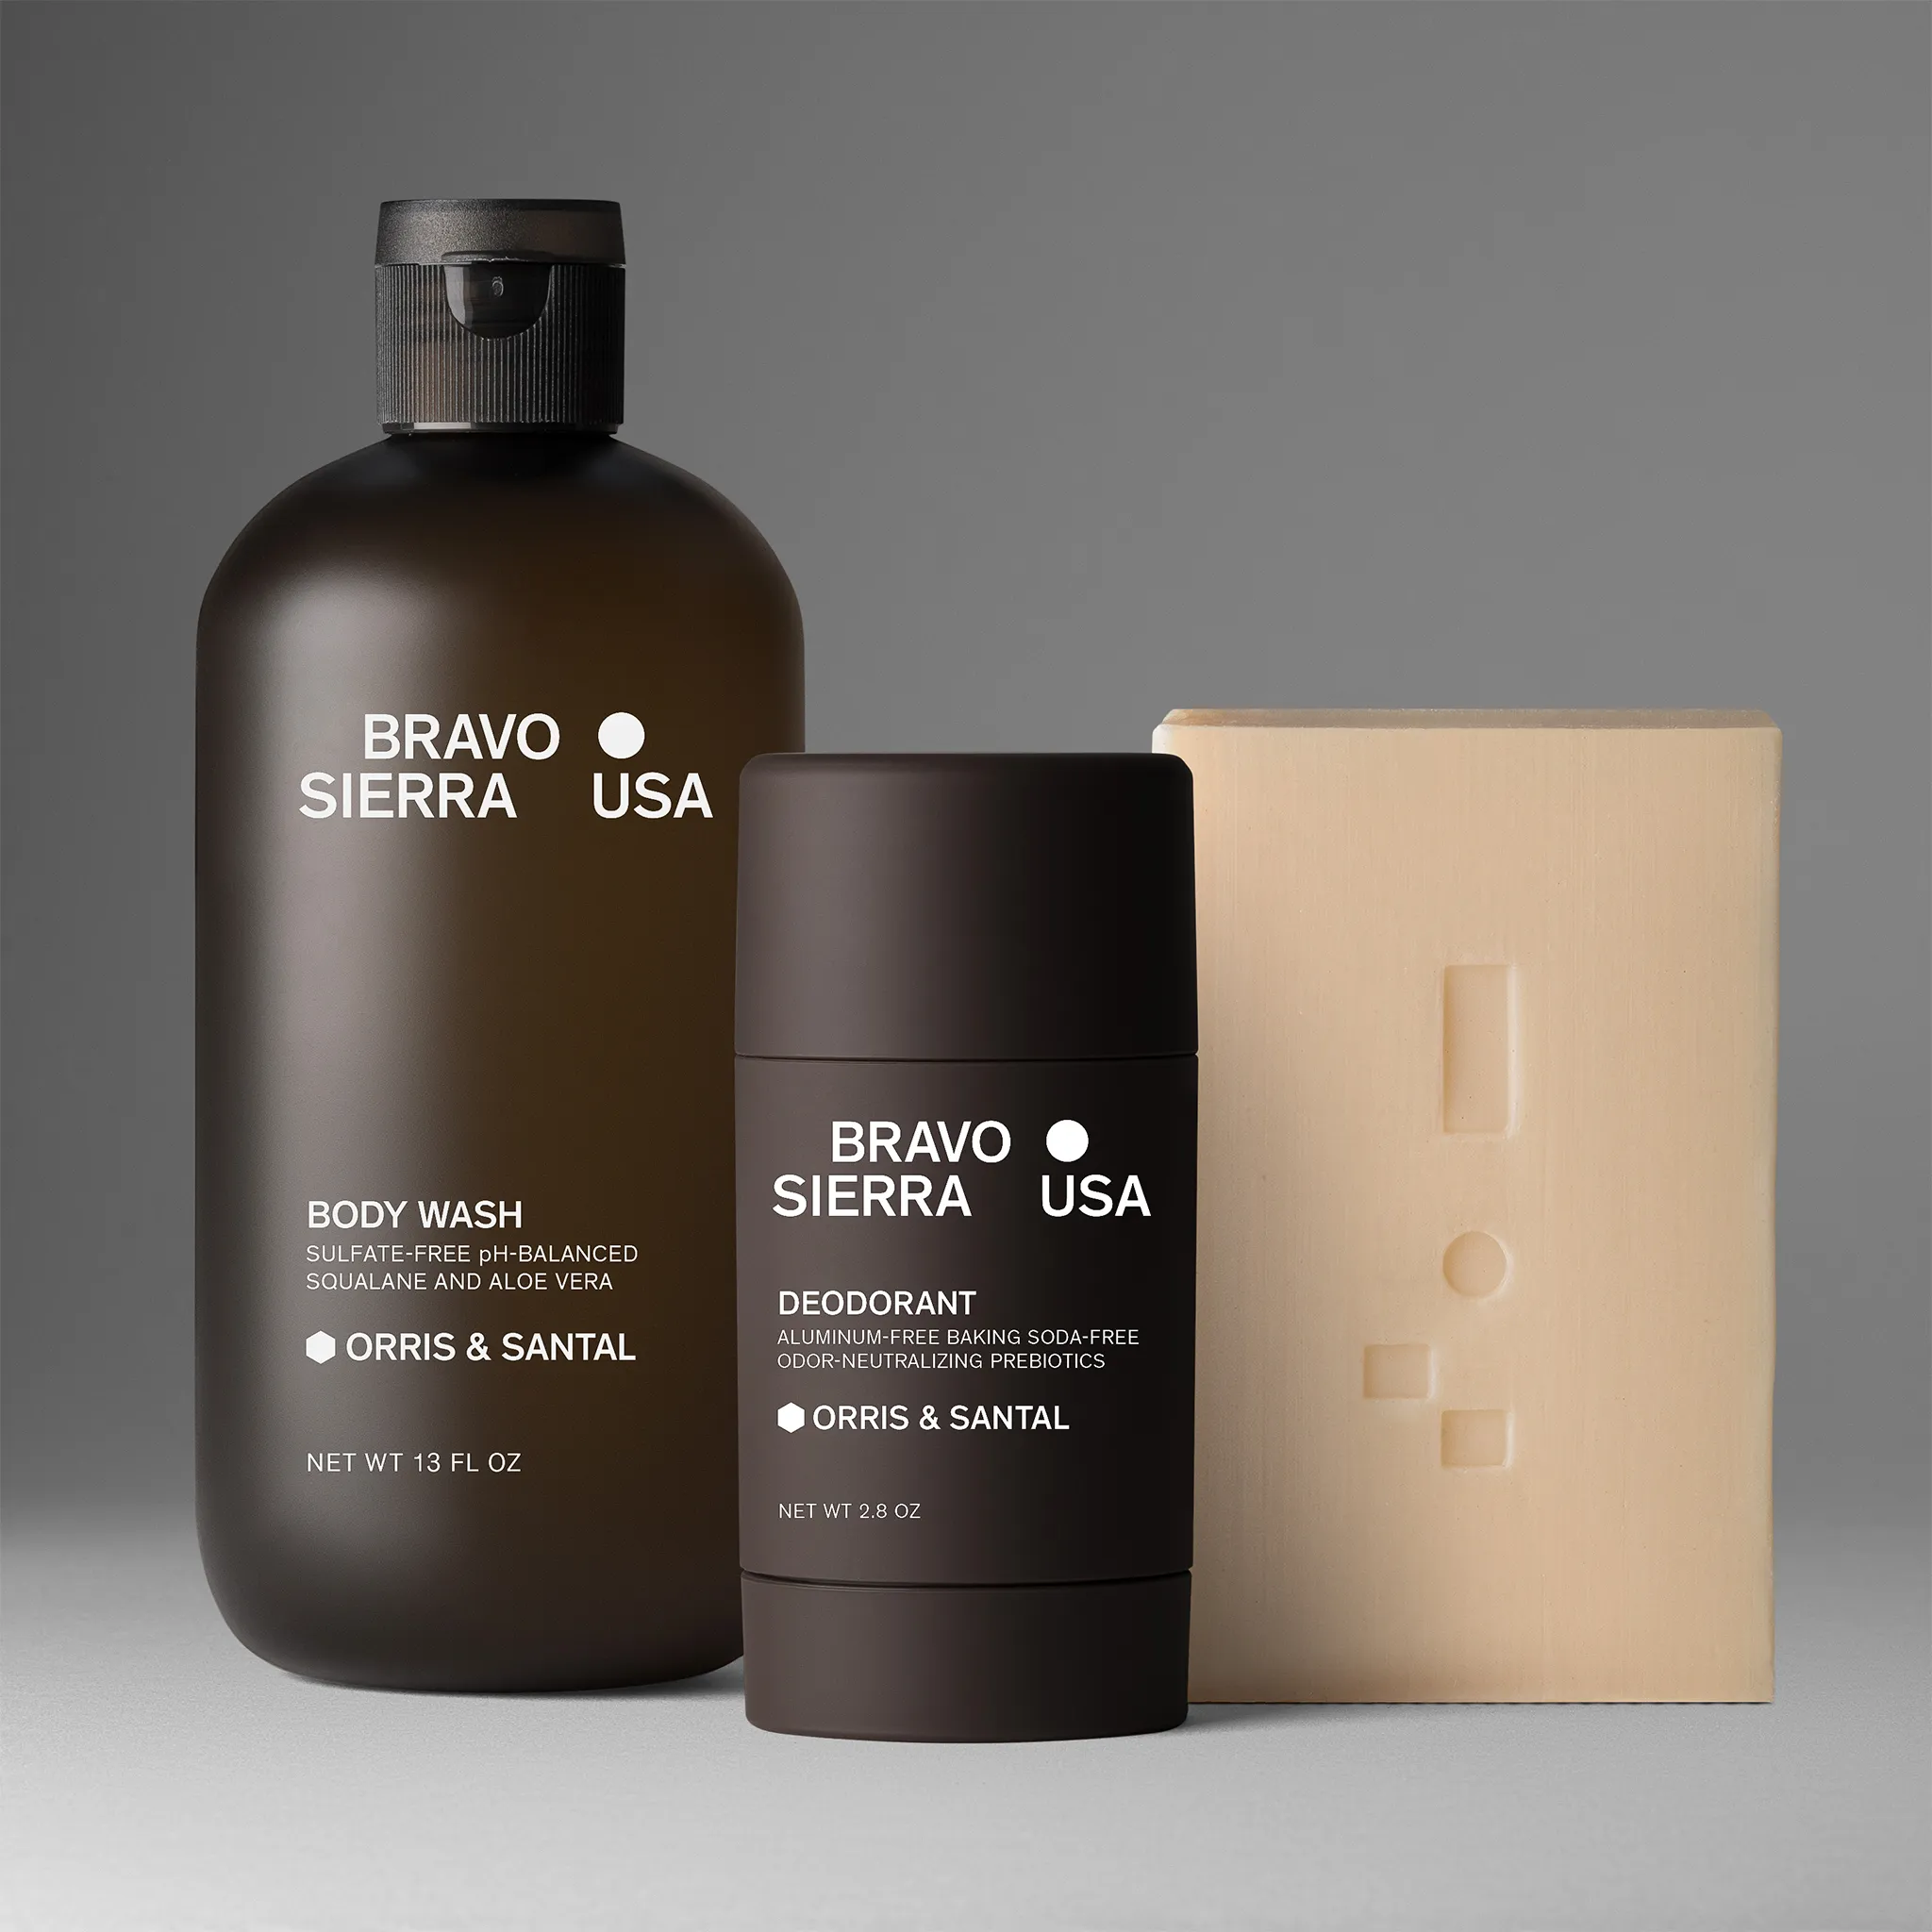
Looking for inspiration? Beauty brands are leading the way with extreme close-up product photography, capturing every shimmer and texture. Social media campaigns often feature macro shots of cosmetics, electronics, and accessories, drawing viewers in with vibrant detail.
Explore case studies from top e-commerce brands that use close-up product photography to highlight craftsmanship. Analyze successful visuals to spark new ideas for your own shoots.
Efficiency and Scalability for Growing Brands
As your product line grows, efficiency becomes essential. Build repeatable workflows using checklists, templates, and batch editing tools. Decide whether to keep close-up product photography in-house or outsource to specialized studios.
Quick turnaround is crucial for fast-moving markets. Set up a scalable system so you can deliver consistent, high-quality images for catalogs and online stores without delays.
Sustainability and Ethical Considerations
Modern close-up product photography goes hand in hand with sustainability. Choose eco-friendly backdrops, reusable props, and energy-efficient lighting for your studio. Responsible editing is key, too — represent products honestly to build trust with your audience.
Many brands now highlight their ethical approach in marketing, showing consumers that great images can also be responsible and transparent.
Resources for Continued Learning
The journey never stops. Stay sharp by reading the latest books on close-up product photography, enrolling in specialized online courses, and joining photography communities. Follow leading product photographers and studios to keep up with emerging techniques.
Continuous learning ensures your skills remain fresh, your workflow stays modern, and your close-up product photos stand out in every campaign.
Now that you’ve seen how close-up product photography can transform your brand’s image and drive real results, why not take the next step and put these insights into practice with expert support? Whether you’re looking to elevate your e-commerce catalog or create stunning visuals for your next campaign, Squareshot’s experienced team is here to help you stand out with high-quality product imagery and fast turnaround.
If you’re ready to showcase your products at their best in 2026, let’s bring your vision to life together.

Product A
SQUARE SHOT
-min.jpg)


