Flat lay photography is one of the most searched visual formats in e-commerce — and one of the most misunderstood. Done right, it's not just a clean overhead shot. It's a deliberate setup where surface, light, angle, and composition work together to build the kind of product trust that converts browsers into buyers.
This guide goes beyond generic advice. Each of the 10 setups below is drawn from real shoots completed across Squareshot's studios — for brands in clothing, beauty, jewelry, and accessories. For every setup, you'll see exactly what the goal is, when to use it, and what makes it work.
What is Flat Lay Photography?
FLAT LAY PHOTOGRAPHY IS A TYPE OF COMMERCIAL PRODUCT PHOTOGRAPHY WHEREBY OBJECTS OF THE PHOTO SESSION ARE PLACED ON THE HORIZONTAL SURFACE, LIKE A TABLE OR A FLOOR, AND SHOT FROM ABOVE. THESE IMAGES ARE MOSTLY EXECUTED IN STUDIOS WITH PROFESSIONAL LIGHTING AND SPECIFIC FLAT LAY PHOTOGRAPHY SETUP.

This method is widely used in social media visual content plans, in the creation of food photography, jewelry, fashion, and cosmetics images.
All smaller objects are subject to this type of commercial photoshoot sooner or later.
When it comes to alternative methods of item positioning, professionals also distinguish the ghost mannequin, hanged/pinned, and on-model techniques. Let's quickly run through them, so that we can better understand the characteristics of the flat lay images.
Flat-Lay Photography That Sells: 10 Studio Tips from NY Pros
1. Camera & Tether Setup
Most of the professional product photography studios will operate a flat photography shoot when their camera is tethered to a computer so that they can see the images on a bigger screen right away.
A tether cord needs to have the respective connections that fit both your computer and your camera settings on opposite ends. There are software programs that enable this mode of shooting. For example, Lightroom has this feature for those who are not looking to master yet another software product.

Why shoot tethered?
- To have a better understanding of the quality of the image right away on a bigger screen, and introduce the required changes.
- To show the images to any people on the site with you – client model, colleagues, MUA, etc.
- To speed up processing and uploading.
But what's most important in this type of shooting is arranging the flat lay photography setup.
There are a few ways to approach this mission; the most common ones will include a sturdy, heavy-duty C stand with a sandbag for stability and a combo of a tripod and an arm like Manfrotto 131DB, which can also be stabilized with sandbags if needed. For a full list of equipment, see Tip 3.
In practice: A clothing brand shooting 200+ SKUs per day uses tethered shooting to catch composition issues instantly — a collar out of place, uneven sleeve spacing — before moving to the next piece. Without tethering, those mistakes are only caught in post, triggering costly reshoots. At this volume, catching one error early saves hours downstream.
When to use it: Any catalog shoot with 20+ SKUs where consistency across the set matters. Essential if a creative director or client is reviewing shots on-set.
2. Lighting & Color Accuracy
You can use a natural light source or professional photo studio equipment. The main mission is to have your product well-lit so that every detail is available for inspection.
Well-lit objects will also require minimal photo editing in the post-editing stage, which can be expensive and time-consuming.
If you choose to shoot with natural light, these insights may help:
- Use chiffon or cloth taped to the window to soften the light on a sunny day.
- Use reflector cards to soften or minimize sharp shadows.
- If a professional softbox is available, placing it at an angle may produce a nice effect, whereby light is dispersed in a graduated manner.
.jpg)
If a client provides a reference image, try to set up your lighting to replicate that. Resulting exposition is vital when setting up flat-lay product photography lighting. To ensure the image is not overexposed or underexposed, it's good to make 2 test images.
The first image of the darkest item in the series needs to be taken with a color passport showing a grey card, and the second test image is for the lightest item with a color passport showing a spread with a color bar. This way, you may achieve better results at the very beginning, so there is no need to reshoot afterwards.
In practice: A cosmetics brand shooting lip products found that their blush tones were consistently reading warmer in photos than in real life — causing a spike in returns with customers citing "color not as shown." Switching to a calibrated daylight-balanced setup (5600K) with a color passport reference card eliminated the mismatch and reduced return complaints by a measurable margin.
When to use it: Any product where color accuracy is a purchase decision — cosmetics, apparel, paint, fabric, candles. Always shoot a color passport test frame before the main session.
3. Essential Flat Lay Equipment
This is a good starter pack of equipment for professional flat lay product photography, but you can indeed find cheaper as well as more expensive alternatives, even available for beginners.

- Flat lay table ~ $500
- Godox DP400II Flash Head ~ $220
- Canon EOS Rebel T7i DSLR Camera with 18-55mm Lens and Accessory Kit ~ $600
- Vello EW-73D Dedicated Lens Hood ~ $10
- Canon ACK-E10 AC Adapter and DC Coupler Kit ~ $95
- Godox XProC TTL Wireless Flash Trigger ~ $70
- Impact Super Clamp with Ratchet Handle ~ $25
- Oben BA-126A Single Lever Ball Head ~ $104
- Impact ME-122P Single Background Holder Hooks for Super Clamps (2-Pack) ~ $16
- Impact Varidrive with Black Chain ~ $225
- Avenger E250 Long Double 5/8" Baby Pin ~ $11
- Belkin Thunderbolt 3 USB Type-C Male Cable ~ $34
- Savage Widetone Seamless Background Paper (#01 Super White, 86" x 36') ~ $68
In practice: A small accessories brand starting out shot their first 50 SKUs with a Canon Rebel T7i, a single Godox flash, and a $68 white seamless background paper roll. The result was clean enough for Shopify and Etsy listings that outperformed competitors using phone photos — not because the gear was exceptional, but because the setup was consistent and properly lit. You don't need a $10k rig to outperform phone photography. You need the right starter kit used correctly.
When to use it: Early-stage brands self-shooting. Budget around $1,000–1,500 for a functional starter setup that produces marketplace-ready images.
4. Product Prep Tips
Just a kind reminder for all the talents just starting and doing your first DIY flat lay product photography clothing session: the speckless item means less time-consuming retouching.
If you are hiring a studio, in most cases, your items will be brought to a near-perfect state before shooting with a microfiber cloth, lint roller, or compressed gas duster. Needless to say, the clothes will be freshly-ironed and creaseless (if that's the look you are going for), while jewelry pieces will be handled in gloves to avoid fingerprints.
In practice: A knitwear brand that ships products directly to the studio for flat lay shoots learned quickly that un-pressed garments added 15–20 minutes of retouching per image — across a 100-piece catalog, that's 25+ extra hours of post-production time. Now they ship everything pre-steamed in wardrobe bags. Total cost: a $60 garment steamer. Time saved: significant.
When to use it: All flat lay shoots. For clothing — steam everything. For jewelry — use cotton gloves during handling. For cosmetics — wipe surfaces before shooting. Cleanliness at the source is always cheaper than retouching.
5. Choosing the Right Angle
When it comes to positioning your items for a shoot, whose results will be served on one of those big platforms like Amazon and Shopify, you need 3 to 5 angles on a white background to start with, and assortment can go up to 10 for premium items or one-product landing pages.
Below are the examples of the angles we recommend to our clients with images for better illustration:
- Front (full-sized)
- Back (full-sized)
- ¾ camera angle (accentuating a collar & brand tag)
- Shot of a detail or texture
.jpg)
If you choose to go for an angle other than 90 degrees, it’s good to double-check how your flat lay clothing photography setup aligns with the concept. What are you getting in terms of a flat lay background? Do you have some glaring or flash reflecting (with a diffuser) in a different way? Is the lighting OK, or do you need to adjust it for a 3/4th angled shot?
In practice: A premium streetwear brand listing on Amazon found that adding a ¾ angle shot (accentuating collar and brand tag) and a close-up texture shot to their standard front/back pair reduced customer questions about material by 40%. Shoppers who could see the garment's construction detail from multiple angles needed fewer reassurances before purchasing.
When to use it: Any apparel listing on Amazon or Shopify where material quality is part of the value proposition. Minimum 3 angles for basics; 5–8 for premium or hero products.
6. Symmetry Matters
When we work in our flat lay photography studio in New York, we always pay extra attention to the positioning of all of the symmetrically designed objects. We can even use a ruler to ensure the distance from the right edge of the photographed garment is the same as the opposite distance on the left.
Also, a great example of symmetry is the rule of thirds. It is a compositional guideline in photography that involves dividing the image into nine equal parts by using two equally spaced horizontal lines and two equally spaced vertical lines. By placing the subject of the photograph along these lines or at their intersections, the composition becomes more balanced and visually appealing. This technique leads to more dynamic and interesting photos.
Not only do these points reduce post-production time, but they also provide the overall feeling of harmony and balance, the absence of which may subconsciously scare a perfectionist away without even realizing the reason for the urge to bounce.
In practice: A jewelry accessories brand noticed their flat lay grid shots were performing poorly on Pinterest compared to competitors. After auditing top-performing pins in their category, they found that consistent symmetry — identical spacing, centered hero product, balanced props — drove significantly more saves and click-throughs than asymmetric arrangements. They introduced a ruler check into their studio workflow and rebuilt their top 30 hero images with tighter grid alignment. Pinterest saves increased noticeably within 60 days.
When to use it: Any flat lay intended for social media grids, Pinterest, or editorial use where multiple images appear side by side. Symmetry is especially critical for gift sets, product bundles, and accessory collections.
7. Shadow Control
Flat lay e-commerce photography standards are somewhat strict on global marketplaces, but if you are shooting for a personal website, there can be different shadow requirements in the technical specification:
To ensure a drop shadow, go for side lighting. However, be mindful that in contrast to a top light, the side light will accentuate all creases and imperfections, giving them more volume and creating additional shadows. Alternatively, if you have a good retouching specialist/team, you may shoot your products with a top light and then add shadows digitally.
Often, we'll get requests for a creaseless styling and look of the items, but a hard shadow that's usually achieved with a side light. In such cases, we'll shoot two different images instead of one. The first one has a top light to create the desired look of the apparel. The second to create a realistic shadow. Once both images are ready, they will be combined to deliver on the creative preference.
In practice: A leather goods brand shooting wallets and cardholders wanted the visual weight of a natural drop shadow — but their products were full of fine stitching details that harsh side-lighting would exaggerate unfavorably. The solution: shoot two separate frames — one with top light for a clean, creaseless look, one with side light to capture the shadow direction — and composite them in post. The final image had the depth of a side-lit product with the clean finish of a top-lit one. Clients frequently ask how it was achieved.
When to use it: Premium leather goods, folded garments, packaged cosmetics — any product where you want shadow for visual depth but can't afford to let that shadow reveal surface imperfections.
8. Check Your Horizon
It’s the best practice in flat lay product photography to keep an object and a camera in a plane.
The other pro trick that helps to ensure a perfect shot is always to use a level to make sure the table for shooting and the camera are both 95% in a horizontal position. Naturally, if you have a tripod with a level, this is the best model for this type of job.
In practice: A home goods brand shooting ceramic tableware found that even a 1–2° camera tilt created a visual imbalance across their product grid — images that looked fine individually appeared misaligned when displayed together on a PDP. Adding a level check to their pre-shoot setup routine added 2 minutes per camera position and eliminated the issue entirely, removing a recurring post-production correction step.
When to use it: Every flat lay shoot, without exception. Use a bubble level on the flat lay table and on the camera arm. If shooting tethered, verify against a grid overlay in Lightroom. Never skip this step for catalog shoots where grid consistency matters.
9. Technical Standards
These are some of the fundamental technical standards to keep in mind when shooting flat images for your e-commerce projects.
- The image needs to be in focus, sharp, and not blurred under 100% increase.
- The background behind an object is as white as it gets.
- The image is neither overexposed nor underexposed.
- The image takes over 80% of the frame.
- The shadow of the product is not cut off.
- If the product has shiny text or any other shiny parts, it should be visible.
In practice: An apparel seller had a batch of 40 images rejected by Amazon because the product didn't fill at least 80% of the frame — a standard requirement they weren't aware of. The reshoot cost more than the original shoot. A simple pre-upload checklist — sharp at 100% zoom, background pure white, product fills 80%+ of frame, no shadow cut-off — would have caught all 40 before submission.
When to use it: Every image destined for Amazon, Walmart Marketplace, or any platform with strict image compliance rules. Run the checklist before delivery, not after upload rejection.
10. Aesthetic Guidelines
As for the aesthetics, there can be quite a bit of creativity in the flat lay pictures, but if you are on a mission to create photography for e-commerce to cause visual interest, these are our recommendations to be aware of:
- Match the shooting angles to those specified in the client order form or reference images.
- Keep the proper perspective. Use the appropriate camera lens and focal distance from 35 to 90mm.
- Maintain the right composition of the frame and proper framing.
- Avoid unnecessary reflections or saturation, such as those found in a photographer's or studio's environment.
- Reflect the actual color of the product in the image.
In practice: A sustainable skincare brand wanted their flat lays to feel editorial — not just compliant. By introducing a rule-of-thirds grid into their composition and deliberately placing their hero product at an intersection point (rather than dead center), surrounding it with supporting props at varying distances, their images started performing significantly better in paid social ads — higher thumb-stop rate, more saves, lower cost-per-click — compared to their previous centered, symmetrical catalog approach. The technical specs didn't change. The composition did.
When to use it: Brand site hero sections, social ads, editorial features, PR pitches, and lookbooks — anywhere the image needs to feel intentional and brand-forward rather than purely functional.
Once your flat lay is styled and captured, it’s time to polish it in post-production.
Retouching Steps That Make the Flat Lay Pop
Even with a well-planned shoot setup (see Tip 7), shadows sometimes need fine-tuning in post-production. Here’s how we do it at Squareshot.
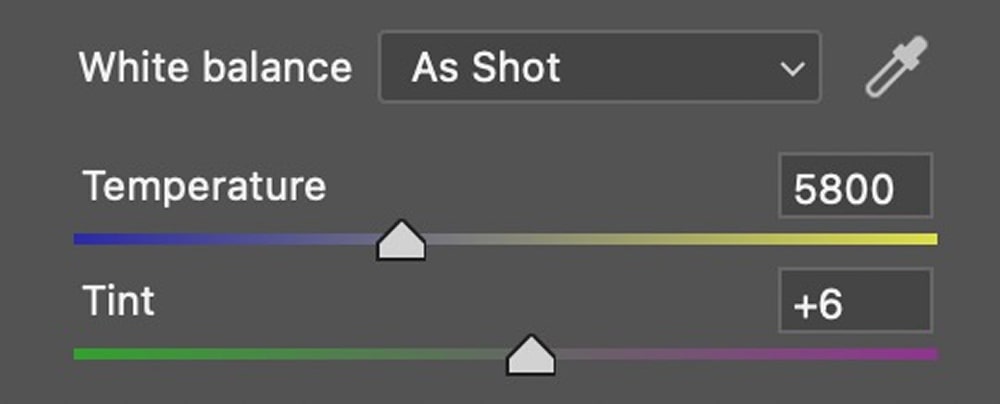
Color Correction
Adjust the white balance and tweak tones to ensure the background is neutral and product colors are accurate — essential for e-commerce where color misrepresentation can lead to returns.
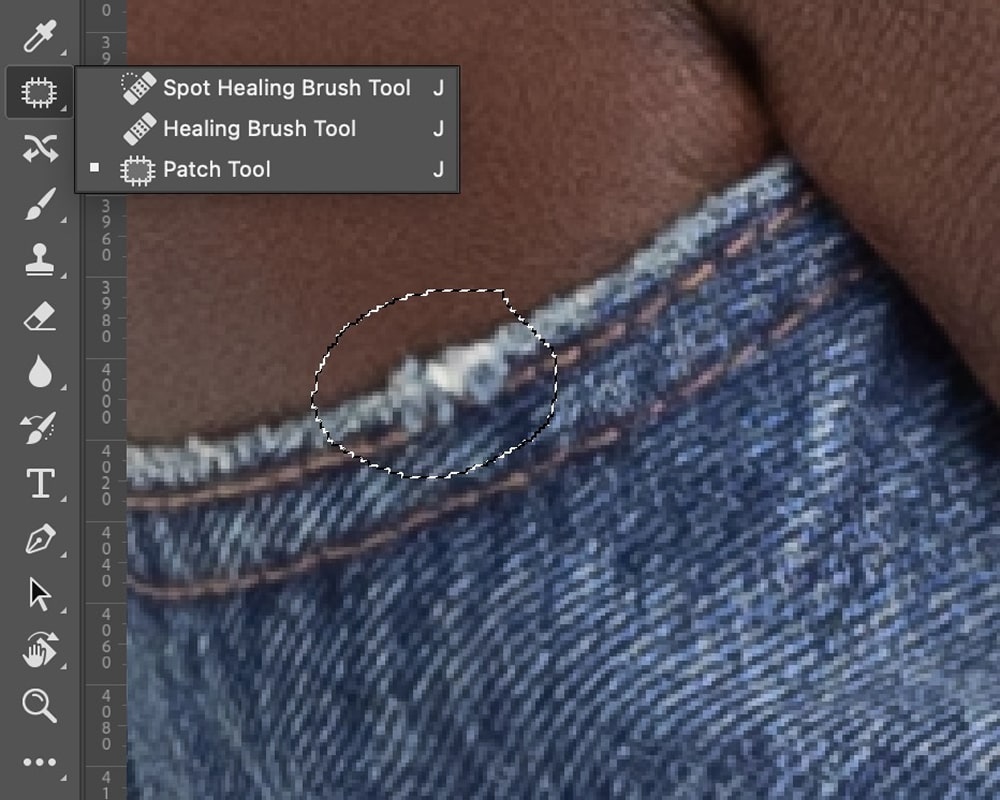
Dust & Scratch Removal
Even in a spotless studio, lint or tiny marks can sneak in. Zoom in and clean up the surface and product with spot healing or cloning tools.
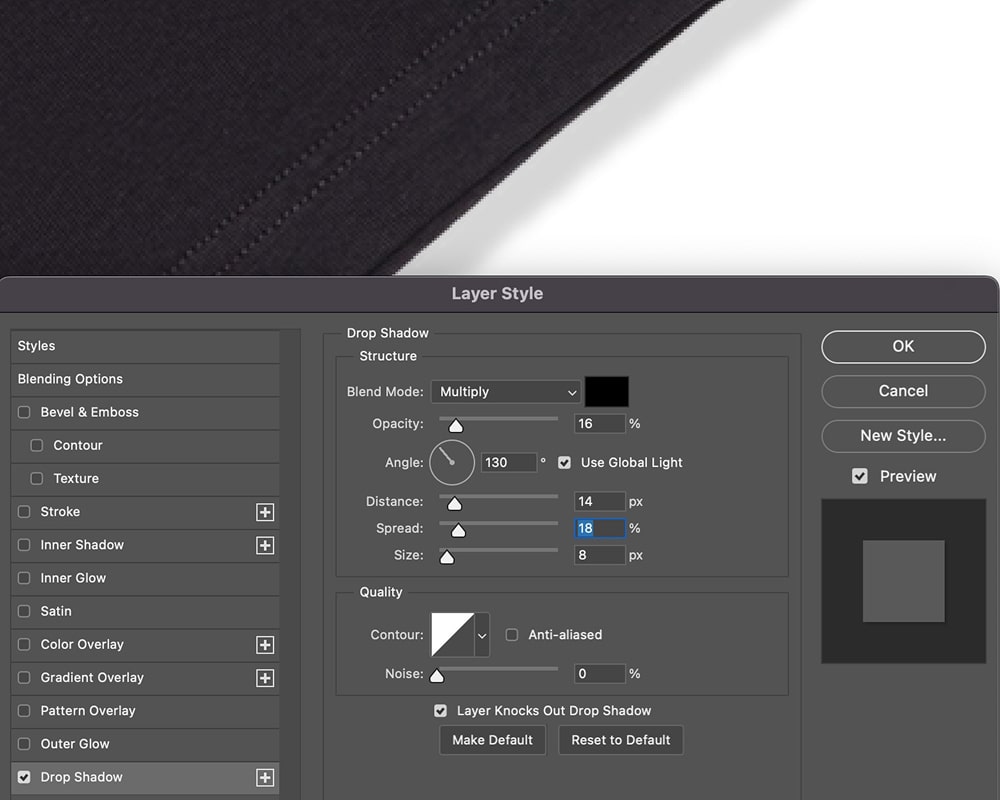
Shadow Control
Too harsh? Soften them. Too flat? Add a custom cast shadow to give the layout depth while keeping it consistent with the original light source.
Composition Refinement
Straighten, crop, and nudge elements if needed to perfect alignment and symmetry—especially when working with grids, diagonals, or negative space.
When these steps are applied with care, the result is a crisp, clean, and conversion-ready flat lay that stands out on any platform.
Flat Lay Photography Pricing
While clothing flatlay photos are no rocket science, the resulting images can make or break your sales.
If your small business and its sales have a few zeros to them, consider hiring a professional photo studio to perform such jobs. Not only may it cost you less at the end of the day, but the results are also likely to bring better sales and allow your team to focus on building out the brand.
When it comes to the rates for the flat lay photos, they range across the poster board and will depend on these factors, among many:
- Bulk vs single product shot
- Individual vs group shot
- Delivery & postage charges
- Location: country/state/city
- Level of professionalism & expertise
With over 50,000 images shot for more than 2,500 brands — including Rhude, Whoop, and Knickerbocker — Squareshot brings proven flat lay expertise to every project. Our ecommerce photography pricing starts at $50 per image, with memberships available for brands that shoot regularly.
Key Takeaways
To help you create standout flat lay images that drive sales, keep these essential shoot tips in mind throughout your photography process.
- Plan your flat lay carefully by using symmetry, composition rules, and client references to guide your setup
- Use proper lighting with soft, even light or professional studio setups to reveal product details and reduce editing time
- Choose the right equipment, such as a sturdy flat lay table, quality camera, and stable tripod for better results
- Prepare your products so they are clean and wrinkle-free to save time in post-production and look more appealing
- Shoot multiple angles, including front, back, and detail shots, to provide versatility on ecommerce platforms
- Mind technical standards by keeping images sharp, well-exposed, and backgrounds pure white for consistency
- Control shadows and reflections to avoid unwanted glare, and use shadows creatively to add depth
- Post-production matters because retouching steps like color correction, dust removal, edge cleanup, shadow adjustment, and composition refinement turn good shots into great ones
- Invest wisely in professional photography to save time, enhance brand image, and boost sales
- Consistency builds trust as accurate colors and clean visuals help customers make confident purchase decisions
Flat Lay FAQs: Everything You Wanted to Ask
What is flat lay photography used for?
Flat lay is widely used in e-commerce and social media to showcase clothing, jewelry, cosmetics, and accessories from a bird’s-eye view. It’s an effective way to highlight details and create clean, conversion-ready visuals.
Is flat lay photography good for clothing?
Yes, especially for small to medium-sized garments like shirts, sweaters, and accessories. For larger items like coats or gowns, brands often combine flat lays with ghost mannequin or on-model shots for better shape and fit.
How do I make flat lay photos look professional?
Prepare clean, wrinkle-free products, arrange them with symmetry, and use consistent lighting. Product photography studios like Squareshot also refine every image in post-production — correcting colors, adjusting shadows, and polishing composition for sales-driven results.
Should I shoot flat lays with natural light or studio light?
Natural light can look soft and organic, but it limits consistency. Studio lighting ensures accuracy, repeatability, and professional polish — which is why Squareshot uses controlled setups for brand catalogs.
How much does flat lay photography cost?
Rates vary by volume and styling. At Squareshot, pricing starts at $50 per image, with membership options for brands that need ongoing content. Professional photos are an investment that often pays off in higher sales and fewer returns.
If you need flat lay photography clothing services but don’t feel like experimenting with all the lighting, camera settings, equipment, and styling – delegate it, so none of the aspects are compromised and your designs are well-represented.


Product A
SQUARE SHOT