Getting studio-quality product photos is key if you want your products to stand out online.These photos help customers trust your brand and make buying decisions easier.
When you work with a photo studio like Squareshot, you get professional shots delivered quickly, with clear pricing and no surprises. You can join the shoot remotely or in person, giving you control and creative flexibility. Whether you need simple product photos or model shots, high-quality images help your products look great and convert better.
Fast turnaround times and polished retouching make a big difference. With options like per-image pricing and membership plans, you can choose what fits your needs best.
This guide explains how to achieve high-quality product photos by walking through studio setup, gear, camera settings, lighting, and editing workflows. You’ll learn how to maintain consistent standards and make technical decisions that match your product and platform needs.
Essentials of Studio-Quality Product Photography
To get sharp, clear, and attractive product photos, focus on key factors like setting clear standards, using the right gear, and controlling lighting. Each element adds to the final quality and helps your products look their best online.
Defining Studio-Quality Standards
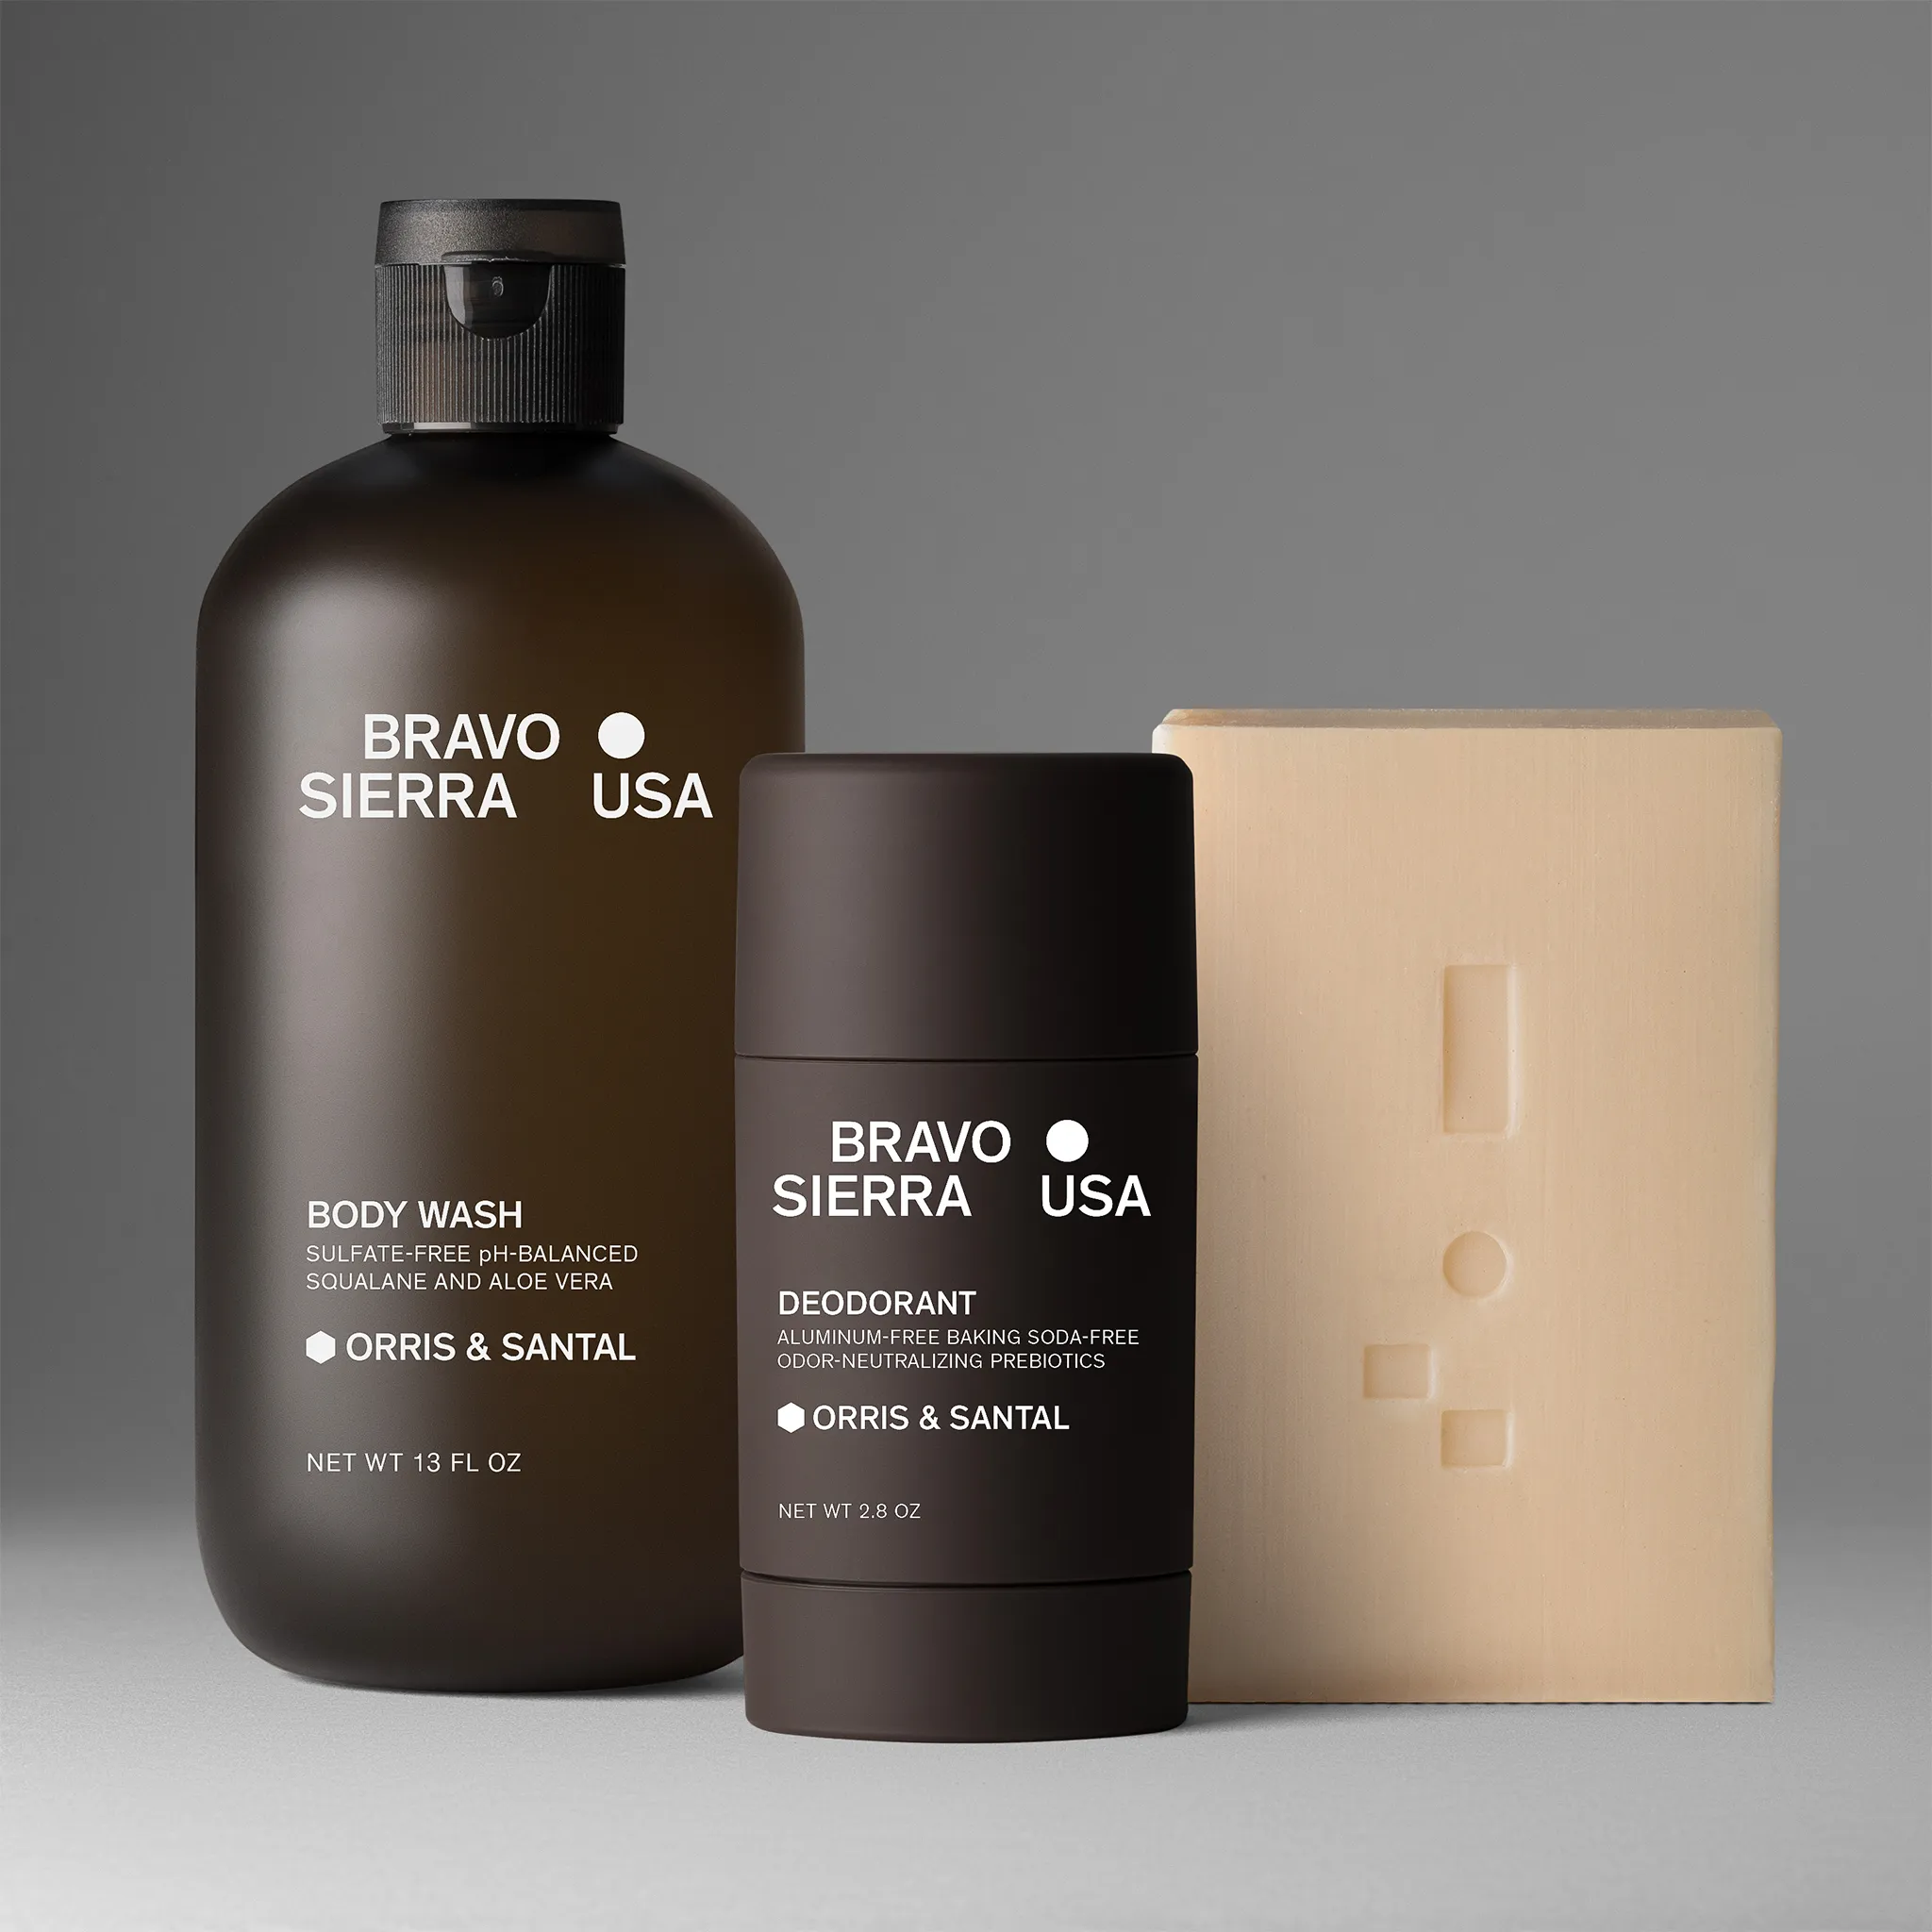
Studio-quality photos look clean, professional, and consistent. You want accurate colors, sharp details, and uncluttered backgrounds. Images should reflect your product as it is in real life, so customers trust what they see.
-min.jpg)
Consistency is crucial if you shoot multiple products or frequently update your catalog. Using the same style, angles, and editing process keeps your brand polished and recognizable. Setting these standards early saves time and avoids confusion with different photographers or studios.
Key Equipment for Flawless Images
Good equipment helps you capture your product clearly. Essential gear includes:
- Camera: A DSLR or mirrorless with a high-resolution sensor.
- Lenses: Macro lenses for small details and prime lenses for crisp shots.
- Tripod: Keeps your camera stable for sharp images.
- Backgrounds: Clean, simple backgrounds like white or light gray.
- Light modifiers: Softboxes and reflectors to control shadows and highlights.
At studios, professionals use this gear along with skilled editing to produce catalog-ready images fast. Using the right tools creates a foundation for great photos every time.
Importance of Consistent Lighting
Lighting controls how your product looks in photos. Soft, even light reduces harsh shadows and shows true colors. Avoid using mixed lighting sources to maintain consistent photos — position.
Use artificial lights with diffusers to create soft, steady light. Position the lights to highlight your product’s shape and texture without glare. Relying on natural light alone is difficult because it changes throughout the day.
Consistent lighting ensures that each photo in your series appears to be part of the same collection. This uniformity enhances professionalism and lends your site a trustworthy appearance.
Studio Lighting vs. Natural Light: What Works Best?
Both studio and natural light can produce high-quality product images, but each has trade-offs. Studio lighting offers control, consistency, and repeatability — ideal for product catalogs and high-volume shoots. You can fine-tune brightness, direction, and color temperature to match your visual standard.
Natural light can deliver soft, flattering illumination with minimal equipment. However, it changes throughout the day and is affected by the weather. It’s harder to control and replicate for large product lines or re-shoots.
For most e-commerce brands, studio lighting is a better long-term solution. It ensures visual consistency, simplifies editing, and speeds up production workflows.
Setting Up Your Studio Environment
Creating a well-planned studio setup helps you produce clear, consistent images. Pick the right space, choose backgrounds that fit your product, and organize your workflow to save time and reduce mistakes.
Choosing the Right Space
Select a room with sufficient space to move freely around your products and lighting equipment. Ideally, it should have good natural light, but avoid direct sunlight because it can cause harsh shadows.
Look for a spot with plain walls to reduce distractions and easy access to power outlets for lights and cameras. High ceilings are a plus — they give you more options for lighting setups.
Ensure your space is quiet to minimize interruptions during shoots. If your studio is small, use a tripod and carefully place your products to maximize your space.
Background and Surface Selection
Your background should highlight your product without detracting from it. Solid colors like white, gray, or black work well for most items. Use smooth surfaces for a clean look, such as seamless paper rolls or matte boards.
For lifestyle or model product photography, select backgrounds and surfaces that complement your brand style without cluttering the image.
-min.jpg)
Keep a variety of backgrounds and surfaces ready to quickly switch looks during shoots.
Types of Product Photography Backgrounds
Your background should enhance, not distract from, the product. The right choice depends on your brand’s aesthetic, the product’s form, and the intended platform.
- Seamless Paper: Ideal for clean, catalog-style shots. Easy to replace and available in many colors.
- Vinyl & PVC: Durable and easy to clean. Works well for flat lays and high-use setups.
- Fabric & Canvas: Adds texture and mood. Great for lifestyle brands or styled sets.
- Acrylic & Glass: Used to create subtle reflections. Works best with jewelry or tech.
- Custom Printed Sets: Useful for branded campaigns or seasonal collections.
Pick a background that maintains focus on the product and supports consistent lighting.
Organizing Workflow for Efficiency
Plan your shoot in stages: setup, shooting, and cleanup. Keep all equipment like lights, stands, and cameras in easy reach and labeled if needed. Use checklists to track what shots you require and reminders for camera settings like ISO and white balance. Connect your camera to a computer (tethering) to preview shots immediately and make quick corrections. This saves time on retakes and editing. Keep your products organized by category or shoot order to avoid mix-ups. This clear system speeds up the process and keeps your photoshoot on track.
Mastering Shooting Techniques
To get studio-quality product photos, focus on sharp camera settings, clean lighting, and accurate colors. These basics help you create clear, professional images.
Camera Settings for Precision
Start with your camera’s ISO. Keep it low (100–200) to reduce grain and make images sharp. Use a small aperture (around f/8 to f/11) to keep the whole product in focus. Set your shutter speed fast enough to avoid blur but slow enough to let in enough light — usually between 1/125 and 1/250 seconds. Use a tripod to keep the camera steady. Shoot in RAW format. RAW keeps all the image data, so you can edit colors and details later without losing quality.
Lighting Placement and Types
Use soft, even lighting to avoid hard shadows and reflections. Place two light sources on either side of the product at 45-degree angles. This balances light and reduces glare. If your product has shiny surfaces, add a diffuser or bounce light off white surfaces to soften reflections. Natural daylight or daylight-balanced LED lights work best to show true colors. Avoid overhead lights directly above the product because they can create unwanted shadows or highlights.
Using Shadow and Reflection for Depth
Shadows and reflections help add realism to product images. Soft shadows can ground a product and suggest shape without overpowering the frame. Use a fill light or reflector to control shadow density.
Reflections, especially on glossy surfaces, create a premium look. Try placing your product on acrylic or glass, then adjust lighting angles to catch a subtle mirrored effect. Avoid heavy reflections that distract from the product itself.
Balance is key — use depth cues to enhance, not dominate, the photo.
Capturing Color Accuracy
Accurate color ensures your product looks real in photos, which helps buyers trust your brand. Use a color checker or white balance card during the shoot to set the right color temperature.
Manually adjust white balance on your camera to match the lighting, typically between 5000K to 6500K for daylight. Check your images on a calibrated monitor to confirm colors match the real product.
If you use photo retouching, start with well-balanced colors, so edits don’t distort the look. Trusted service’s professional retouching helps maintain color accuracy while polishing your images.
Hiring a Studio vs. DIY: What to Consider
Deciding between DIY and hiring a product photography studio depends on scale, complexity, and your in-house capabilities.
DIY works if you have basic equipment, consistent lighting, and editing skills. It's ideal for small catalogs or test shots. However, the learning curve and setup time can be significant.
Professional studios offer fast turnaround, per-image pricing, and post-production included. You gain consistent results and access to experienced teams without having to manage the shoot yourself.
For brands scaling their product line or aiming for catalog-ready visuals, a studio reduces errors and ensures a higher standard across the board.
Polishing with Professional Post-Processing
After capturing your product photos, refine them to highlight their best features. Enhance details, fix imperfections naturally, and prepare your images for any platform, whether online or print.
Editing for Clarity and Detail
In this stage, improve sharpness, brightness, and contrast to make your product stand out. Adjust lighting to reveal textures and colors more accurately. Avoid over-editing, as it can create an unrealistic appearance.
Use professional tools to sharpen edges without adding noise and balance white levels to avoid color shifts. Make your product match its appearance in real life. Clean backgrounds and proper cropping keep the focus where it belongs.
Retouching Products Naturally
Retouching fixes small flaws like dust, scratches, or reflections without changing the product's true look. The goal is subtle enhancement, not altering the shape, color, or details of the original. Natural retouching builds trust with shoppers because the photos reflect the actual item.
Professionals remove distractions while respecting the product’s texture. For example, jewelry might need sparkle enhanced, but not overdone. Complex edits like reshaping or repairs usually cost more and should be discussed upfront.
Exporting Files for Web and Print
Once images are polished, save them in the right format. For web use, optimize file size with formats like JPEG or PNG to ensure fast loading without losing quality. Use RGB color profiles to keep colors consistent on screens.
For print, export in higher resolution, like TIFF or PDF, with CMYK color profiles. Ensure your files meet the printing service’s specifications to avoid blurry or dull prints. Naming files clearly and keeping backups help manage your catalog smoothly.
Squareshot offers full post-production services to deliver catalog-ready images with fast turnaround and fixed pricing tailored for your needs. You can track your images at every step to stay in control and save time.
Technical Priorities for Studio-Quality Photography
Achieving studio-quality product images means managing every detail—from lighting consistency to color accuracy and editing control. Begin with a well-defined visual standard that aligns with your brand and meets customer expectations. This ensures every image feels part of the same system, even across product categories.
Use the right tools: macro or prime lenses for detail, soft light modifiers for even exposure, and calibrated monitors for post-production. Maintain neutral backgrounds and shoot in RAW to preserve flexibility during edits.
Position lighting to shape the product without harsh shadows or glare. Preview images through tethering to catch issues early. Accuracy is more valuable than enhancement — well-lit, true-to-life photos reduce returns and improve buyer confidence.
Post-processing should enhance realism, not distort it. Clean retouching, color correction, and platform-optimized exports ensure images are suitable for e-commerce, print, and advertising without requiring additional work later.
Want professional product shots without managing the shoot yourself? Book a call with our team to see how Squareshot can handle it for you.
Frequently Asked Questions
Getting studio-quality product photos means paying close attention to lighting, angles, and consistency. Knowing the cost range and creative options can help you plan better. Selecting the right tools and professionals can significantly enhance your results.
How can I achieve high-quality product photos at home?
Use natural light near a large window, or opt for soft, diffused artificial lighting. A plain background and stable camera setup help keep images sharp. Try shooting from several angles and keep your product clean and dust-free.
What should I expect to pay for professional product photography services?
Prices vary depending on experience and service type. For example, per-image pricing often starts around $50 for clothing photos. Hourly rates for studio shoots range from $750 for a quarter day to around $3,000 for a full day. Packages may also include retouching and flexible shoot options.
What are some creative ideas for product photography?
Try 360-degree shots or use different angles like front, back, or ¾ views. Incorporate props related to your product, or add a model for lifestyle shots. Consistent lighting and backgrounds keep your images clean and on-brand.
Which studio lights are recommended for the best product photography results?
Softbox lights and LED panels work well for even, shadow-free lighting. Ring lights help with close-up shots and details. Adjustable color temperature allows you to match natural light and effectively highlight your product’s features.
Are there any local photographers who specialize in product photography?
Look for studios in your area that specialize in product photography. For example, we have locations in Brooklyn and Los Angeles offering fast turnaround with transparent, per-image pricing. Such studios often provide remote access to shoots if you can’t visit in person.
Can AI be used to enhance the quality of product photographs?
Yes, AI tools can improve lighting, remove backgrounds, and retouch images quickly. Some professional studios use AI in conjunction with expert editing to deliver catalog-ready photos more efficiently.


Product A
SQUARE SHOT