Did you know that in 2025, brands with standout footwear photography are seeing product pages convert up to 30% higher than their competitors? In a world where first impressions happen in milliseconds, the right shoe image can make or break a sale.
But mastering footwear photography isn’t easy. Photographing shoes presents challenges — think tricky materials, awkward shapes, and the need for flawless detail. That’s why this guide is packed with expert tips to help you capture high-quality images that truly pop.
No matter if you're styling, shooting, editing, or just staying ahead of trends, this is your go-to resource for every part of the process. Want your shoe shots to look like they belong in a top-tier product listing? Follow along and discover how pro-level techniques can transform your results.
Ready to up your footwear photography game? Let’s dive in and grow together.
Preparing Footwear for Photography
Getting ready for a shoe photography session begins long before the camera is even brought out. The smallest scuff or stray thread can undermine even the most professional setup. That’s why every step of shoe preparation is critical—think of it as laying the foundation for images that drive sales and boost brand credibility.
Cleaning and Detailing Shoes
Spotless shoes are the secret weapon of successful footwear photography. High-resolution cameras catch every speck, so start with a thorough clean. For leather, a gentle wipe with a damp cloth, followed by a quality polish, brings out shine without residue. Suede requires a soft-bristled brush — always move in one direction to align the fibers and avoid patches. Mesh or synthetics benefit from a lint roller and a mild soap solution.
Remove all manufacturers’ stickers, tags, and stubborn glue residue with tweezers or adhesive remover. Don’t overlook the soles, which should be as immaculate as the uppers. Always select the most flawless pair from your inventory; even minor flaws can distract shoppers and negatively impact conversions.
Professional footwear product photography services emphasize that meticulous prep is non-negotiable for flawless results. Investing time here ensures your shoes look their absolute best in every shot.
Stuffing, Shaping, and Lacing
Nothing ruins shoe photography faster than a collapsed upper or sagging silhouette. Use tissue paper, shoe trees, or foam inserts to help shoes keep their intended shape. This prevents creasing and helps the footwear stand upright, which is especially important for boots or high-tops.
Lacing is another detail that separates amateur from professional results. Arrange the laces evenly, and consider creative techniques, such as “flying” shoelaces using clear fishing lines for a dynamic look. Always double-check the symmetry between pairs and ensure soles align perfectly.
Address common flaws before shooting: smooth out bent edges, tuck in loose threads, and give the shoes a final once-over. These small adjustments make a world of difference in the finished images.
Surface Preparation and Props
Just before the shoot, use a lint roller and compressed air for last-minute touch-ups. Dust and debris can appear magnified in high-resolution footwear photography, so don’t skip this step.
Props can transform simple images into lifestyle statements. For e-commerce, stick to neutral backgrounds and minimal accessories, such as clean surfaces. For more creative shots, experiment with transparent stands, dynamic backgrounds, or even “floating” shoes using thin lines. Positioning shoes on angled surfaces or suspending them slightly can add energy and movement to your imagery.
Thoughtful prop selection and surface prep ensure your shoes always steal the spotlight, no matter the style or setting.


Setting Up Your Footwear Photography Studio
Creating a professional shoe photography studio doesn’t require a massive investment, but it does demand attention to detail and the right gear. Whether you’re just starting out or looking to refine your current setup, a well-organized studio is the backbone of every standout shoe image.
Essential Equipment and Space Considerations
The foundation of exceptional footwear photography starts with your equipment and workspace. Invest in a full-frame DSLR or mirrorless camera for the best image quality, but don’t overlook modern smartphones—they’re surprisingly capable for beginners. Pair your camera with a 50mm prime lens to minimize distortion, or use a macro lens for detailed close-ups.
A sturdy tripod is essential for capturing sharp, repeatable shots. It locks your framing in place, letting you adjust other elements without losing consistency. Dedicate a space for your studio, ideally with enough room for backdrop stands, a large table, and a light tent for controlled environments.
Keep your studio clutter-free to streamline your footwear photography workflow. For more in-depth breakdowns, check out these tips for preparing your products for the shoot.
Lighting for Shoes: Techniques and Tools
Lighting is the secret ingredient in footwear photography. Softboxes, umbrellas, and diffusers are your best friends for creating even, flattering light. Position your main light at a 45-degree angle to the shoes — this adds depth and brings out textures without harsh shadows.
Balance your setup with fill lights or reflectors to soften shadows behind the shoes. Aim for a color temperature around 5500K and a CRI (color rendering index) above 95 to ensure true color reproduction. Avoid placing lights directly in front of the shoes (“en face”), as this can flatten the image.
Natural lighting works well for lifestyle shots, but studio lighting offers more control and consistency. Experiment with both to see what suits your footwear photography style and brand.
Backgrounds and Surfaces
Backgrounds set the stage for your shoe photography. For e-commerce shots, use seamless white paper, plexiglass, or a light tent to create a clean, distraction-free look. This not only meets marketplace requirements but also makes background removal in post-production a breeze.
For more creative projects, try textured or colored backdrops — think concrete, wood, or vibrant hues — to enhance your brand’s story. Environmental backgrounds, like outdoor or sports settings, add authenticity to lookbooks and social media. Always keep props minimal unless the shot calls for lifestyle context.
Quick tip: Secure your backgrounds firmly to avoid wrinkles or sagging, which can distract from your shoes.
Camera Settings and Angles
Dialing in the right camera settings elevates your footwear photography from amateur to professional. Stick with a 50mm focal length to minimize distortion, especially for e-commerce product shots. Set your aperture between f/11 and f/16 for deep focus, keeping every detail sharp. Use ISO 100 for maximum clarity, and adjust the shutter speed as needed — a tripod enables longer exposures without blur.
Shoot from consistent angles: side, 45-degree, top-down, back, and close-up for details. Mark your positions and settings for batch shoots to maintain brand consistency. This repeatable process is a hallmark of professional footwear photography and helps streamline your workflow.
Shooting Techniques for Stunning Footwear Shots
Capturing footwear photography that truly stands out means understanding both the technical and creative sides of the process. Whether you’re aiming for e-commerce perfection or a visually rich lookbook, mastering the right techniques will set your shoe images apart in today’s crowded market.
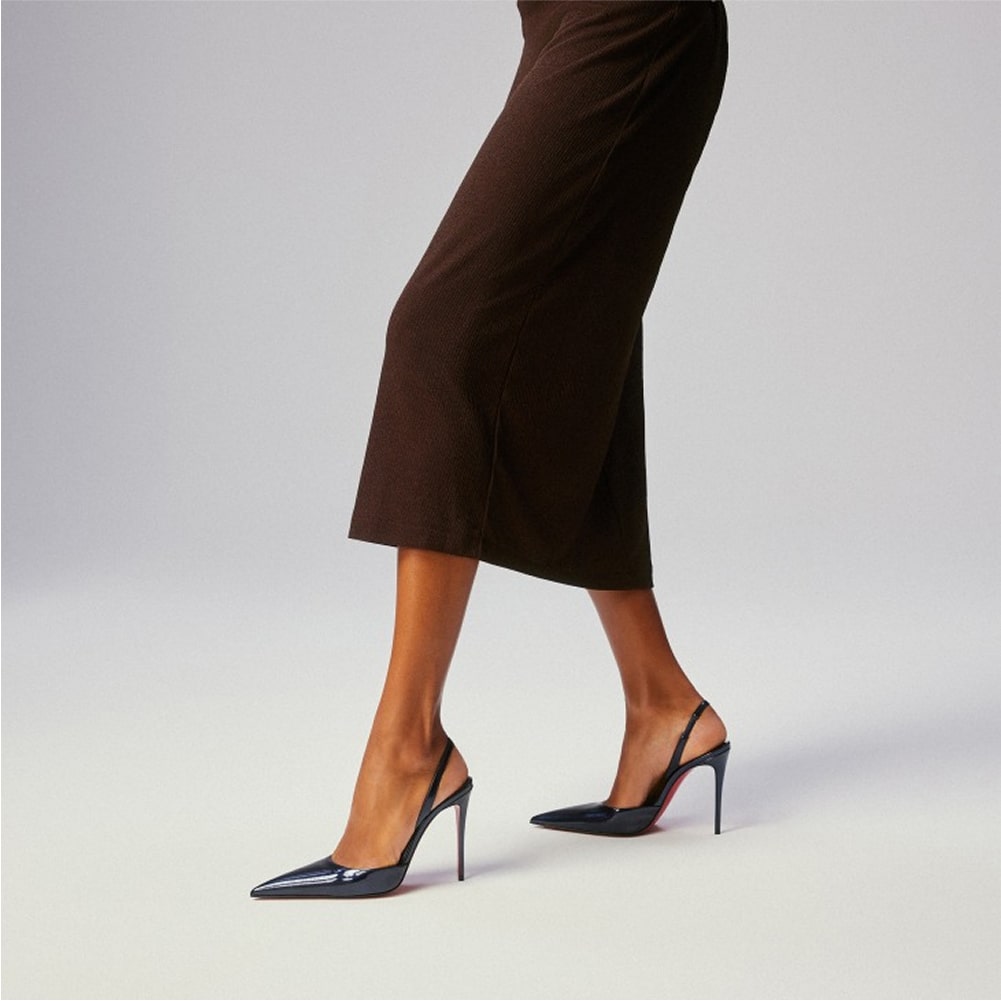
Product photo vs. Lookbook Photography
When it comes to footwear photography, understanding the difference between product shots and lookbook styles is essential. Packshots are designed for e-commerce platforms and require clean, distraction-free images on a white background. This approach ensures shoppers see every detail — think of the uniform product photos on e-commerce platforms.
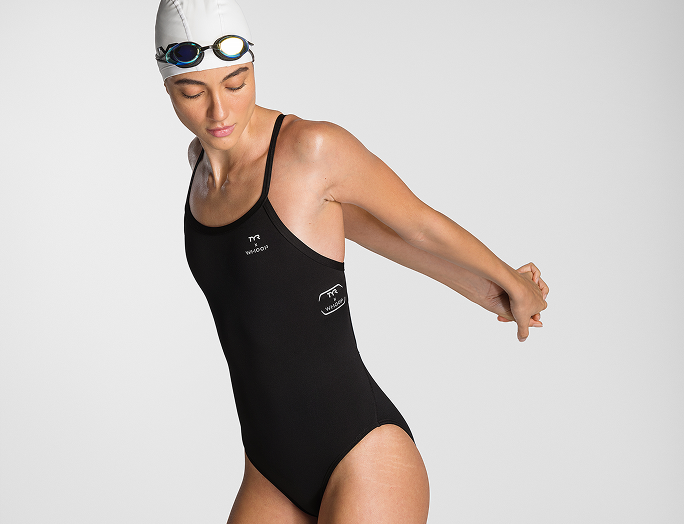
Lookbook photography, on the other hand, is all about storytelling and branding. These high-quality images often feature shoes in lifestyle settings, on models, or in action, making them ideal for social media and marketing campaigns. Lookbooks favor creativity, varied backgrounds, and dynamic compositions.
Step-by-Step Shooting Process
A successful footwear photography session follows a clear, repeatable process. Start by preparing your shoes and studio, ensuring everything is spotless and well-lit. Position the shoes carefully. Symmetry is key. Use a tripod to lock in your camera angle and maintain consistency across shots.
Follow this typical workflow:
- Set up your background and lighting.
- Place and shape the shoes, stuffing as needed for structure.
- Arrange laces creatively, perhaps even making them “fly” with a fishing line.
- Adjust your camera settings. Stick to a 50mm lens, with an aperture of f/11–f/16 and ISO 100, for crisp results.
- Capture test shots, refining lighting and positions as needed.
- Photograph all required angles: side, 45-degree, top, back, and sole.
- Take close-ups of unique features, such as stitching, logos, or textures.
- Use props for dynamic effects, like levitating laces or “walking” shoes.
- Mark positions and save settings for repeatability.
Every step in the footwear photography process should be deliberate, ensuring you achieve consistent, professional results across your product line.
Creative Styling and Composition
Great footwear photography goes beyond technical skill — it’s about telling a story. Use negative space to draw the eye to your product. Experiment with leading lines and symmetry to create visually pleasing compositions.
Incorporate models, mannequins, or even “ghost” effects to give shoes a sense of movement or real-world context. Lifestyle shots, such as sneakers on rocky surfaces or boots splashing in puddles, create instant impact and help customers envision themselves in the product.
Consider these creative tips:
- Use environmental props for context, but keep them minimal.
- Play with motion — capture shoes mid-air or in action.
- Vary your background colors and textures.
With the right approach, footwear photography becomes an art form that elevates your brand’s image while captivating your audience.
Common Mistakes and How to Avoid Them
Even seasoned photographers can fall into common photography traps. Overexposure or underexposure can wash out colors or hide details, while harsh shadows may distract from the product. Crooked angles or inconsistent framing break the professional look.
Avoid using wide-angle lenses, as they often distort shoe proportions. Steer clear of cluttered or overly busy backgrounds, which pull attention away from the footwear. Always double-check that the laces are neat and that the shoes are perfectly aligned.
Solutions?
- Use a pre-shoot checklist to catch issues early.
- Take test shots and review them on a large screen.
- Stick to a consistent studio setup for every shoot.
- Save camera and lighting settings for future sessions.
By recognizing and addressing these pitfalls, your footwear photography will consistently hit a high professional standard.
Advanced Post-Production and Editing Tips
Every pro knows the magic doesn’t end with the camera — post-production is where footwear photography truly shines. Editing refines your images, amplifies details, and ensures every pair looks as crisp online as it does in person. Let’s break down the essential post-production steps to help your shoes stand out.
Background Removal and Retouching
The first step in post-production for footwear photography is achieving a flawless, distraction-free background. Clean backgrounds are crucial for both e-commerce and brand consistency. You can use manual clipping paths in Photoshop, automated AI-based tools, or batch processing for higher volumes.
- Manual: Offers precise control, best for complex edges.
- Automated: Fast and efficient, but watch for missed spots or artifacts.
- Batch: Ideal for large inventories (just double-check for consistency).
Poor background removal can leave unsightly halos or jagged edges, instantly lowering the perceived quality of your footwear photography. After isolating the shoes, shift the focus to photo editing. Remove dust, scratches, or stray fibers with healing brushes and clone tools. Polish up colors, but keep textures authentic — shoes should look real, not plastic. For deeper insights, check out this advanced product photo retouching guide, which covers techniques that elevate your results.
Color Correction and Consistency
Color accuracy is non-negotiable in footwear photography. Start by adjusting the white balance to ensure shoes appear true-to-life, especially for materials like leather or suede that are sensitive to lighting shifts.
Use color calibration tools, such as a grey card or calibration device, during your shoot and in editing. This helps keep every image in your collection consistent, so customers know exactly what to expect, regardless of which product page they land on. Consistent color correction across your footwear photography builds trust and helps your brand maintain a polished, professional look.
Enhancing Details and Textures
Great footwear photography captures not just the shape but the soul of the shoe — the stitching, mesh, or subtle branding that sets it apart. Sharpening tools let you highlight these textures, drawing the viewer’s eye to unique features.
Apply sharpening selectively to mesh, laces, and logos, but be careful not to overdo it. Over-editing can make shoes look unnatural or introduce noise. The goal is to enhance, not overwhelm. Always zoom in to check your work at 100% before exporting your final footwear photography images.
Output and File Management
Once your footwear photography edits are complete, it’s time to export. Choose the right file type for each platform:
- E-commerce. JPEG/PNG – white background, web-optimized
- Social Media. JPEG/PNG – high-resolution, vibrant
- Print Catalogs. TIFF/JPEG – maximum quality
Optimize file size to ensure fast loading without losing clarity. Use consistent naming conventions and fill out metadata—think product name, color, size, and brand—for better SEO and catalog management. A streamlined file workflow ensures your footwear photography is always ready for every channel.
Trends and Innovations in Footwear Photography for 2025
The world of footwear photography is quickly evolving, pushing brands and creators to rethink how they capture and present shoes. In 2025, staying ahead means knowing the latest trends, embracing smart technology, and understanding what today’s customers value most. Let’s dive into the fresh styles, tools, and insights shaping footwear photography this year.
Emerging Styles and Visual Trends
Footwear photography in 2025 is all about storytelling. Brands are moving beyond static packshots, embracing dynamic lifestyle imagery that places shoes in real-world settings — think sneakers splashing through puddles or boots on rugged terrain.
Minimalist backgrounds remain popular for e-commerce, but maximalist, vibrant scenes are trending in lookbooks and campaigns. Textured surfaces, bold colors, and environmental backdrops help shoes stand out and tell a story. User-generated content is also rising, as customers share their own creative takes on footwear photography, giving brands fresh content and building trust.
Technology and Automation
The technical side of footwear photography is undergoing a revolution. Automated studios are now standard for many brands, allowing them to save lighting and camera setups for each product line. This ensures consistency and speeds up large-scale shoots.
New tools like 360-degree spinners and interactive image viewers are enhancing the customer experience on e-commerce sites. These features let shoppers explore every angle, boosting confidence in their purchase. AI-powered editing and background removal are making post-production faster and more precise, freeing up time for creative work. For actionable advice on using these innovations, check out these Professional Tips for Footwear Product Photography.
Sustainability and Authenticity
Sustainability is now central to footwear photography. Brands are using eco-friendly props, recycled materials, and natural backgrounds to reflect their values. This shift isn’t just about aesthetics — it’s about connecting with environmentally conscious consumers.
Authenticity is equally important. Audiences, especially Gen Z and Millennials, crave realness. Unretouched images, visible textures, and "imperfect" moments are gaining ground over overly polished shots. Footwear photography in 2025 celebrates the shoe's true character, making every shot feel genuine and relatable.
Data-Driven Insights
The impact of high-quality footwear photography is undeniable. Industry data shows that professional, detailed images can increase e-commerce conversion rates by up to 30%. Customers prefer seeing shoes from multiple angles and in real-life scenarios, which builds trust and reduces returns.
For more on how stunning visuals influence online shopping, see the Impact of High-Quality Product Images on E-commerce Sales. As footwear photography evolves, data-driven strategies will be essential for brands aiming to stand out in a crowded digital marketplace.
Expert Tips for Elevating Your Footwear Photography Workflow
A streamlined workflow is the secret sauce behind consistently stunning footwear photography. Whether you’re shooting a single pair or managing a massive catalog, refining your process can save hours, reduce stress, and dramatically boost image quality. Let’s unpack practical tips and professional strategies to level up every stage of your photography journey.
Workflow Optimization and Efficiency
Efficiency is everything in footwear photography, especially when you’re facing a high-volume shoot. Start by creating detailed shot lists and checklists—this ensures every angle, detail, and creative variation gets captured without missing a beat.
Batch shooting is a game-changer. By grouping similar shoes or styles, you can keep lighting and camera setups consistent, making post-production faster and more uniform. Editing in batches also speeds up delivery and reduces the chance of inconsistencies.
Don’t overlook digital asset management tools. These help keep your image files organized, searchable, and ready for quick retrieval. Tag images with metadata, assign keywords and use folders or collections to streamline your workflow. With the right system, scaling your footwear photography business becomes much more manageable.
Collaboration and Professional Resources
Even the most skilled solo photographers sometimes need extra hands or specialized expertise. Knowing when to hire a professional studio can save you time, especially for complex shoots requiring advanced lighting or creative styling. Hiring stylists, models, or production assistants also enhances the final result, adding a polished, editorial feel to your images.
For shoots requiring human presence, consider model photography for shoes. Using professional models can make lifestyle shots more relatable and dynamic, helping your footwear photography connect with your target audience.
Establishing a feedback loop is vital. Regularly review analytics and gather user feedback to identify what works and where you can improve. This iterative process ensures that your workflow — and your images — continue to improve over time.
Staying Inspired and Up-to-Date
The world of footwear photography is always evolving. To stay ahead, follow top footwear photographers and innovative brands. Study their portfolios, note emerging trends, and adapt fresh ideas to your own shoots.
Engage with photography communities and attend workshops, both online and in person. These spaces are goldmines for tips, critique, and inspiration. Regularly update your portfolio to showcase new techniques, styles, and trends, keeping your work relevant and impressive.
Now that you’ve got a solid grasp on what goes into standout footwear photography — from prepping your shoes to nailing those creative, on-trend shots — why not take things to the next level? If you’re ready to showcase your products with the same level of polish as the pros, let’s make your vision a reality. Whether you have just a few pairs or a whole new collection, you don’t have to figure it all out alone. We’re here to help you every step of the way.
Product A
SQUARE SHOT