In e-commerce, the battle between ghost mannequin product photography and flat lay images comes down to three things: budget, product type, and market positioning.
If you sell premium custom-made suits, ghost mannequin shots are non-negotiable. Selling scarves or $10 T-shirts? Flat lay can absolutely do the job.
Large-scale store owners often have the data to know which format converts best for each item — dresses, sweaters, jackets, bottoms, etc. Many seasoned ecommerce brands use a mix of both, tailoring content for their website, marketplaces, ads, and social media.
In this guide, we’ll break down the differences, pros, cons, and best uses for ghost mannequin and flat lay photography — plus pro tips for getting flawless results from either style.
What Is Ghost Mannequin Photography?
Also known as the invisible man effect, ghost mannequin photography involves shooting garments on a mannequin and then editing out the mannequin in post-production. The result is a lifelike, 3D look that shows the shape, drape, and fit of the clothing.
Why It Works
- Bridges the gap between online and in-store by showing how the garment would look on a real person.
- Reduces hesitation by making it easier for buyers to imagine themselves wearing the item.
Pros
- Simple setup with minimal props like clips, pins, and double-sided tape.
- Produces dynamic, “alive” images compared to static flat lays.
- Can be styled with matching pieces or accessories for a full look.
Cons
- Post-production is more labor- and cost-intensive.
- High-quality mannequins (especially magnetic, removable-part models) are expensive.
- Lighting setup requires skill — best handled by a professional studio for maximum ROI.


When to Use Ghost Mannequin Photography
This technique shines for premium apparel and pieces rich in detail or structure:
- Tops: T-shirts, shirts, cardigans, jackets, coats
- Bottoms: Jeans, trousers, shorts, underwear, socks
- Other: Dresses, caps, outerwear
Pro tip: Without a magnetic mannequin, photographers often shoot garments twice — once from the front, once showing the garment’s inside back — and combine them in post for a seamless invisible effect.
What Is Flat Lay Photography?
Flat lay photography — also called tabletop photography — means arranging products on a flat surface and shooting from above. It’s widely used in fashion, jewelry, beauty, and accessories.
Why It Works
- One of the easiest, most accessible ways to create consistent, true-to-life ecommerce images.
- Requires minimal post-processing compared to ghost mannequin shots.
Pros
- Beginner-friendly in both setup and lighting.
- Highly versatile: works for single items, groupings, and creative compositions.
- Can be done with natural light and inexpensive reflector boards — though professional results are best from a studio.
Cons
- Requires careful consistency (markings for placement, fixed camera position).
- Limited shooting window with natural light.
- Not ideal for large garments like coats or long dresses, which can look flat and lifeless.
When to Use Flat Lay Photography
Flat lay works across both commerce and social media, and suits a broad range of products:
- Tops: T-shirts, shirts, sweaters, jackets, dresses
- Bottoms: Jeans, skirts, trousers, shorts, socks, underwear
- Other: Jewelry, handbags, beauty products, small accessories
Flat lays can be elevated with creative styling — colored backgrounds, textured surfaces, playful props, or even a human hand in the shot for a lifestyle feel.
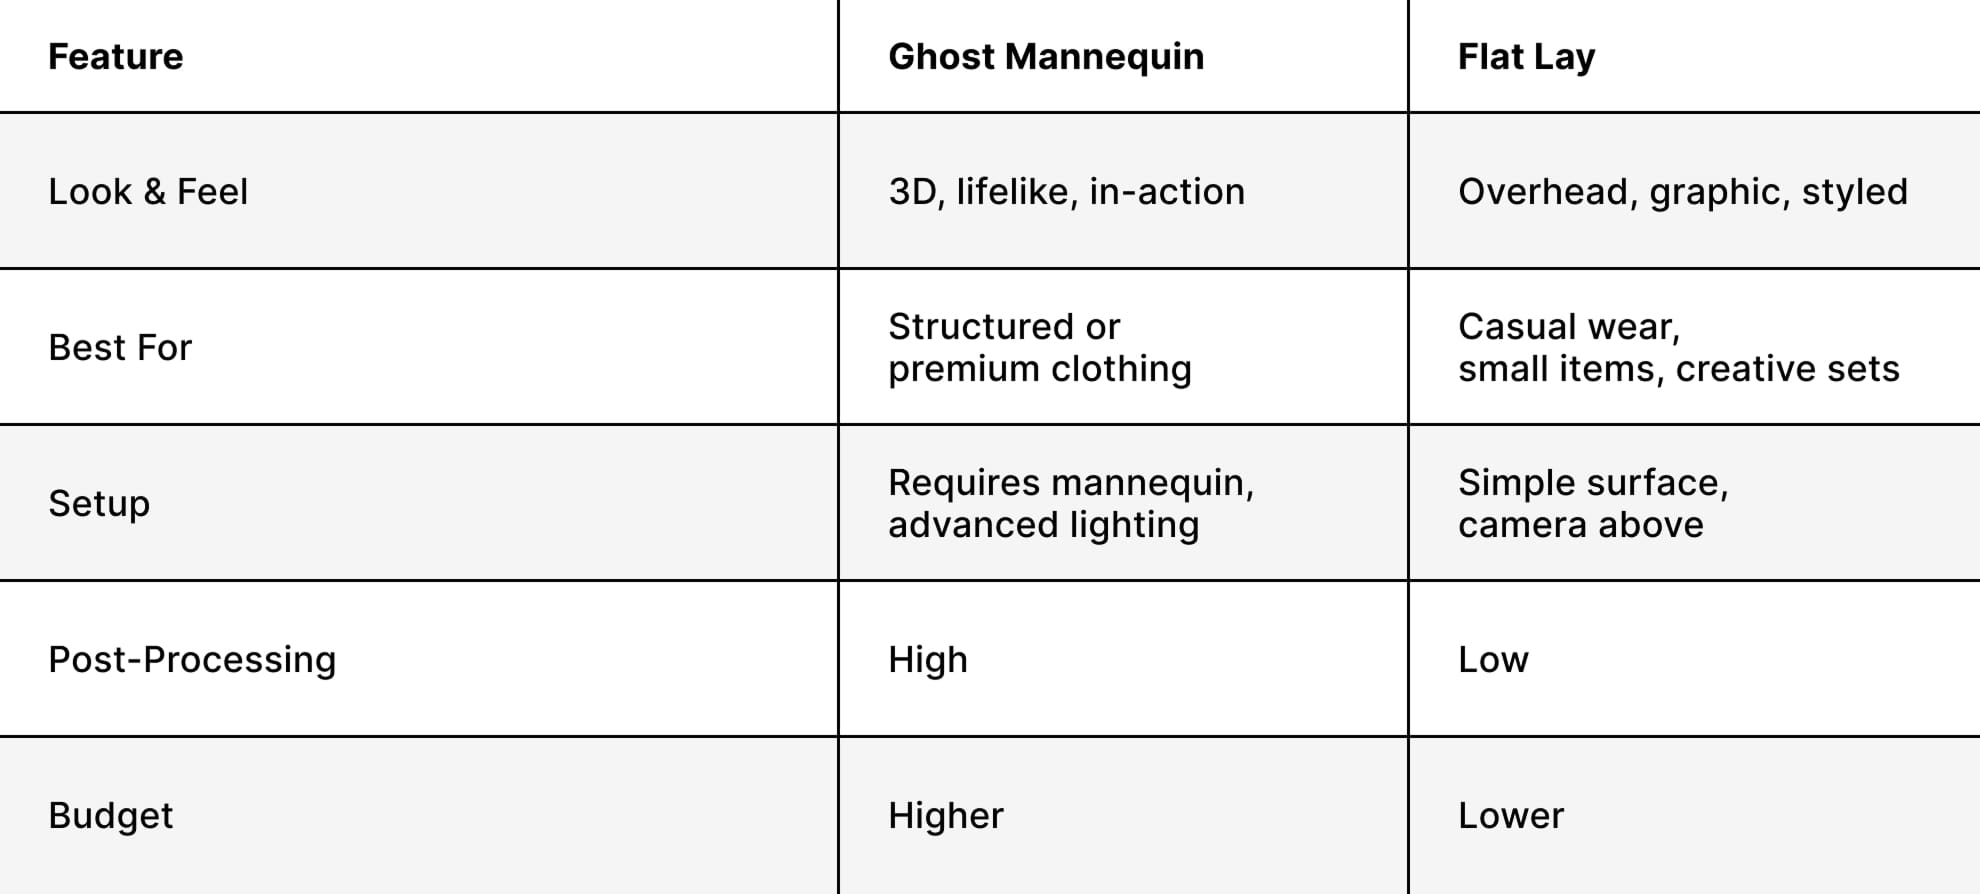
Ghost Mannequin vs Flat Lay: Quick Comparison
Squareshot’s Pro Tips for Flawless Product Photography
- Invest in Professional Photography Early
We’re biased (as a product photography service with studio in New York), but for good reason: great images convert, bad images kill sales. Marketing budgets are wasted on poor visuals.
- Use Tissue to Add Volume
Stuffing garments with tissue (or stiffer materials for jeans) adds shape, realism, and texture. Even hoodies look better with a tissue-filled hood for the back shot.
- Always Have Fixing Tools on Hand
Clips, pins, and double-sided tape can refine fit, smooth wrinkles, and hold garments or linings in place for a polished result.
- Shape Tops in Flat Lay
Tuck in sides slightly to give T-shirts and sweaters a more natural silhouette and sense of motion.
- Balance Symmetry and Creative Asymmetry
For product pages, symmetry builds trust (aligned sleeves, even strings). For social media, asymmetry can add personality — like a hoodie string tied unevenly for a “rebel” vibe.
- Maintain Consistency
Same lighting, same camera height, same background — every shot in a series should feel like it belongs together.
- Use Both Techniques When Possible
For premium pieces, pair ghost mannequin shots for fit and shape with flat lay close-ups for details or styled social media content.
FAQs: Ghost Mannequin vs Flat Lay Photography
Which is more cost-efficient — ghost mannequin or flat lay photography?
Flat lay is generally more budget-friendly. Ghost mannequin requires specialized mannequins, more advanced lighting, and additional post-production work.
Can I do ghost mannequin photography myself?
It’s possible, but results are often inconsistent without professional equipment and retouching skills. For e-commerce, where image quality directly impacts sales, hiring a pro is recommended.
Is flat lay photography good for all clothing?
Not quite. It works well for small to medium-sized items like shirts, accessories, and folded sweaters, but bulky or long garments (like coats or gowns) tend to look flat and lifeless.
Can I mix ghost mannequin and flat lay shots on the same product page?
Absolutely. Many brands use ghost mannequin for main product images and flat lay for detail shots, social media, or styled lookbooks.
Which style sells better?
It depends on your target audience and product type. Premium shoppers often expect ghost mannequin shots, while casual or fast-fashion buyers respond well to creative flat lays.
Get Expert Advice from Squareshot Team
Your choice between ghost mannequin and flat lay should be driven by budget, product type, and customer expectations. Both methods have their place, and the most successful ecommerce brands use each strategically.
If you’re ready to produce high-converting images that elevate your brand, explore Squareshot’s portfolio or chat with our team. We’ll help you choose the right approach — and execute it to perfection.

Product A
SQUARE SHOT